注意力机制应用
Created|Updated
|Post Views:
注意力机制应用
1 注意力机制应用
思路: 解码器端的一般注意力机制(加性注意力)
实现步骤:
- q和k按特征维度轴进行拼接torch.concat(), 经过线性层计算nn.linear(), 再经过softmax激活层计算torch.softmax(, dim=-1), 得到权重概率矩阵
- 将上一步的权重概率矩阵和V进行矩阵乘法torch.bmm(), 得到动态张量c
- q和动态张量c进行融合, 按特征维度轴进行拼接torch.concat(), 经过线性层计算nn.linear(), 得到融合的结果->解码器当前时间步的输入X output, hn=nn.gru(X, h0)
代码实现
1
2
3
4
5
6
7
8
9
10
11
12
13
14
15
16
17
18
19
20
21
22
23
24
25
26
27
28
29
30
31
32
33
34
35
36
37
38
39
40
41
42
43
44
45
46
47
48
49
50
51
52
53
54
55
56
57
58
59
60
61
62
63
64
65
66
67
68
69
70
71
72
73
74
75
76
77
import torch
import torch.nn as nn
# 创建神经网络类
class Attn(nn.Module):
# todo:1-初始化init构造函数
def __init__(self, query_size, key_size, value_size1, value_size2, output_size):
super().__init__()
# 1-1: 初始化对象属性
self.query_size = query_size # 解码器隐藏状态值的特征维度 或 输入x的特征维度
self.key_size = key_size # 编码器隐藏状态值的特征维度 解码器第一个隐藏状态=编码器最后一个隐藏状态
# value-> 编码器的output结果 (batch_size, seq_len, hidden_size)
self.value_size1 = value_size1 # seq_len, 句子长度, 时间步数量, token数
self.value_size2 = value_size2 # hidden_size, gru层提取的特征维度
self.output_size = output_size # 解码器输入的特征维度
# 1-2: 定义线性层1 -> q和k在特征维度轴拼接后进行线性计算
# 输入特征数/输入神经元个数: self.query_size + self.key_size q和k在特征维度轴拼接
# 输出特征数/输出神经元个数: self.value_size1
# 权重概率矩阵 * value = (b, n, m) * (b, m, p) = (b, n, p) (b,n,p)代表是动态c的形状
# value->(b, m, p) b=1, m=value_size1 p=value_size2
# 权重概率矩阵的形状是由 attn线性层决定 (b, n, m) -> m=value_size1
self.attn = nn.Linear(self.query_size + self.key_size, self.value_size1)
# 1-3: 定义线性层2 -> q和动态c在特征维度轴拼接后进行线性计算, 得到当前时间步的输入X(X=w(q+c))
# self.query_size + self.value_size2->为什么加value_size2?
# q和动态c在特征维度上拼接,而c形状->(b, m, p) p=value_size2
self.attn_combine = nn.Linear(self.query_size + self.value_size2, self.output_size)
# todo:2- 定义forward方法
def forward(self, Q, K, V):
# print('Q--->', Q.shape, Q)
# print('K--->', K.shape, K)
# print('V--->', V.shape, V)
# 2-1 拼接+线性计算+softmax -> 权重概率矩阵
# print('Q[0]--->', Q[0].shape, Q[0]) # 形状->(句子长度, 词向量维度)
# dim=1:特征维度进行拼接
# print('q和k拼接结果--->', torch.cat(tensors=[Q[0], K[0]], dim=1).shape)
# print('q和k拼接后线性计算结果--->', self.attn(torch.cat(tensors=[Q[0], K[0]], dim=1)).shape)
# dim=-1:按行进行softmax计算
attn_weights = torch.softmax(self.attn(torch.cat(tensors=[Q[0], K[0]], dim=1)), dim=-1)
print('权重概率矩阵--->', attn_weights.shape, attn_weights)
# 2-2 权重概率矩阵和V矩阵相乘 -> 动态张量c
# attn_weights.unsqueeze(0)->将二维转换成三维 (句子数, 句子长度, 词向量维度)
attn_applied = torch.bmm(input=attn_weights.unsqueeze(0), mat2=V)
print('动态张量c--->', attn_applied.shape, attn_applied)
# 2-3 Q和动态张量c融合 -> 得到 解码器当前时间步的输入X, 后续将X输入到gru层 nn.GRU(X, h0)
q_c_cat = torch.cat(tensors=[Q[0], attn_applied[0]], dim=1)
print('q和动态张量c融合结果--->', q_c_cat.shape, q_c_cat)
# gru层的输入X是三维, 所以进行unsqueeze(0)
output = self.attn_combine(q_c_cat).unsqueeze(0)
print('gru当前时间步的输入X(q和c融合结果)--->', output.shape, output)
# outpu后续输入到gru层
# 伪代码: output2, hn = nn.GRU(output, h0)
return output, attn_weights
if __name__ == '__main__':
# 定义特征维度
query_size = 32
key_size = 32
value_size1 = 32
value_size2 = 64
output_size = 32
# 创建测试q,k,v
# 形状 -> (batch_size, seq_len, embedding)
Q = torch.randn(1, 1, query_size)
K = torch.randn(1, 1, key_size)
V = torch.randn(1, value_size1, value_size2)
# 创建实例对象
my_attn = Attn(query_size, key_size, value_size1, value_size2, output_size)
# 调用实例对象, 自动执行forward方法
output, attn_weights = my_attn(Q, K, V)
print('=' * 80)
print('输出结果--->', output.shape, output)
print('权重概率矩阵--->', attn_weights.shape, attn_weights)
2 RNN案例-seq2seq英译法
2.1 seq2seq模型介绍
- 模型结构
- 编码器 encoder
- 解码器 decoder
- 编码器和解码器中可以使用RNN模型或者是transformer模型
- 工作流程
- 编码器生成上下文语义张量 -> 什么是nlp? 将问题转换成语义张量
- 解码器根据编码器的语义张量和上一时间步的预测值以及上一时间步的隐藏状态值进行当前时间步的预测
- 自回归模式
- 局限性
- 信息瓶颈问题
- 长序列问题
2.2 数据集介绍
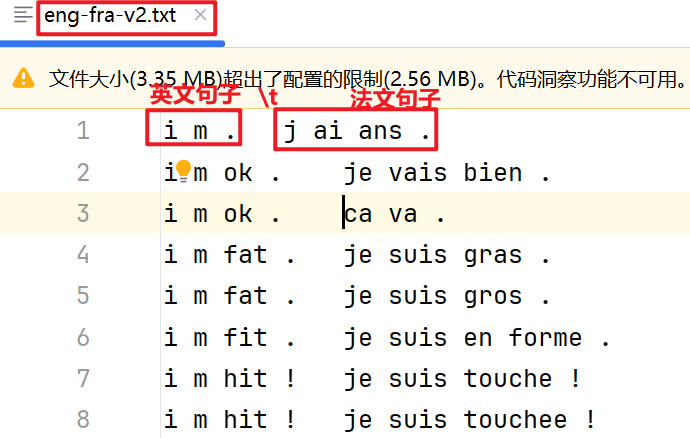
- 每行样本由英文句子和法文句子对组成, 中间用
\t分隔开 - 英文句子是编码器的输入序列, 法文句子是解码器的输出序列(预测序列)对应的真实序列
2.3 案例实现步骤
2.3.1 文本清洗工具函数
utils.py1
2
3
4
5
6
7
8
9
10
11
12
13
14
15
16
17
18
19
20
21
22
23
24
25
26
27
28
29
30
31
32
33
34
35
36
37
38
39
40
41
42
43
44
45# 用于正则表达式
import re
# 用于构建网络结构和函数的torch工具包
import torch
import torch.nn as nn
from torch.utils.data import Dataset, DataLoader
# torch中预定义的优化方法工具包
import torch.optim as optim
import time
# 用于随机生成数据
import random
import numpy as np
import matplotlib.pyplot as plt
# 定义变量
# 选择设备 cpu/gpu
# 'cuda'->使用所有显卡 'cuda:0'->使用第一张显卡
device = torch.device('cuda' if torch.cuda.is_available() else 'cpu')
# 起始符号下标
# sos -> start of sentences
SOS_token = 0
# 结束符号下标
EOS_token = 1
# 文件路径
data_path = 'data/eng-fra-v2.txt'
# 最大句子长度, 预处理分析的结果
MAX_LENGTH = 10
# 定义处理文本的工具函数 处理句子中的特殊符号/大小写/换行符
def normalizeString(s: str):
# 转换成小写, 并删掉两端的空白符号
str = s.lower().strip()
# 正则表达式匹配标签符号'.?!' 转换成 ' .?!'
str = re.sub(r'([.!?])', r' \1', str)
# print('str--->', str)
# 正则表达式匹配除a-z.!?之外的其他的符号 转换成 ' '
str = re.sub(r'[^a-z.!?]+', r' ', str)
# print('str--->', str)
return str
if __name__ == '__main__':
str1 = 'I m sad.@'
normalizeString(str1)
2.3.2 数据预处理
preprocess.py清洗文本和构建词表
1
2
3
4
5
6
7
8
9
10
11
12
13
14
15
16
17
18
19
20
21
22
23
24
25
26
27
28
29
30
31
32
33
34
35
36
37
38
39
40
41
42
43
44
45
46
47
48
49
50
51
52
53
54
55
56
57
58
59
60
61
62
63
64
65
66
67
68from utils import *
def my_getdata():
# todo:1- 读取文件数据集, 得到 [[英文句子1, 法文句子1], [英文句子2, 法文句子2], ...]内存数据集
# 1-1 with open 读取文件数据集
with open(data_path, 'r', encoding='utf-8') as f:
my_lines = f.read().strip().split('\n')
# print('my_lines --->', my_lines)
# 1-2 获取 [[英文句子1, 法文句子1], [英文句子2, 法文句子2], ...] 数据集格式
# 定义两个空列表
tmp_pair, my_pairs = [], []
# 循环遍历my_lines
for line in my_lines:
# print('line--->', line) # i m . j ai ans .
# 对my_lines中每行样本使用\t分割符进行分割后再循环遍历
for item in line.split('\t'):
# print('item--->', item)
# 将每行样本中的英文句子和法文句子使用工具函数进行清洗, 保存到tmp_pair列表中
tmp_pair.append(normalizeString(item))
# 将tmp_pair列表保存到my_pairs列表中
my_pairs.append(tmp_pair)
# 重置tmp_pair列表
tmp_pair = []
# print('my_pairs的长度为--->', len(my_pairs))
# print('my_pairs[:4]--->', my_pairs[:4])
# todo:2-构建英文和法文词表 {词:下标} {下标:词}
# 2-0: 初始化词表, 有SOS和EOS两个词
english_word2index = {'SOS':0, 'EOS':1}
# 定义第3个词起始下标
english_word_n = 2
french_word2index = {'SOS': 0, 'EOS': 1}
french_word_n = 2
# 2-1: 循环遍历my_pairs [['i m .', 'j ai ans .'], ...]
for pair in my_pairs:
# print('pair--->', pair) # ['i m .', 'j ai ans .']
# 2-2: 对英文句子或法文句子根据 ' '空格进行分割, 再进行循环遍历
for word in pair[0].split(' '):
# print('word--->', word) # i m .
# 2-3: 使用if语句, 判断当前词是否在词表中, 如果不在添加进去
if word not in english_word2index.keys():
english_word2index[word] = english_word_n
# 更新词下标
english_word_n+=1
for word in pair[1].split(' '):
# 2-3: 使用if语句, 判断当前词是否在词表中, 如果不在添加进去
if word not in french_word2index.keys():
french_word2index[word] = french_word_n
# 更新词下标
french_word_n+=1
# 2-4 获取{下标:词}格式词表
english_index2word = {v:k for k, v in english_word2index.items()}
french_index2word = {v:k for k, v in french_word2index.items()}
# print('english_word2index--->', len(english_word2index), english_word2index)
# print('french_word2index--->', len(french_word2index), french_word2index)
# print('english_index2word--->', len(english_index2word), english_index2word)
# print('french_index2word--->', len(french_index2word), french_index2word)
# print('english_word_n--->', english_word_n)
# print('french_word_n--->', french_word_n)
return english_word2index, english_index2word, english_word_n, french_word2index, french_index2word, french_word_n, my_pairs
if __name__ == '__main__':
(english_word2index, english_index2word, english_word_n,
french_word2index, french_index2word, french_word_n, my_pairs) = my_getdata()构建数据源对象
1
2
3
4
5
6
7
8
9
10
11
12
13
14
15
16
17
18
19
20
21
22
23
24
25
26
27
28
29
30
31
32
33
34
35
36
37
38
39
40
41
42
43
44
45
46
47
48
49
50
51
52
53
54
55
56
57
58
59
60
61
62
63
# 自定义张量数据源类
class MyPairsDataset(Dataset):
# todo:1- init构造方法, 初始化属性
def __init__(self, my_pairs, english_word2index, french_word2index):
self.my_pairs = my_pairs # [[], [], ...]
self.english_word2index = english_word2index
self.french_index2word = french_word2index
# 获取数据集长度
self.sample_len = len(my_pairs)
# todo:2- len方法, 返回数据集的长度
def __len__(self):
return self.sample_len
# todo:3- getitem方法, 对数据进行处理, 转换成张量数据对象
def __getitem__(self, index):
"""
转换成张量数据对象
:param index: 数据集的下标 -> 第index个样本
:return: tensor_x, tensor_y
"""
# 3-1: 修正index, 防止超过下标边界
index = min(max(index, 0), self.sample_len - 1)
# print('index--->', index)
# 3-2: 获取当前index样本中的 x和y
x = self.my_pairs[index][0]
y = self.my_pairs[index][1]
# print('x--->', x)
# print('y--->', y)
# 3-3: 将x和y的字符串数据转换成下标表示 词表
# self.english_word2index[word]: 根据key获取字典中的value
x = [self.english_word2index[word] for word in x.split(' ')]
y = [self.french_index2word[word] for word in y.split(' ')]
# print('x--->', x)
# print('y--->', y)
# 3-4: 每个样本最后加EOS下标 结束符号
x.append(EOS_token)
y.append(EOS_token)
# print('x--->', x)
# print('y--->', y)
# 3-5: 将下标列表转换成张量对象
# device: 将张量创建到对应的设备上 GPU/CPU
tensor_x = torch.tensor(x, dtype=torch.long, device=device)
tensor_y = torch.tensor(y, dtype=torch.long, device=device)
# print('tensor_x--->', tensor_x)
# print('tensor_y--->', tensor_y)
return tensor_x, tensor_y
if __name__ == '__main__':
(english_word2index, english_index2word, english_word_n,
french_word2index, french_index2word, french_word_n, my_pairs) = my_getdata()
# 创建自定义数据源对象
my_dataset = MyPairsDataset(my_pairs, english_word2index, french_word2index)
print('my_dataset数据集条目数--->', len(my_dataset))
print(my_dataset[0])
# 创建数据加载器对象
my_dataloader = DataLoader(dataset=my_dataset, batch_size=1, shuffle=True)
# 循环遍历数据加载器
for i, (x, y) in enumerate(my_dataloader):
print('x--->', x.shape, x)
print('y--->', y.shape, y)
break
Author: 甘虎文
Copyright Notice: All articles on this blog are licensed under CC BY-NC-SA 4.0 unless otherwise stated.
Related Articles
2023-12-20
RNN案例-seq2seq英译法
RNN案例-seq2seq英译法1 RNN案例-seq2seq英译法1.1 seq2seq模型介绍 模型结构 编码器 encoder 解码器 decoder 编码器和解码器中可以使用RNN模型或者是transformer模型 工作流程 编码器生成上下文语义张量 -> 什么是nlp? 将问题转换成语义张量 解码器根据编码器的语义张量和上一时间步的预测值以及上一时间步的隐藏状态值进行当前时间步的预测 自回归模式 局限性 信息瓶颈问题 长序列问题 1.2 数据集介绍 每行样本由英文句子和法文句子对组成, 中间用\t分隔开 英文句子是编码器的输入序列, 法文句子是解码器的输出序列(预测序列)对应的真实序列 1.3 案例实现步骤1.3.1 文本清洗工具函数 utils.py 123456789101112131415161718192021222324252627282930313233343536373839404142434445# 用于正则表达式import re# 用于构建网络结构和函数的torch工具包import torchimport torch...
2024-02-25
fasttext工具
fasttext工具1 fasttext工具1.1 介绍 概念 是一种文本分类和词向量训练的高效工具 作用 文本分类 (分类模型) 训练高质量词向量 (词嵌入模型) 特点 高效, 快 适用于大规模数据集 1.2 架构(了解) fasttext模型组成 输入层 词向量 -> 根据词和词子词信息 词:apple 子词:app ppl ple skipgram模型 CBOW模型 隐藏层 加权求和 -> 文本向量表示 输出层 文本分类 线性层 softmax层 层次softmax 由霍夫曼二叉树组成 二叉树转换成是否问题 二分类问题 树路径越短, 词概率越大; 树路径越长, 词概率越小 层次softmax最多只需要计算 $$log_2词数$$ 次数, 普通的softmax计算 词数 的次数 负采样 将输出层的神经元分为正负两类, 正例神经元1个, 其余都是负例神经元 在负例神经元中随机选择2-5个/5-20个进行反向传播 其他Bert/GPT模型对所有的神经元进行反向传播 1.3 文本分类 概念: 将输入文本分...
2024-01-05
seq2seq
seq2seq1 RNN案例-seq2seq英译法1.1 seq2seq模型介绍 模型结构 编码器 encoder 解码器 decoder 编码器和解码器中可以使用RNN模型或者是transformer模型 工作流程 编码器生成上下文语义张量 -> 什么是nlp? 将问题转换成语义张量 解码器根据编码器的语义张量和上一时间步的预测值以及上一时间步的隐藏状态值进行当前时间步的预测 自回归模式 局限性 信息瓶颈问题 长序列问题 1.2 数据集介绍 每行样本由英文句子和法文句子对组成, 中间用\t分隔开 英文句子是编码器的输入序列, 法文句子是解码器的输出序列(预测序列)对应的真实序列 1.3 案例实现步骤1.3.1 文本清洗工具函数 utils.py 123456789101112131415161718192021222324252627282930313233343536373839404142434445# 用于正则表达式import re# 用于构建网络结构和函数的torch工具包import torchimport torch.nn as nn...
2024-01-22
transformer
transformer1 transformer介绍 概念 transformer是基于自注意力机制的seq2seq模型/架构/框架 核心思想 基于注意力机制 自注意力 一般注意力 作用 捕获超长距离语义关系 并行计算 灵活性: 处理不同的数据, 文本/语音/图像/视频 扩展性: 层数和多头数量可调, transformer默认是6层, 8个头 2 transformer架构 输入部分 词嵌入层 位置编码层 输出部分 线性层 softmax层 编码器部分 多头自注意力子层 前馈全连接子层 残差连接层 规范化层(层归一化) 解码器部分 掩码多头自注意力子层 编码器-解码器堵头一般注意力子层 前馈全连接子层 残差连接层 规范化层(层归一化) 3 输入3.1 文本嵌入层 概念 将token转换成词向量过程 nn.Embedding() 代码实现 1234567891011121314151617181920212223242526272829303132333435363738# 输入部分是由...
2024-03-13
transformers库使用
transformers库使用1 transformers库使用1.1 transformers库是什么 收集预训练模型的开源库 各种开源大模型以及数据集 访问https://huggingface.co需要科学上网 1.2 transformers库使用12345678910# 创建虚拟环境conda create --name 虚拟环境名称 python=3.10# 切换虚拟环境conda activate 虚拟环境名称# 安装transformers库pip install transformers -i https://mirrors.aliyun.com/pypi/simple/# 安装datasets库pip install datasets -i https://mirrors.aliyun.com/pypi/simple/# 安装torch cpu/gpu 当前是cpu版本pip install torch -i https://mirrors.aliyun.com/pypi/simple/ 管道方式 文本分类任务 12345678910111213...
2024-02-08
transformer介绍
day12_课堂笔记1 transformer介绍 概念 transformer是基于自注意力机制的seq2seq模型/架构/框架 核心思想 基于注意力机制 自注意力 一般注意力 作用 捕获超长距离语义关系 并行计算 灵活性: 处理不同的数据, 文本/语音/图像/视频 扩展性: 层数和多头数量可调, transformer默认是6层, 8个头 2 transformer架构 输入部分 词嵌入层 位置编码层 输出部分 线性层 softmax层 编码器部分 多头自注意力子层 前馈全连接子层 残差连接层 规范化层(层归一化) 解码器部分 掩码多头自注意力子层 编码器-解码器堵头一般注意力子层 前馈全连接子层 残差连接层 规范化层(层归一化) 3 输入3.1 文本嵌入层 概念 将token转换成词向量过程 nn.Embedding() 代码实现 1234567891011121314151617181920212223242526272829303132333435363738# 输入部分是由 ...