transformer
Created|Updated
|Post Views:
transformer
1 transformer介绍
- 概念
- transformer是基于自注意力机制的seq2seq模型/架构/框架
- 核心思想
- 基于注意力机制
- 自注意力
- 一般注意力
- 作用
- 捕获超长距离语义关系
- 并行计算
- 灵活性: 处理不同的数据, 文本/语音/图像/视频
- 扩展性: 层数和多头数量可调, transformer默认是6层, 8个头
2 transformer架构
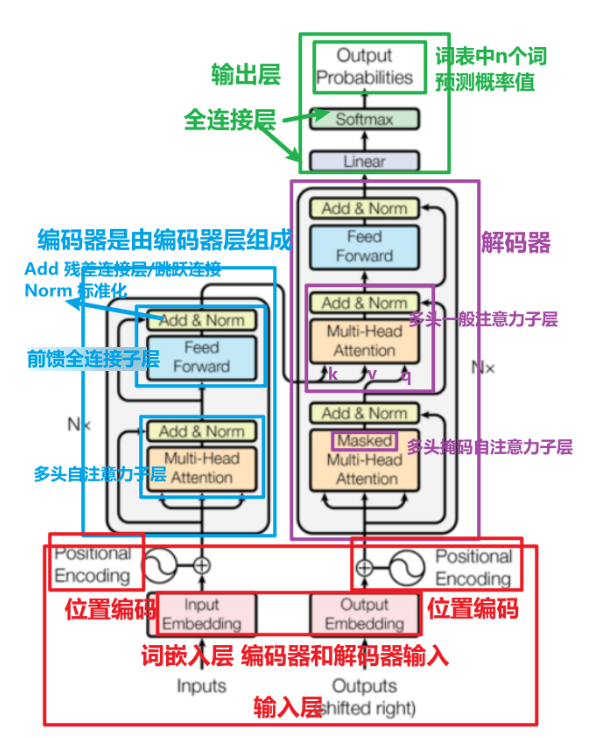
- 输入部分
- 词嵌入层
- 位置编码层
- 输出部分
- 线性层
- softmax层
- 编码器部分
- 多头自注意力子层
- 前馈全连接子层
- 残差连接层
- 规范化层(层归一化)
- 解码器部分
- 掩码多头自注意力子层
- 编码器-解码器堵头一般注意力子层
- 前馈全连接子层
- 残差连接层
- 规范化层(层归一化)
3 输入
3.1 文本嵌入层
概念
- 将token转换成词向量过程
- nn.Embedding()
代码实现
1
2
3
4
5
6
7
8
9
10
11
12
13
14
15
16
17
18
19
20
21
22
23
24
25
26
27
28
29
30
31
32
33
34
35
36
37
38
# 输入部分是由 词嵌入层和位置编码层组成 x = word_embedding + position_encoding
import torch
import torch.nn as nn
import math
# 词嵌入层
class Embeddings(nn.Module):
# todo:1- 定义构造方法 init
def __init__(self, vocab_size, d_model):
super().__init__()
# 初始化属性
self.vocab = vocab_size # 词表大小
self.d_model = d_model # 词向量维度
# 初始化词嵌入层对象
# padding_idx: 将值为0的值, 不进行词向量, 用0填充
self.embedding = nn.Embedding(num_embeddings=self.vocab,
embedding_dim=self.d_model,
padding_idx=0)
# todo:2- 定义forward方法 前向传播
def forward(self, x):
# 词嵌入结果乘以根号维度数
# 最终的词向量值和后续位置编码信息差不太多, 实现信息平衡
# 后续注意力机制使用的缩放点积, 乘和除相抵消
return self.embedding(x) * math.sqrt(self.d_model)
if __name__ == '__main__':
vocab_size = 1000
d_model = 512
# 创建测试数据
x = torch.LongTensor([[100, 2, 421, 508], [491, 998, 1, 0]])
# 创建词嵌入对象
my_embedding = Embeddings(vocab_size, d_model)
# 调用对象实现词嵌入
embedded_result = my_embedding(x)
print('embedded_result--->', embedded_result.shape, embedded_result)
3.2 位置编码器
概念
- 通过一些计算方式给词向量引入位置信息工具
- 位置编码器替代rnn/lstm/gru中的顺序执行 -> 拿到token和token位置信息
作用
- transformer中不使用rnn/lstm/gru计算语义, 没有位置概念
- 引入位置信息
- x 我 x -> 没有位置信息:我x(前x) = 我x(后x) 引入位置信息:我x(前x) != 我x(后x)
方法
使用正弦和余弦函数

计算每个token在512维度上所有位置信息
PE -> 词维度上的位置信息
- 索引下标偶数位用sin(第1,3,5…词), 索引下标奇数位用cos(第2,4,6…词)
- 我 -> [sin(), cos(), sin(), …]
- 爱 -> [sin(), cos(), …]
transformer中为什么要引入位置编码?
- 注意机制计算时只算token和token之间的语义关系/相关性, 没有考虑位置关系, 需要引入位置编码
- transformer中使用正弦和余弦函数计算位置信息值
- 周期性 -> sin(α+β) = sin(α)cos(β) + sin(β)cos(α)
- 我-> sin(10) -> sin(10+20) = sin(10)cos(20) + sin(20)cos(10) = 爱
- 可以学习到我和爱之间的位置关系(规律)
- 取值范围[-1,1], 避免值太大或太小, 导致梯度消失或爆炸
- 周期性 -> sin(α+β) = sin(α)cos(β) + sin(β)cos(α)
代码实现
1
2
3
4
5
6
7
8
9
10
11
12
13
14
15
16
17
18
19
20
21
22
23
24
25
26
27
28
29
30
31
32
33
34
35
36
37
38
39
40
41
42
43
44
45
46
47
48
49
50
51
52
53
54
55
56
57
58
59
60
61
# 位置编码器
class PositionalEncoding(nn.Module):
# todo:1- init方法, 计算出n个词位置矩阵
def __init__(self, d_model, max_len=5000, dropout_p=0.1):
super().__init__()
# 初始化属性
self.d_model = d_model # 词向量维度, 模型维度
self.max_len = max_len # 句子最大长度
self.dropout = nn.Dropout(p=dropout_p)
# 获取句子所有token索引下标,作为pos
# .unsqueeze(1)->在1轴升维 [[0],[1],...]
pos = torch.arange(0, self.max_len).unsqueeze(1)
# print('pos--->', pos.shape, pos)
# 创建一个pe全0矩阵, 存储位置信息 形状(句子长度, 词维度)
pe = torch.zeros(size=(self.max_len, self.d_model))
# print('pe--->', pe.shape, pe)
# 获取2i结果, 对向量维度d_model取偶数下标值
_2i = torch.arange(0, self.d_model, 2).float()
# print('_2i--->', _2i)
# 计算位置信息 奇数位的词sin 偶数位的词cos
pe[:, ::2] = torch.sin(pos / 10000 ** (_2i / self.d_model))
pe[:, 1::2] = torch.cos(pos / 10000 ** (_2i / self.d_model))
# 将pe位置矩阵升维, 三维数据集
pe = pe.unsqueeze(0)
# print('pe--->', pe.shape, pe)
# 存储到内存中, 后续便于加载
# pe属性中存储的是pe矩阵结果
self.register_buffer('pe', pe)
# todo:2- forward方法 将位置信息添加到词嵌入结果中
def forward(self, x):
"""
:param x: 词嵌入层的输出结果
:return: 编码器的输入x
"""
print('x--->', x.shape, x)
# x.shape[1], 句子中有多少个真实的token, 就在pe矩阵中取前多少个就可以
print('x.shape[1]--->', x.shape[1])
print('self.pe[:, :x.shape[1], :]--->', self.pe[:, :x.shape[1], :].shape, self.pe[:, :x.shape[1], :])
return x + self.pe[:, :x.shape[1], :]
if __name__ == '__main__':
vocab_size = 1000
d_model = 512
# 创建测试数据
# max_len=60, 句子最大长度
# 当前第1个句子长度为4, 后续需要补56个0
# 当前第2个句子长度为4
x = torch.LongTensor([[100, 2, 421, 508], [491, 998, 1, 211]])
# 创建词嵌入对象
my_embedding = Embeddings(vocab_size, d_model)
# 调用对象实现词嵌入
embedded_result = my_embedding(x)
print('embedded_result--->', embedded_result.shape, embedded_result)
# 创建pe位置矩阵 生成位置特征数据[1,60,512]
my_pe = PositionalEncoding(d_model=d_model, dropout_p=0.1, max_len=60)
# 调用位置编码对象
pe_result = my_pe(embedded_result)
print('pe_result--->', pe_result.shape, pe_result)
4 编码器
4.1 掩码张量
概念
- 掩盖一些信息的二进制张量或下三角矩阵张量
作用
- 屏蔽填充的信息
- 屏蔽未来的信息
transformer中使用
- 编码器中只能使用padding mask
- 解码器中使用padding mask 和 casual mask
代码实现
1
2
3
4
5
6
7
8
9
10
11
12
13
14
15
16
17
18
19
20
21
22
23
24
25
26
27
28
29
30
import torch
import matplotlib.pyplot as plt
# tril():生成下三角矩阵
# triu():生成上三角矩阵
# diagonal: 移动对角线
def subsequent_mask(size):
# 下三角
causal_mask = torch.tril(torch.ones(size=(size, size)), diagonal=0)
# 上三角
# causal_mask = torch.triu(torch.ones(size=(size, size)), diagonal=0)
return causal_mask
if __name__ == '__main__':
causal_mask = subsequent_mask(20)
print('causal_mask--->', causal_mask.shape, causal_mask)
# 绘图
plt.figure()
plt.imshow(causal_mask)
plt.show()
# 模拟自回归,进行自回归掩码
scores = torch.randn(size=(5, 5))
mask = subsequent_mask(5)
print('mask==0--->', mask==0)
masked_result = scores.masked_fill(mask==0, value=float('-inf'))
print('masked_result--->', masked_result)
4.2 自注意力机制
概念
- 在同一序列中进行注意力计算
- q=k=v
作用
- 并行计算
- 捕获更长距离的语义关系
为什么除以$\sqrt{d_k}$
- 防止
q*k^T乘积值过大, 产生梯度饱和, 导致梯度消失
- 防止
代码实现
1
2
3
4
5
6
7
8
9
10
11
12
13
14
15
16
17
18
19
20
21
22
23
24
25
26
27
28
29
30
31
32
33
34
35
36
37
38
39
40
41
42
43
44
45
46
47
48
49
50
51
52
53
54
55
56
57
58
59
60
61
62
63
64
65
66
67
from input import *
# 定义缩放点积注意力规则函数, 方便后续调用
def attention(query, key, value, mask=None, dropout=None):
"""
注意力计算封装函数
:param query: 输入x 解码器掩码多头自注意力子层输出
:param key: 输入x 编码器输出结果
:param value: 输入x 编码器输出结果
:param mask: 是否掩码
:param dropout: dropout层对象 函数名
:return: 动态c, 权重概率矩阵
"""
# todo:1- 获取d_k, 词维度数
d_k = query.shape[-1]
# print('d_k--->', d_k)
# todo:2- q和k计算权重分数矩阵
scores = torch.matmul(query, key.transpose(-2, -1)) / math.sqrt(d_k)
# print('scores--->', scores.shape, scores)
# todo:3- 判断是否需要进行掩码操作
if mask is not None:
scores = scores.masked_fill(mask == 0, value=-1e9)
print('='*50)
# print('scores--->', scores.shape, scores)
# todo:4- 权重分数矩阵进行softmax操作, 得到权重概率矩阵
p_attn = torch.softmax(scores, dim=-1)
print('p_attn--->', p_attn.shape, p_attn)
# todo:5- 判断是否对权重概率矩阵进行dropout正则化
if dropout is not None:
p_attn = dropout(p_attn)
# todo:6- 计算动态c矩阵
c = torch.matmul(p_attn, value)
print('c--->', c.shape, c)
return c, p_attn
if __name__ == '__main__':
vocab = 1000 # 词表大小是1000
d_model = 512 # 词嵌入维度是512维
# 输入x 形状是2 x 4
x = torch.LongTensor([[100, 2, 421, 0], [491, 998, 0, 0]])
# 输入部分的Embeddings类
my_embeddings = Embeddings(vocab, d_model)
embedded_result = my_embeddings(x)
dropout_p = 0.1 # 置0概率为0.1
max_len = 60 # 句子最大长度
# 输入部分的PositionalEncoding类
my_pe = PositionalEncoding(d_model, max_len, dropout_p)
pe_result = my_pe(embedded_result)
# 调用attention函数
# 准备q,k,v
query=key=value=pe_result # 自注意力
print('query--->', query.shape)
# 准备mask掩码张量 padding_mask
# unsqueeze(1) -> 形状(2,1,4) 后续进行masked_fill操作, 会进行广播, 变成 (2,4,4)
mask = (x!= 0).type(torch.uint8).unsqueeze(1)
# casual mask
# mask = torch.tril(torch.ones(4, 4))
print('mask--->', mask.shape, mask)
c, p_attn = attention(query, key, value, mask)
print('c--->', c.shape, c)
print('p_attn--->', p_attn.shape, p_attn)
4.3 多头注意力机制
概念
- 使用多个头并行计算注意力, 可以从不同子空间维度学习特征
作用
- 得到更丰富的特征
- 增强模型表达能力
多头指的是什么
- 在进行注意力计算时由多个人分别取算不同子空间的注意力
实现流程
- q,k,v分别经过线性层计算, 得到wq,wk,wv
- 将线性计算的q,k,v进行多头转换操作,分别计算注意力
- 将多头注意力结果合并(类似于还原操作)后的结果经过线性层计算
代码实现
1
2
3
4
5
6
7
8
9
10
11
12
13
14
15
16
17
18
19
20
21
22
23
24
25
26
27
28
29
30
31
32
33
34
35
36
37
38
39
40
41
42
43
44
45
46
47
48
49
50
51
52
53
54
55
56
57
58
59
60
61
62
63
64
65
66
67
68
69
70
71
72
73
74
75
76
77
78
79
80
81
82
83
84
85
86
87
88
89
90
91
92
93
94
# 定义克隆函数, 用于克隆不同子层
def clones(module, N):
return nn.ModuleList(copy.deepcopy(module) for _ in range(N))
# 创建多头注意力机制类
class MultiHeadedAttention(nn.Module):
# todo:1- init方法
def __init__(self, head, d_model, dropout_p=0.1):
super().__init__()
assert d_model % head ==0, 'd_model不能被head整数'
self.d_k = d_model // head
self.dropout = nn.Dropout(p=dropout_p)
self.head = head
# 初始为None, 还没有计算注意力
self.attn = None
# 4个线性层
# 前3个分别对q,k,v进行线性学习
# 第1个对多头注意力拼接结果进行线性学习
self.linears = clones(nn.Linear(d_model, d_model), 4)
# print('self.linears--->', self.linears)
# todo:2- forward方法
def forward(self, query, key, value, mask=None):
# todo:1- 获取batch_size大小
batch_size = query.size()[0]
# print('batch_size--->', batch_size)
# todo:2- 准备空列表, 存储线性计算+变形结果
output_list = []
# todo:3- q,k,v分别进行线性计算
for model, x in zip(self.linears, (query, key, value)):
# print('model--->', model)
# print('x--->', x)
output = model(x)
# todo:4- 线性计算结果变形 -> (batch_size, seq_len, head, d_k)
# transpose(1, 2):词数和词向量相邻, 更好的学习特征
output = output.view(batch_size, -1, self.head, self.d_k).transpose(1, 2)
# todo:5- 将变形结果保存到空列表中
output_list.append(output)
# 获取q, k, v
# print('output_list--->', len(output_list))
query = output_list[0]
key = output_list[1]
value = output_list[2]
# todo:6- 计算多头注意力, 调用attention函数 (batch_size, seq_len, head, d_k)
x, p_attn = attention(query, key, value, mask)
# print('x--->', x.shape)
# todo:7- 多头注意力结果变形 -> (batch_size, seq_len, word_dim)
x = x.transpose(1, 2).contiguous().view(batch_size, -1, self.head*self.d_k)
# print('x--->', x.shape)
# todo:8- 经过线性层计算返回输出结果
# self.linears[-1]: 线性层对象
x = self.linears[-1](x)
return x
if __name__ == '__main__':
vocab = 1000 # 词表大小是1000
d_model = 512 # 词嵌入维度是512维
# 输入x 形状是2 x 4
x = torch.LongTensor([[100, 2, 421, 0], [491, 998, 0, 0]])
# 输入部分的Embeddings类
my_embeddings = Embeddings(vocab, d_model)
embedded_result = my_embeddings(x)
dropout_p = 0.1 # 置0概率为0.1
max_len = 60 # 句子最大长度
# 输入部分的PositionalEncoding类
my_pe = PositionalEncoding(d_model, max_len, dropout_p)
pe_result = my_pe(embedded_result)
# 调用attention函数
# 准备q,k,v
query=key=value=pe_result # 自注意力
# print('query--->', query.shape)
# 准备mask掩码张量 padding_mask
# unsqueeze(1) -> 形状(2,1,4) 后续进行masked_fill操作, 会进行广播, 变成 (2,4,4)
# 多头注意力机制,需要得到(2,1,1,4)形状mask
mask = (x!= 0).type(torch.uint8).unsqueeze(1).unsqueeze(2)
# casual mask
# mask = torch.tril(torch.ones(4, 4))
# print('mask--->', mask.shape, mask)
# c, p_attn = attention(query, key, value, mask)
# print('c--->', c.shape, c)
# print('p_attn--->', p_attn.shape, p_attn)
head=8
# 创建多头注意力机制类对象
my_mha = MultiHeadedAttention(head, d_model)
# 调用多头注意力机制对象
mha_result = my_mha(query, key, value, mask)
print('mha_result--->', mha_result.shape, mha_result)
4.4 前馈全连接层
概念
- 由两层线性层和一层relu激活层
作用
- 提取更丰富的非线性特征, 增强模型表达能力
代码实现
1
2
3
4
5
6
7
8
9
10
11
12
13
14
15
16
17
18
19
20
21
22
23
24
25
26
27
28
29
30
31
32
33
34
35
36
37
38
39
40
41
42
43
44
45
46
47
48
49
50
51
52
53
54
55
56
57
58
59
60
61
62
63
# 前馈全连接层
class PositionwiseFeedForward(nn.Module):
def __init__(self, d_model, d_ff, dropout_p=0.1):
super().__init__()
# 定义两层线性层
# d_ff>d_model
self.linear1 = nn.Linear(d_model, d_ff)
self.linear2 = nn.Linear(d_ff, d_model)
# 定义dropout层
self.dropout = nn.Dropout(p=dropout_p)
def forward(self, x):
output = torch.relu(self.linear1(x))
output = self.dropout(output)
print('output--->', output.shape)
return self.linear2(output)
if __name__ == '__main__':
vocab = 1000 # 词表大小是1000
d_model = 512 # 词嵌入维度是512维
# 输入x 形状是2 x 4
x = torch.LongTensor([[100, 2, 421, 0], [491, 998, 0, 0]])
# 输入部分的Embeddings类
my_embeddings = Embeddings(vocab, d_model)
embedded_result = my_embeddings(x)
dropout_p = 0.1 # 置0概率为0.1
max_len = 60 # 句子最大长度
# 输入部分的PositionalEncoding类
my_pe = PositionalEncoding(d_model, max_len, dropout_p)
pe_result = my_pe(embedded_result)
# 调用attention函数
# 准备q,k,v
query = key = value = pe_result # 自注意力
# print('query--->', query.shape)
# 准备mask掩码张量 padding_mask
# unsqueeze(1) -> 形状(2,1,4) 后续进行masked_fill操作, 会进行广播, 变成 (2,4,4)
# 多头注意力机制,需要得到(2,1,1,4)形状mask
mask = (x != 0).type(torch.uint8).unsqueeze(1).unsqueeze(2)
# casual mask
# mask = torch.tril(torch.ones(4, 4))
# print('mask--->', mask.shape, mask)
# c, p_attn = attention(query, key, value, mask)
# print('c--->', c.shape, c)
# print('p_attn--->', p_attn.shape, p_attn)
head = 8
# 创建多头注意力机制类对象
my_mha = MultiHeadedAttention(head, d_model)
# 调用多头注意力机制对象
mha_result = my_mha(query, key, value, mask)
print('mha_result--->', mha_result.shape, mha_result)
# 创建前馈全连接对象
d_ff = 2048
my_ff = PositionwiseFeedForward(d_model, d_ff)
ff_result = my_ff(mha_result)
print('ff_result--->', ff_result.shape)
Author: 甘虎文
Copyright Notice: All articles on this blog are licensed under CC BY-NC-SA 4.0 unless otherwise stated.
Related Articles
2023-12-20
RNN案例-seq2seq英译法
RNN案例-seq2seq英译法1 RNN案例-seq2seq英译法1.1 seq2seq模型介绍 模型结构 编码器 encoder 解码器 decoder 编码器和解码器中可以使用RNN模型或者是transformer模型 工作流程 编码器生成上下文语义张量 -> 什么是nlp? 将问题转换成语义张量 解码器根据编码器的语义张量和上一时间步的预测值以及上一时间步的隐藏状态值进行当前时间步的预测 自回归模式 局限性 信息瓶颈问题 长序列问题 1.2 数据集介绍 每行样本由英文句子和法文句子对组成, 中间用\t分隔开 英文句子是编码器的输入序列, 法文句子是解码器的输出序列(预测序列)对应的真实序列 1.3 案例实现步骤1.3.1 文本清洗工具函数 utils.py 123456789101112131415161718192021222324252627282930313233343536373839404142434445# 用于正则表达式import re# 用于构建网络结构和函数的torch工具包import torchimport torch...
2024-02-25
fasttext工具
fasttext工具1 fasttext工具1.1 介绍 概念 是一种文本分类和词向量训练的高效工具 作用 文本分类 (分类模型) 训练高质量词向量 (词嵌入模型) 特点 高效, 快 适用于大规模数据集 1.2 架构(了解) fasttext模型组成 输入层 词向量 -> 根据词和词子词信息 词:apple 子词:app ppl ple skipgram模型 CBOW模型 隐藏层 加权求和 -> 文本向量表示 输出层 文本分类 线性层 softmax层 层次softmax 由霍夫曼二叉树组成 二叉树转换成是否问题 二分类问题 树路径越短, 词概率越大; 树路径越长, 词概率越小 层次softmax最多只需要计算 $$log_2词数$$ 次数, 普通的softmax计算 词数 的次数 负采样 将输出层的神经元分为正负两类, 正例神经元1个, 其余都是负例神经元 在负例神经元中随机选择2-5个/5-20个进行反向传播 其他Bert/GPT模型对所有的神经元进行反向传播 1.3 文本分类 概念: 将输入文本分...
2024-01-05
seq2seq
seq2seq1 RNN案例-seq2seq英译法1.1 seq2seq模型介绍 模型结构 编码器 encoder 解码器 decoder 编码器和解码器中可以使用RNN模型或者是transformer模型 工作流程 编码器生成上下文语义张量 -> 什么是nlp? 将问题转换成语义张量 解码器根据编码器的语义张量和上一时间步的预测值以及上一时间步的隐藏状态值进行当前时间步的预测 自回归模式 局限性 信息瓶颈问题 长序列问题 1.2 数据集介绍 每行样本由英文句子和法文句子对组成, 中间用\t分隔开 英文句子是编码器的输入序列, 法文句子是解码器的输出序列(预测序列)对应的真实序列 1.3 案例实现步骤1.3.1 文本清洗工具函数 utils.py 123456789101112131415161718192021222324252627282930313233343536373839404142434445# 用于正则表达式import re# 用于构建网络结构和函数的torch工具包import torchimport torch.nn as nn...
2024-03-13
transformers库使用
transformers库使用1 transformers库使用1.1 transformers库是什么 收集预训练模型的开源库 各种开源大模型以及数据集 访问https://huggingface.co需要科学上网 1.2 transformers库使用12345678910# 创建虚拟环境conda create --name 虚拟环境名称 python=3.10# 切换虚拟环境conda activate 虚拟环境名称# 安装transformers库pip install transformers -i https://mirrors.aliyun.com/pypi/simple/# 安装datasets库pip install datasets -i https://mirrors.aliyun.com/pypi/simple/# 安装torch cpu/gpu 当前是cpu版本pip install torch -i https://mirrors.aliyun.com/pypi/simple/ 管道方式 文本分类任务 12345678910111213...
2024-02-08
transformer介绍
day12_课堂笔记1 transformer介绍 概念 transformer是基于自注意力机制的seq2seq模型/架构/框架 核心思想 基于注意力机制 自注意力 一般注意力 作用 捕获超长距离语义关系 并行计算 灵活性: 处理不同的数据, 文本/语音/图像/视频 扩展性: 层数和多头数量可调, transformer默认是6层, 8个头 2 transformer架构 输入部分 词嵌入层 位置编码层 输出部分 线性层 softmax层 编码器部分 多头自注意力子层 前馈全连接子层 残差连接层 规范化层(层归一化) 解码器部分 掩码多头自注意力子层 编码器-解码器堵头一般注意力子层 前馈全连接子层 残差连接层 规范化层(层归一化) 3 输入3.1 文本嵌入层 概念 将token转换成词向量过程 nn.Embedding() 代码实现 1234567891011121314151617181920212223242526272829303132333435363738# 输入部分是由 ...
2023-11-16
注意力机制
注意力机制1 注意力机制由来 seq2seq架构介绍(encoder-decoder) encoder:编码器, 生成固定上下文张量c decoder:解码器, 生成预测序列 自回归预测: 只能使用上一时间步的预测结果作为下一时间步的输入 seq2seq架构存在问题 c不变->信息不变/信息瓶颈 使用GRU模型, 处理超长序列时也会产生梯度消失或梯度爆炸 基于以上两个问题引用了注意力机制 2 注意力机制介绍 概念 一种增强神经网络模型性能的技术/工具 预测时每个时间步都要计算一个中间语义张量C(动态C) C1,C2,C3… C1 = 0.5欢迎 + 0.3来 + 0.2北京 C2 = 0.3欢迎 + 0.6来 + 0.1北京 核心思想 通过计算==动态中间语义张量c==来增强模型表达能力 作用 增强神经网络模型性能 增强可解释性 -> 权值 缓解信息瓶颈问题 -> 动态C 解决长序列问题 -> 使用自注意力机制替换RNN/LSTM&#x...