SmartTravel项目实现
P02-项目实现
一、项目架构与代码架构图【掌握】
1 项目架构图
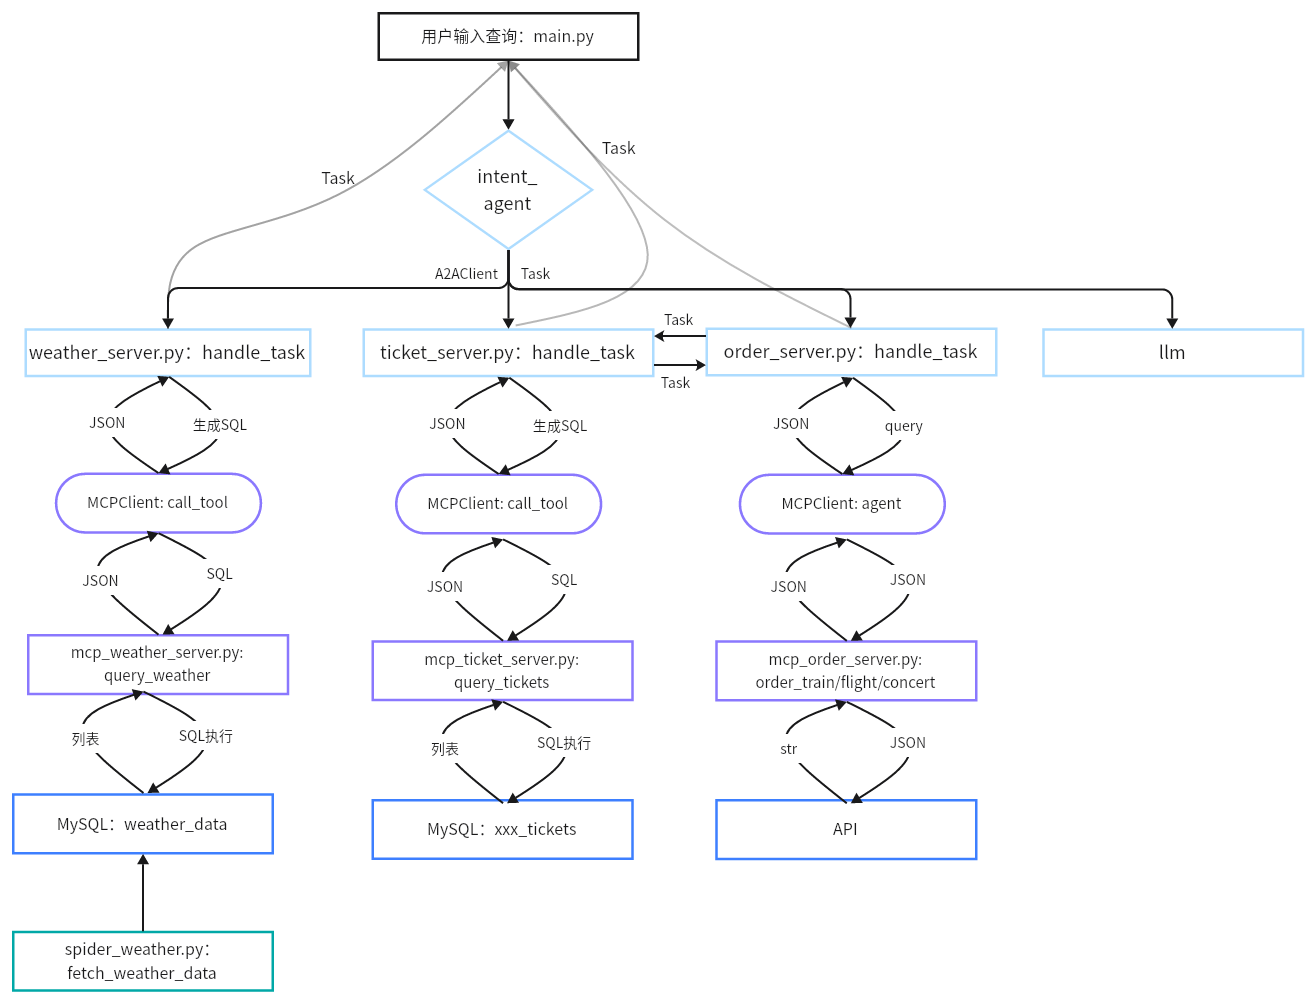
SmartVoyage 是基于A2A与MCP协议实现是一个多agent系统。系统包括 LLM 路由服务器(意图识别)、天气代理服务器(查询天气数据库)、票务代理服务器(查询票务数据库)、票务预定服务器(API接口)、MCP 工具服务器(数据库接口)、数据采集脚本和 Streamlit 前端客户端。

2 代码架构图
以下是代码层面的架构图。
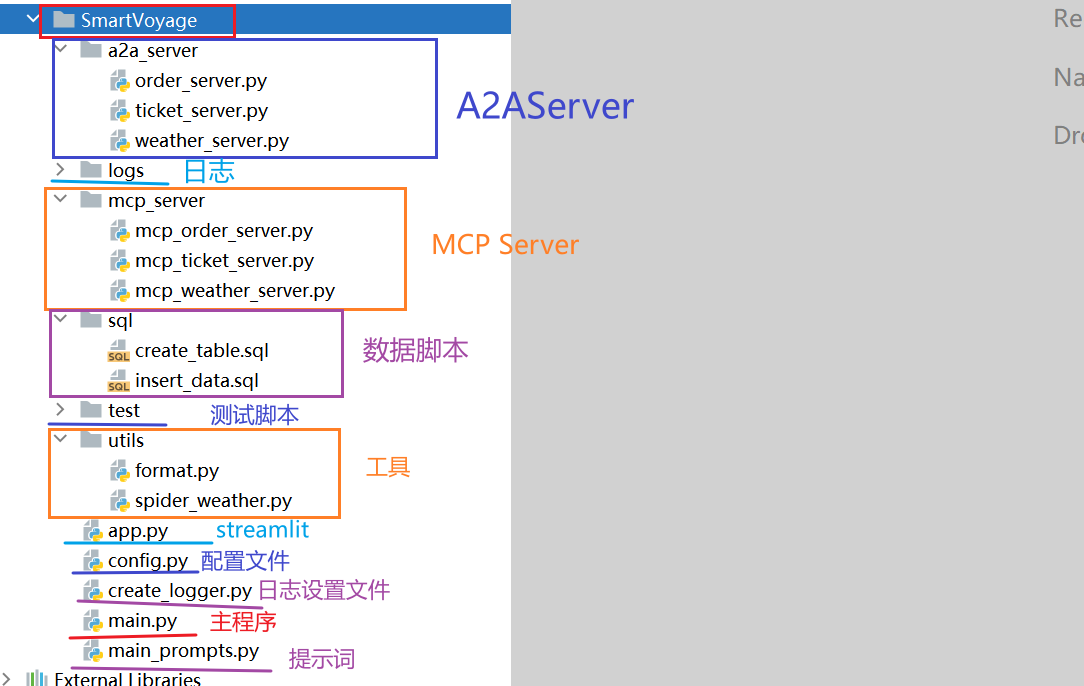
代码结构如下:
二、项目实现
1 整体流程【熟悉】
- 配置基础环境(config.py 和 create_logger.py)
- 初始化数据库(SQL 脚本)
- 采集数据(spider_weather.py)
- 完成 MCP 服务器(mcp_weather_server.py 、mcp_ticket_server.py 和 mcp_order_server.py)
- 完成A2A代理服务器(weather_server.py 、ticket_server.py 和 order_server.py)
- 完成客户端(main.py)
- 启动服务进行联调
- 启动MCP 服务器(mcp_weather_server.py 、mcp_ticket_server.py 和 mcp_order_server.py)
- 启动代理服务器(weather_server.py 、ticket_server.py 和 order_server.py)
- 启动客户端(main.py)
2 配置模块【实现】
2.1 config.py
位置:SmartVoyage/config.py
1 | import os |
2.2 create_logger.py
位置:SmartVoyage/create_logger.py
1 | import logging |
3 数据库初始化【实现】
SQL 脚本,创建票务和天气数据库表。定义数据结构,确保 MCP 服务器能查询存储的数据。
项目中的定位:数据基础,存储天气和票务信息。
核心功能:创建表、设置唯一键和注释。
数据库概述:
数据库名称:travel_rag
字符集:utf8mb4(支持中文等复杂字符)
校对规则:utf8mb4_unicode_ci(大小写不敏感,适合多语言)
作用:存储票务数据(火车票、机票、演唱会票),供 mcp_ticket_server.py 查询,支持 ticket_server.py 的票务查询功能。存储天气数据,供mcp_weather_server.py查询,支持weather_server.py天气查询功能。

4 数据采集【实现】
spider_weather天气数据采集脚本,从 API 获取数据,写入 MySQL。保持数据库实时更新,支持代理查询。数据采集地址:https://dev.qweather.com/docs/api/weather/weather-daily-forecast/
项目中的定位:后台数据源,定时执行。
核心功能:API 请求、数据解析、写入/更新数据库、调度。
**代码路径:**SmartVoyage/sql
5 数据导入【实现】
5.1 导包及配置
以下配置是关于天气API配置以及数据库配置,通过爬虫爬取天气信息网站存储到数据库用于作为A2A检索数据库。
位置:SmartVoyage/utils/spider_weather.py
1 | import requests |
5.2 连接数据库
connect_db函数
目标:建立 MySQL 数据库连接。
功能:使用 db_config 配置连接 MySQL,返回连接对象
输入输出:
输入:无。
输出:mysql.connector.connection.MySQLConnection 对象。
1 | def connect_db(): |
测试:
1 | if __name__ == '__main__': |
5.3 爬取数据
fetch_weather_data函数用于天气数据的爬取与解析。
目标:从和风天气 API 获取 30 天天气预报数据。
功能:发送 GET 请求,处理 gzip 压缩,解析 JSON 返回数据。
输入输出:
输入:city(字符串,如“北京”),location(字符串,如“101010100”)。
输出:JSON 字典(包含 daily 预报列表)或 None。
1 | def fetch_weather_data(city, location): |
测试:
1 | if __name__ == "__main__": |
5.4 查询数据更新时间
get_latest_update_time函数
目标:查询数据库中指定城市的最新更新时间。
功能:执行 SQL 查询,返回 weather_data 表中 city 的最新 update_time。
输入输出:
输入:cursor(MySQL 游标),city(字符串,如“北京”)。
输出:datetime 对象或 None。
1 | def get_latest_update_time(cursor, city): |
测试:
1 | if __name__ == "__main__": |
5.5 是否需要更新
should_update_data函数
目标:判断是否需要更新城市天气数据。
功能:检查最新更新时间是否超过 1 天,或强制更新。
输入输出:
输入:latest_time(datetime 或 None),force_update(布尔值)。
输出:布尔值(True/False)。
1 | def should_update_data(latest_time, force_update=False): |
测试:
1 | if __name__ == "__main__": |
5.6 存储数据
store_weather_data函数
目标:写入或更新天气预报数据到数据库。
功能:循环预报数据,使用 INSERT ON DUPLICATE KEY UPDATE 插入/更新 weather_data 表。
输入输出:
输入:数据库连接、mysql游标,城市、数据。
输出:无,数据库更新。
1 | def store_weather_data(conn, cursor, city, data): |
测试:
1 | if __name__ == "__main__": |
5.7 更新数据
update_weather函数
目标:更新所有城市数据。
功能:查看是否满足更新条件,调用数据存储与数据爬取。
输入输出:
输入:更新条件
输出:无,数据库更新。
1 | def update_weather(force_update=False): |
测试:
1 | if __name__ == "__main__": |
5.8 定时更新
setup_scheduler函数
目标:设置定时任务,每天在 PDT 16:00(北京时间 01:00)调用 update_weather 函数。保证数据的实时性。
功能:
使用 schedule 库注册每日任务。
进入无限循环,检查并运行待执行任务,每 60 秒检查一次。
项目中的定位:确保天气数据定时更新,保持 weather_data 表的数据新鲜,支持 weather_server.py 和 mcp_weather_server.py 查询。
1 | def setup_scheduler(): |
原理测试:
1 | from datetime import datetime, timedelta |
5.9 完整代码
位置:SmartVoyage/utils/spider_weather.py
1 | import requests |
6 天气MCP服务器【掌握】
mcp_ticket_server.py:票务 MCP 服务器,提供 train_tickets、flight_tickets 和 concert_tickets 表的 SELECT 查询接口,返回 JSON 格式结果。
核心功能:
- 初始化 MySQL 数据库连接。
- 执行 SELECT 查询,返回 JSON 格式结果。
- 格式化日期和数值字段,确保 JSON 序列化兼容。
- 通过 FastAPI 提供 HTTP 接口,响应 MCP 工具调用。
位置:SmartVoyage/mcp_server/mcp_weather_server.py
1 | import mysql.connector |
7 票务MCP 服务器【掌握】
mcp_weather_server天气 MCP 服务器,提供 weather_data 表的 SELECT 查询接口,返回 JSON 格式结果。
核心功能:
初始化 MySQL 数据库连接。
执行 SELECT 查询,返回 JSON 格式结果。
格式化日期和数值字段,确保 JSON 序列化兼容。
通过 FastAPI 提供 HTTP 接口,响应 MCP 工具调用。
位置:SmartVoyage/mcp_server/mcp_ticket_server.py
1 | import mysql.connector |
8 订票MCP服务器【掌握】
mcp_order_server.py:订票 MCP 服务器,通过调用API完成火车票、飞机票和演唱会票的预定。
位置:SmartVoyage/mcp_server/mcp_order_server.py
1 | from mcp.server.fastmcp import FastMCP |
9 天气agent服务器【掌握】
weather_server.py:天气代理服务器,使用 LLM 生成 SQL 查询 MCP 票务工具,返回用户友好文本结果。
作用:处理用户自然语言查询,转为 SQL 调用 MCP,提升智能性,支持追问和默认值。
项目中的定位:执行层,接收路由任务,生成 SQL 调用 MCP,返回 artifacts 给客户端。
核心功能:
初始化 LLM 和 MCP 客户端。
生成 SQL,提取代码块,调用 MCP。
解析 JSON 结果,返回格式化文本。
位置:SmartVoyage/a2a_server/weather_server.py
1 | import json |
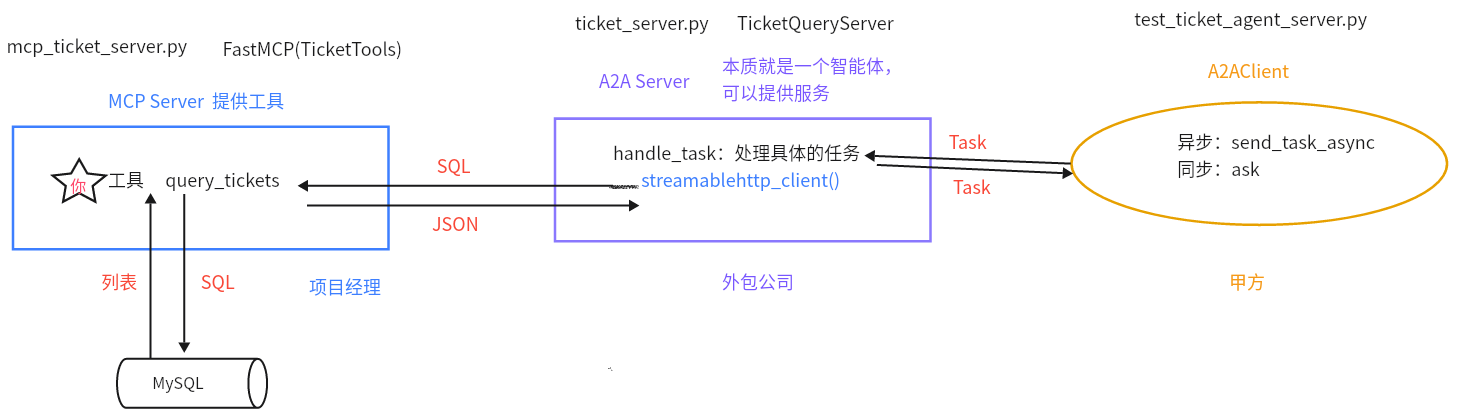
10 票务Agent服务器【掌握】
ticket_server.py:票务代理服务器,使用 LLM 生成 SQL 查询 MCP 票务工具,返回用户友好文本结果。
**作用:**处理用户自然语言查询,转为 SQL 调用 MCP,提升智能性,支持追问和默认值。
项目中的定位:执行层,接收路由任务,生成 SQL 调用 MCP,返回 artifacts 给客户端。
核心功能:
- 初始化 LLM 和 MCP 客户端。
- 生成 SQL,提取代码块,调用 MCP。
- 解析 JSON 结果,返回格式化文本。
调用链:
==位置==:SmartVoyage/mcp_server/mcp_ticket_server.py
1 | import json |
11 订票Agent服务器【掌握】
order_server.py:订票代理服务器,首先根据用户的意图去调用票务Agent服务器查询余票信息,然后进行调用订票MCP服务器完成订票。
位置:SmartVoyage/a2a_server/order_server.py
1 | import asyncio |
12 main主程序【掌握】
提示词:
位置:SmartVoyage/main_prompts.py
1 | from langchain_core.prompts import ChatPromptTemplate |
意图识别:
1 | # 意图识别agent |
不同意图的处理流程:
位置:SmartVoyage/main.py

完整代码:
1 | import asyncio |