快速部署 检查环境 个人电脑:Lenovo Yoga Win11
已安装:git bash工具
运行git bash聊天窗口 检查node和npm的版本,没有就安装 1 2 3 4 node -v npm -v 要求: Node >= 22
快速开始 安装openclaw并打开新手指南程序 onboard 1 2 3 4 5 6 npm install -g openclaw@latest 检查是否安装成功: openclaw --version 返回发布日期 e.g. 2026.3.2 ,则成功 openclaw onboard --install-daemon
配置模版
打开openclaw 对话界面 配置飞书渠道 进入config页面,选择配置飞书渠道
配置飞书id和密码 一、创建飞书应用(机器人) 打开飞书开发者后台:
https://open.feishu.cn/app
步骤:
1、点击 创建企业自建应用
3、 创建成功后进入应用后台。
获取 App ID 和 App Secret 进入:
你会看到:
复制这两个值。
例如:
1 2 cli_xxxxxxxxx xxxxxx_secret
开启机器人权限 进入:
添加权限:
1 2 3 im:message im:message.group im:message.p2p
至少要有:
然后点击:
否则机器人不会生效。
在 OpenClaw 配置飞书 运行:
选择:
然后选择:
填写:
保存。
启动飞书机器人 重新启动 gateway:
把机器人拉进飞书 在飞书里:
搜索你刚刚创建的应用:
然后你就可以直接在飞书聊天:
AI 就会回复。
完成配置修改
开发者模式部署 win11准备环境 安装 Node.js OpenClaw需要 Node.js。Node ≥22
下载安装:
https://nodejs.org
安装 LTS版本 。
安装完后测试:
打开git bash对话框
如果显示版本号说明成功。
安装 pnpm OpenClaw依赖 pnpm 包管理器。
执行:
检查:
克隆 OpenClaw 进入你想放项目的目录:
1 git clone https://github.com/openclaw/openclaw.git
进入目录:
安装依赖 第一次会比较慢。
构建 UI 构建项目 初始化 OpenClaw 1 pnpm openclaw onboard --install-daemon
这一步会:
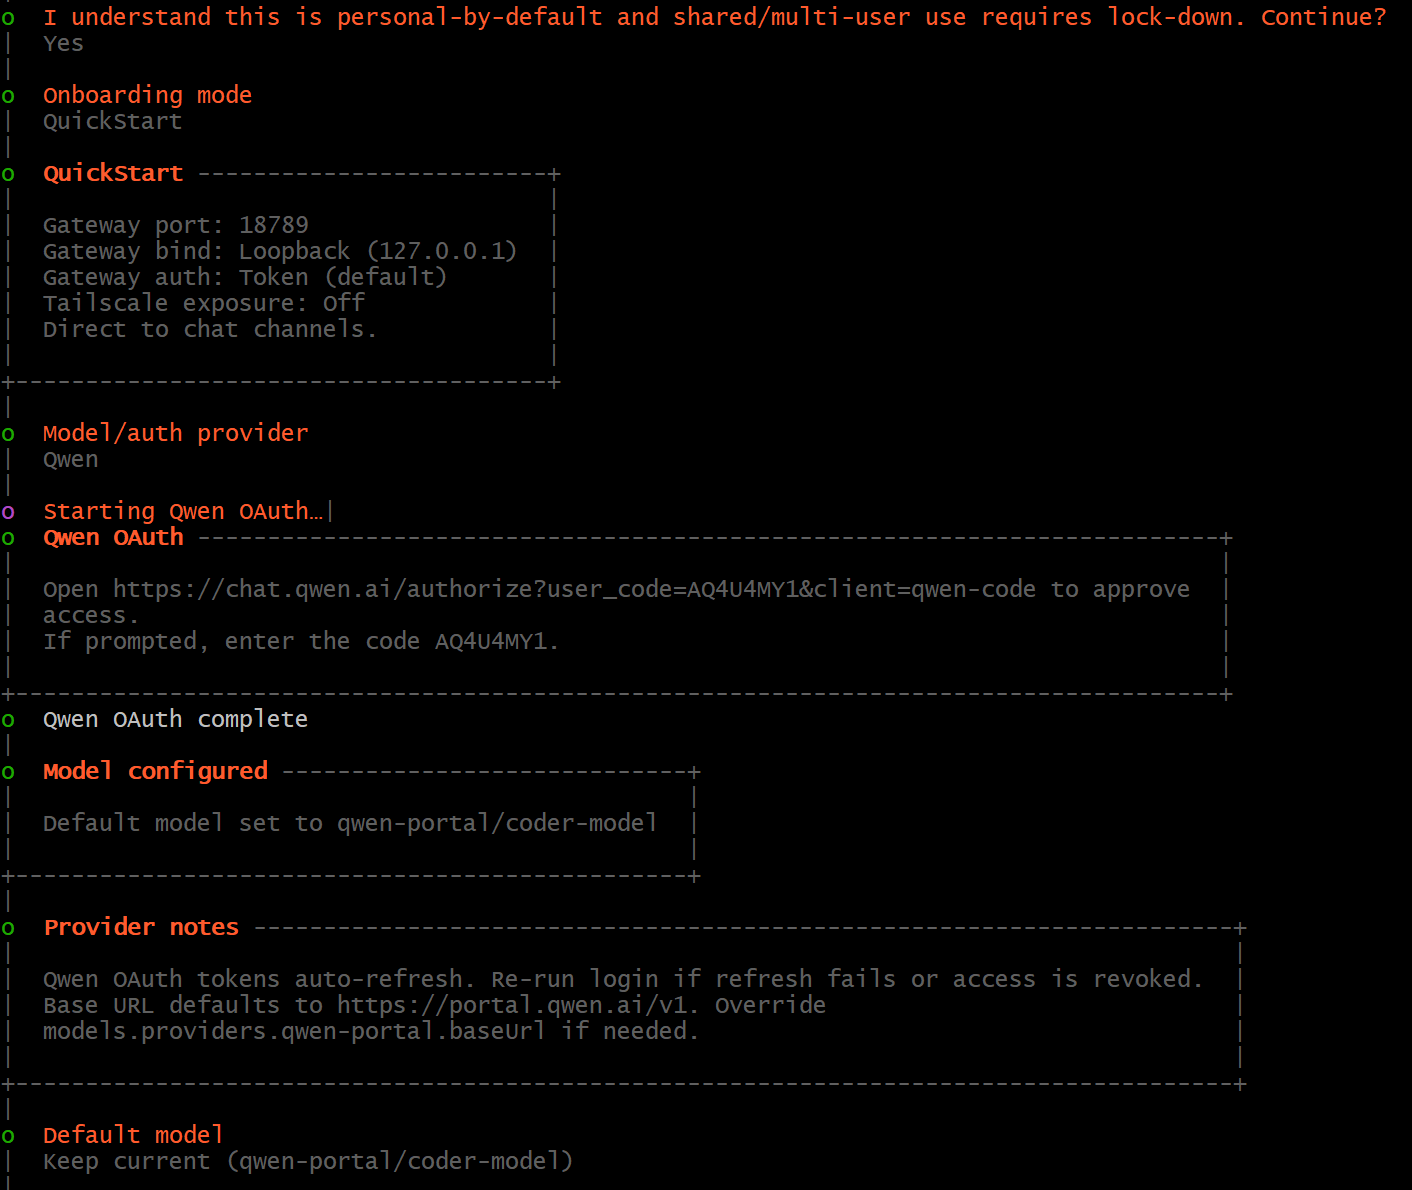
初始化配置(键盘左右键做选择) 1、我已理解:OpenClaw 默认是“个人模式”,如果用于共享或多用户环境,需要额外的安全锁定措施。是否继续?
1 2 3 * I understand this is personal-by-default and shared/multi-user use requires lock-down. Continue? | Yes / > No Yes
2、新手引导模式
引导安装模式
> 快速开始(稍后可以通过 openclaw configure 再配置详细参数)
手动配置
1 2 3 4 5 * Onboarding mode | > QuickStart (Configure details later via openclaw configure.) | Manual — QuickStart
3、模型提供商选择
1 2 3 4 5 6 7 8 9 10 11 12 13 14 15 16 17 18 19 20 21 22 23 24 25 26 27 28 29 30 31 * Model/auth provider | > OpenAI (Codex OAuth + API key) | Anthropic | Chutes | vLLM | MiniMax | Moonshot AI (Kimi K2.5) | Google | xAI (Grok) | Mistral AI | Volcano Engine | BytePlus | OpenRouter | Kilo Gateway | Qwen | Z.AI | Qianfan | Copilot | Vercel AI Gateway | OpenCode Zen | Xiaomi | Synthetic | Together AI | Hugging Face | Venice AI | LiteLLM | Cloudflare AI Gateway | Custom Provider | Skip for now — Qwen
4、默认模型选择
qwen-portal → 千问服务入口
coder-model → 用于写代码、推理、Agent任务
vision-model → 用于图片识别
而 OpenClaw 默认 Agent 需要的是 coder-model 。
1 2 3 4 5 6 7 Default model | > Keep current (qwen-portal/coder-model) | Enter model manually | qwen-portal/coder-model | qwen-portal/vision-model — Keep current
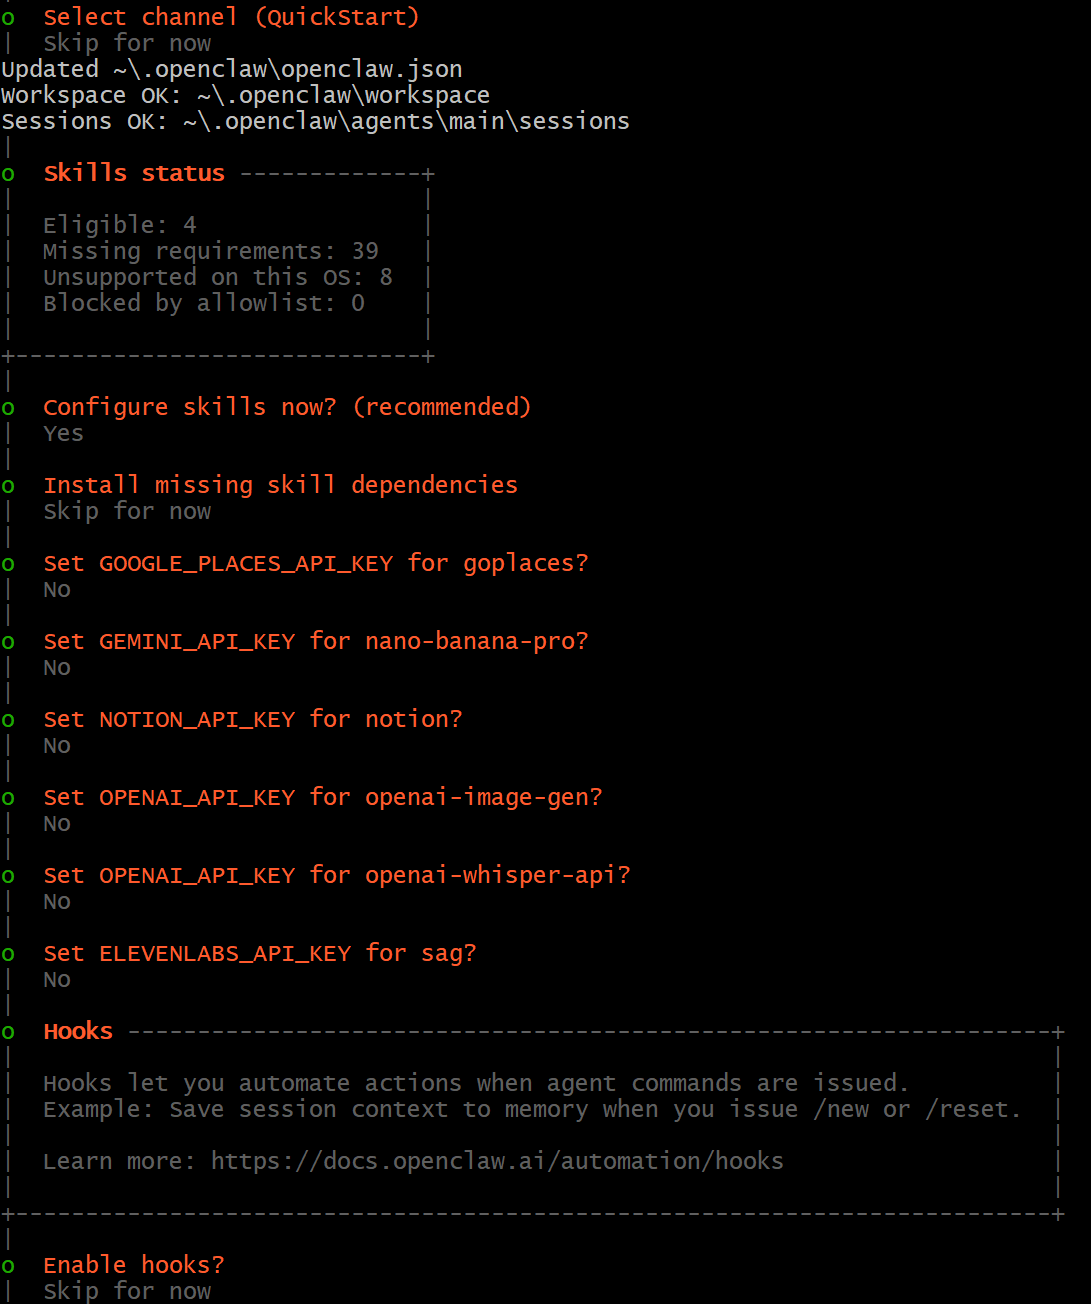
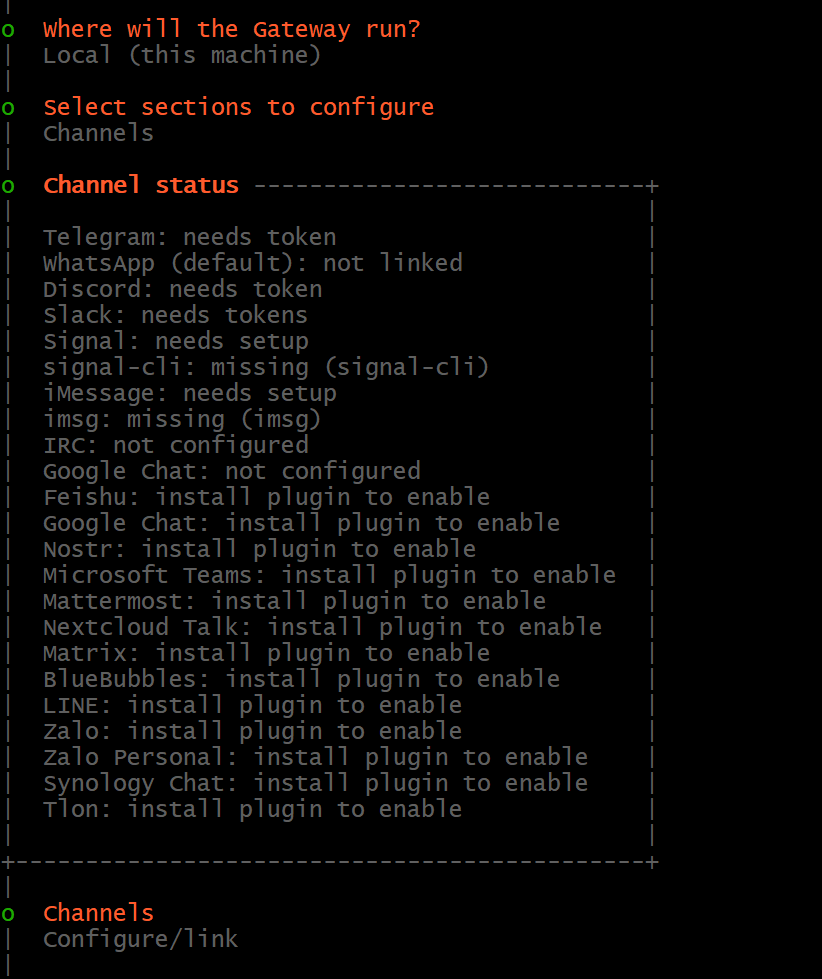
5、选择聊天渠道
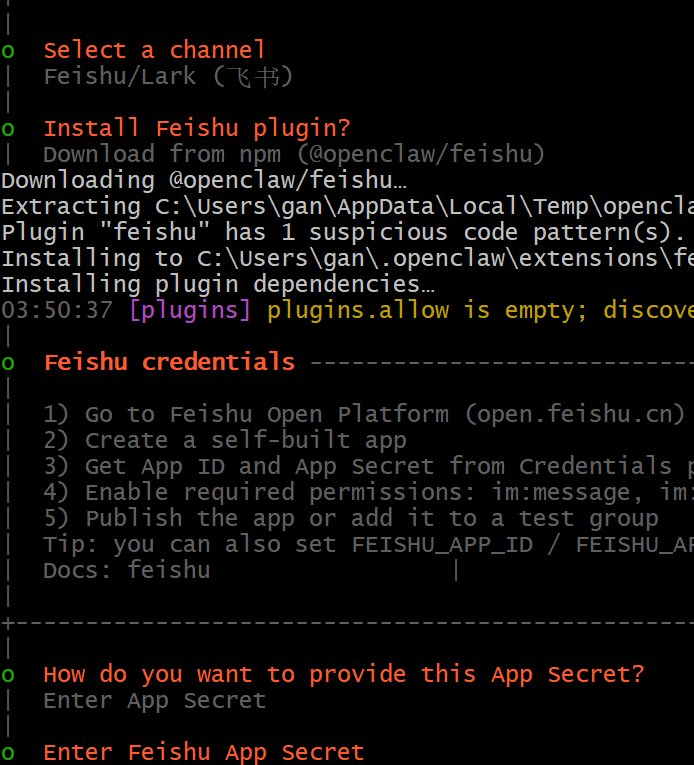
1 2 3 4 5 6 7 8 9 10 11 12 13 14 15 16 17 18 19 20 21 22 23 24 25 26 27 28 29 30 31 32 * Select channel (QuickStart) | Telegram (Bot API) | WhatsApp (QR link ) | Discord (Bot API) | IRC (Server + Nick) | Google Chat (Chat API) | Slack (Socket Mode) | Signal (signal-cli) | iMessage (imsg) | > Feishu/Lark (飞书) (plugin · install) | Nostr (NIP-04 DMs) | Microsoft Teams (Bot Framework) | Mattermost (plugin) | Nextcloud Talk (self-hosted) | Matrix (plugin) | BlueBubbles (macOS app) | LINE (Messaging API) | Zalo (Bot API) | Zalo (Personal Account) | Synology Chat (Webhook) | Tlon (Urbit) | Skip for now — Feishu/Lark (飞书) * Install Feishu plugin? | > Download from npm (@openclaw/feishu) | Use local plugin path | Skip for now — Download from npm
6、输入飞书的账号的密码
你希望通过哪种方式提供该 App Secret(应用密钥)
输入 App Secret(将凭据直接存储在 OpenClaw 配置中)
使用外部密钥管理工具
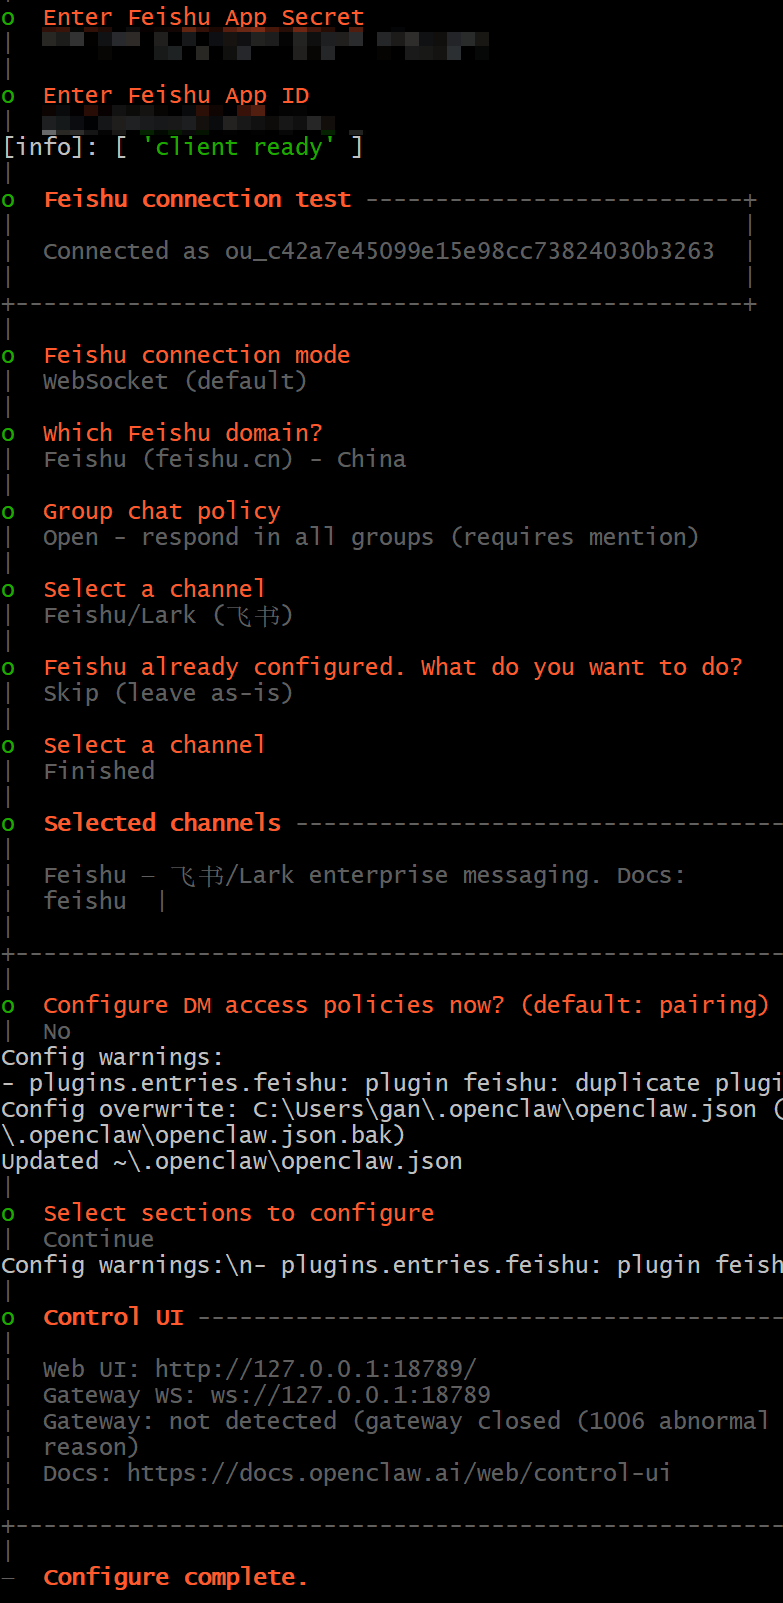
1 2 3 4 5 6 7 * How do you want to provide this App Secret? | > Enter App Secret (Stores the credential directly in OpenClaw config) | Use external secret provider — Enter App Secret (推荐,适合绝大多数情况) 飞书配置如上所示
7、飞书连接模式
1 2 3 4 5 * Feishu connection mode | > WebSocket (default) | Webhook — WebSocket
8、domain
1 2 3 o Which Feishu domain? | Feishu (feishu.cn) - China
9、群组聊天规则
允许在所有群组中交互
1 2 3 4 5 6 * Group chat policy | Allowlist - only respond in specific groups | > Open - respond in all groups (requires mention) | Disabled - don't respond in groups — Open - respond in all groups (requires mention)
10、搜索服务提供商
Perplexity 搜索(结构化结果 · 支持域名 / 语言 / 时间过滤)
这些搜索基本都需要 API Key ,先跳过
1 2 3 4 5 6 7 8 9 * Search provider | > Perplexity Search (Structured results · domain/language/freshness filters) | Brave Search | Gemini (Google Search) | Grok (xAI) | Kimi (Moonshot) | Skip for now — Skip for now
11、skill选择
合格可用的:9个
缺少依赖的:38个
当前操作系统不支持:8个
被白名单限制:0 个
1 2 3 4 5 6 7 8 9 10 11 12 13 o Skills status -------------+ | | | Eligible: 9 | | Missing requirements: 38 | | Unsupported on this OS: 8 | | Blocked by allowlist: 0 | | | +-----------------------------+ | * Configure skills now? (recommended) | > Yes / No —
12、技能表
1 2 3 4 5 6 7 8 9 10 11 12 13 14 15 16 17 18 19 20 21 22 23 24 25 26 27 28 29 * Install missing skill dependencies | [•] Skip for now (Continue without installing dependencies) | [ ] 🔐 1password 账号 / 服务管理。自动读取账号密码,适合企业自动化。 | [ ] 📰 blogwatcher 网络 / 信息获取。监控博客 RSS,自动抓取更新。例如监控 AI 博客更新 | [ ] 🫐 blucli | [ ] 📸 camsnap 调用电脑摄像头拍照 | [ ] 🧩 clawhub openclaw 官方插件市场 | [ ] 🎛️ eightctl openclaw内部控制工具 | [ ] ♊️ gemini 用于接入:Google Gemini API。用于推理和问答,需要gemini的api key | [ ] 🧲 gifgrep | [ ] 🐙 github Agent 可以:创建 repo,提交代码,查看 PR,查 issue。但是需要github token | [ ] 🎮 gog 可以用来访问GOG游戏库 | [ ] 📍 goplaces 作用:地点查询,地址 / 地图信息。类似于Google Maps API。 | [ ] 📧 himalaya | [ ] 📦 mcporter | [ ] 📄 nano-pdf 可以处理pdf,主要功能:解析、提取文本、总结 | [ ] 💎 obsidian 可以让agent操作obsidian笔记库,比如写或者搜索笔记 | [ ] 🎙️ openai-whisper 作用:语音转文字。需要:OpenAI 或本地 whisper。 | [ ] 💡 openhue | [ ] 🧿 oracle 作用:访问 Oracle 数据库。,企业系统才会使用 | [ ] 🛵 ordercli 作用是订单管理CLI,一般是企业api | [ ] 🗣️ sag | [ ] 🌊 songsee 音乐查询 | [ ] 🔊 sonoscli 控制sonos音响 | [ ] 🧾 summarize 作用:Agent 自动:总结文章,总结网页,总结文本 | [ ] 📱 wacli 控制WhatsApp | [ ] 𝕏 xurl 解析 X(Twitter)链接,获取推文信息 — Skip for now
13、不设置skill的api key
1 2 3 4 5 6 7 8 9 10 11 12 13 14 15 16 17 18 19 o Set GOOGLE_PLACES_API_KEY for goplaces? | No | o Set GEMINI_API_KEY for nano-banana-pro? | No | o Set NOTION_API_KEY for notion? | No | o Set OPENAI_API_KEY for openai-image-gen? | No | o Set OPENAI_API_KEY for openai-whisper-api? | No | o Set ELEVENLABS_API_KEY for sag? | No
14、hooks
1 2 3 4 5 6 7 8 * Enable hooks? | [•] Skip for now | [ ] 🚀 boot-md | [ ] 📎 bootstrap-extra-files | [ ] 📝 command-logger | [ ] 💾 session-memory — Skip for now
15、完成预设置
新手引导完毕。控制面板已打开;请保持这个浏览器页面,用它来控制 OpenClaw。
已经完成了:pnpm openclaw onboard –install-daemon(初始化设置,安装后台服务daemon,启动控制台网页)。openClaw已经在运行了
启动开发模式 重启打开的命令 1 2 3 4 5 pnpm gateway:watch 启动openclaw后端服务 pnpm ui:dev 启动dashboard控制界面,先执行pnpm ui:build构建ui所学依赖,# 首次运行时自动安装 UI 依赖
权限问题 查看项目的配置文件所在位置 查看网关端口 1 openclaw config get gateway.port
查看代理列表 1 openclaw config get agents.list
查看工具配置 1 openclaw config get tools
查看渠道配置(飞书) 1 openclaw config get channels
1 2 3 4 5 6 7 8 9 10 11 12 13 14 openclaw config set tools.profile "full" openclaw config set agents.list[0].tools.profile "full" openclaw config get agents.list openclaw config set agents.list[1].tools.profile "coding" openclaw gateway restart
其他权限修改 1 2 3 4 5 6 7 8 9 10 11 openclaw config set tools.profile "coding" openclaw config set tools.profile "messaging" openclaw config set tools.profile "minimal" openclaw gateway restart
精细控制 allow/deny 列表 1 2 3 4 5 6 7 8 openclaw config set tools.allow '["exec", "browser", "read", "write"]' openclaw config set tools.deny '["exec", "process"]' openclaw config set tools.allow '["group:runtime", "group:fs"]'
部署在ubuntu系统 安装nvm 升级 Node.js 版本有可能影响已经部署的其他项目,尤其是如果这些项目依赖于较旧版本的 Node.js 时。为了确保升级后不影响其他项目,可以用docker或者nvm。
使用 Node Version Manager (nvm) 进行版本管理
安装 nvm 通过以下命令安装 Node Version Manager(nvm):
1 curl -o- https://raw.githubusercontent.com/nvm-sh/nvm/v0.39.3/install.sh | bash
安装和使用不同版本的 Node.js: 使用 nvm 管理不同版本的 Node.js。你可以根据项目需求切换版本:
1
2
nvm install 22 nvm use 22
验证版本 :在当前终端里直接启动 Agent 优点:
不需要浏览器
服务器环境最稳定
日志直接可见
官方推荐
这是 服务器部署最标准方式 。
1 Hatch in TUI (recommended)
正确的服务器运行方式(必须) 不要直接运行:pnpm gateway:watch
而是先启动 tmux
tmux 或 screen 是最常用的 会话保持工具
安装 tmux 创建会话 启动 OpenClaw 退出但不关闭 1 2 3 4 5 6 7 8 9 按: Ctrl + B 然后 D 会看到: [detached from 0] 说明: OpenClaw 在后台运行了。
重新进入 pm2代替pnpm gateway:watch 1 2 3 4 5 6 7 8 9 10 11 12 13 14 15 16 17 18 19 20 21 先确认 .openclaw 是否存在 ls -a /root修改配置文件/root/.openclaw/config.json nano /root/.openclaw/config.json { "gateway" : { "port" : 18789, "mode" : "0.0.0.0" "bind" : "0.0.0.0" , } } 重启服务 pm2 restart openclaw 确认监听地址 ss -tlnp | grep 18791
需要给 gateway 显式传入 host 参数 。
1
2
cd /home/projects/openclawpm2 start scripts/run-node.mjs --name openclaw -- gateway --host 0.0.0.0
SSH 端口转发 1 2 3 4 5 gitbash执行: ssh -L 18789:localhost:18789 root@47.115.72.68 然后浏览器打开: http://localhost:18789
``