报错解决
Failed to build <code>litellm==1.92.0</code>
报错日志:
PS E:\projects\code\GraphRAG\IndexG\graphrag-main\graphrag-main> uv run pip list
  × Failed to build <code>litellm==1.92.0</code>
  ├─▶ The build backend returned an error
  ╰─▶ Call to <code>maturin.build_wheel</code> failed (exit code: 1)

      [stdout]
      Running <code>maturin pep517 build-wheel -i C:\Users\VT-1222\AppData\Local\uv\cache\builds-v0\.tmpihsjO4\Scripts\python.exe --compatibility off</code>
      cargo 1.98.0 (797e8a9bc 2026-08-05)
      Rust not found, installing into a temporary directory

      [stderr]
      Python reports platform: win-amd64
      Computed rustc target triple: x86_64-pc-windows-msvc
      Installation directory: C:\Users\VT-1222\AppData\Local\puccinialin\puccinialin\Cache
      Rustup already downloaded
      Installing rust to C:\Users\VT-1222\AppData\Local\puccinialin\puccinialin\Cache\rustup
      warn: It looks like you have an existing rustup settings file at:
      warn: C:\Users\VT-1222\AppData\Local\puccinialin\puccinialin\Cache\rustup\settings.toml
      warn: Rustup will install the default toolchain as specified in the settings file,
      warn: instead of the one inferred from the default host triple.
      warn: installing msvc toolchain without its prerequisites
      info: profile set to minimal
      info: setting default host triple to x86_64-pc-windows-msvc
      warn: Updating existing toolchain, profile choice will be ignored
      info: syncing channel updates for stable-x86_64-pc-windows-msvc
      info: default toolchain set to stable-x86_64-pc-windows-msvc
      Checking if cargo is installed
      🍹 Building a mixed python/rust project
      🔗 Found pyo3 bindings
      🐍 Found CPython 3.11 at C:\Users\VT-1222\AppData\Local\uv\cache\builds-v0\.tmpihsjO4\Scripts\python.exe
      📡 Using build options bindings from pyproject.toml
         Compiling proc-macro2 v1.0.106
         Compiling quote v1.0.46
         Compiling target-lexicon v0.12.16
         Compiling icu_properties_data v2.2.0
         Compiling httparse v1.10.1
         Compiling icu_normalizer_data v2.2.0
         Compiling libc v0.2.186
         Compiling zerocopy v0.8.52
         Compiling ring v0.17.14
         Compiling generic-array v0.14.7
         Compiling serde_core v1.0.228
         Compiling rustls v0.23.41
         Compiling subtle v2.6.1
         Compiling tracing v0.1.44
         Compiling rand_core v0.6.4
         Compiling serde v1.0.228
         Compiling fnv v1.0.7
         Compiling tower-service v0.3.3
         Compiling zmij v1.0.21
         Compiling indexmap v2.14.0
      error: linker <code>link.exe</code> not found
        |
        = note: program not found

      note: the msvc targets depend on the msvc linker but <code>link.exe</code> was not found

      note: please ensure that Visual Studio 2017 or later, or Build Tools for Visual Studio were installed with the Visual C++ option

      note: VS Code is a different product, and is not sufficient

      error: could not compile <code>icu_normalizer_data</code> (build script) due to 1 previous error
      warning: build failed, waiting for other jobs to finish...
      error: could not compile <code>icu_properties_data</code> (build script) due to 1 previous error
      error: could not compile <code>quote</code> (build script) due to 1 previous error
      error: could not compile <code>generic-array</code> (build script) due to 1 previous error
      error: could not compile <code>rustls</code> (build script) due to 1 previous error
      error: could not compile <code>proc-macro2</code> (build script) due to 1 previous error
      error: could not compile <code>libc</code> (build script) due to 1 previous error
      error: could not compile <code>serde_core</code> (build script) due to 1 previous error
      error: could not compile <code>httparse</code> (build script) due to 1 previous error
      error: could not compile <code>zmij</code> (build script) due to 1 previous error
      error: could not compile <code>zerocopy</code> (build script) due to 1 previous error
      error: could not compile <code>serde</code> (build script) due to 1 previous error
      error: could not compile <code>target-lexicon</code> (build script) due to 1 previous error
      💥 maturin failed
        Caused by: Failed to build a native library through cargo
        Caused by: Cargo build finished with "exit code: 101": `"cargo" "rustc" "--message-format" "json-render-diagnostics" "--manifest-path"
      "C:\\Users\\VT-1222\\AppData\\Local\\uv\\cache\\sdists-v9\\pypi\\litellm\\1.92.0\\zmDWkBwqJ4Yj1g_Z\\src\\litellm-rust\\crates\\python-bridge\\Cargo.toml" "--release"
      "--lib"`
      Error: command ['maturin', 'pep517', 'build-wheel', '-i', 'C:\\Users\\VT-1222\\AppData\\Local\\uv\\cache\\builds-v0\\.tmpihsjO4\\Scripts\\python.exe', '--compatibility',
      'off'] returned non-zero exit status 1

hint: <code>litellm</code> (v1.92.0) was included because <code>graphrag-monorepo</code> (v0.0.0) depends on <code>graphrag</code> (v3.1.1) which depends on <code>graphrag-llm</code> (v3.1.1) which depends on <code>litellm</code>
hint: Build failures usually indicate a problem with the package or the build environment
原因分析:
error: linker <code>link.exe</code> not found
问题非常明确了:litellm==1.92.0 在 Windows 上无法编译,因为缺少 MSVC 链接器(link.exe)。
而 graphrag 依赖 graphrag-llm,graphrag-llm 又依赖 litellm==1.92.0,所以整个安装卡住了。
根本原因
litellm 从某个版本开始,其核心组件用 Rust 编写,安装时需要编译。而编译需要:
Rust 工具链(uv 会自动临时安装,已经做到了)
MSVC 链接器 link.exe(你的系统里没有)
所以即使 Rust 装好了,没有 MSVC 链接器,仍然无法完成编译。
解决办法:安装 MSVC 编译器(推荐,一劳永逸)
这是最彻底的解决方法。安装后,以后所有需要编译的 Python 包都能正常安装了。
步骤:
下载 Visual Studio Build Tools 2022:
直接下载链接:https://aka.ms/vs/17/release/vs_BuildTools.exe
或访问官网:https://visualstudio.microsoft.com/downloads/#build-tools-for-visual-studio-2022
运行安装程序,在"工作负载"选项卡中,勾选:
使用 C++ 的桌面开发(Desktop development with C++)
点击"安装",等待完成(可能需要 2-5GB 磁盘空间)
重启终端(重要!),然后重新执行命令
正文目录
- GraphRAG 深度剖析之原理 & 快速实践
- GraphRAG 深度剖析之 Index 流程详解
- GraphRAG 深度剖析之 Query 流程详解
- GraphRAG 深度剖析之源码二次开发优化
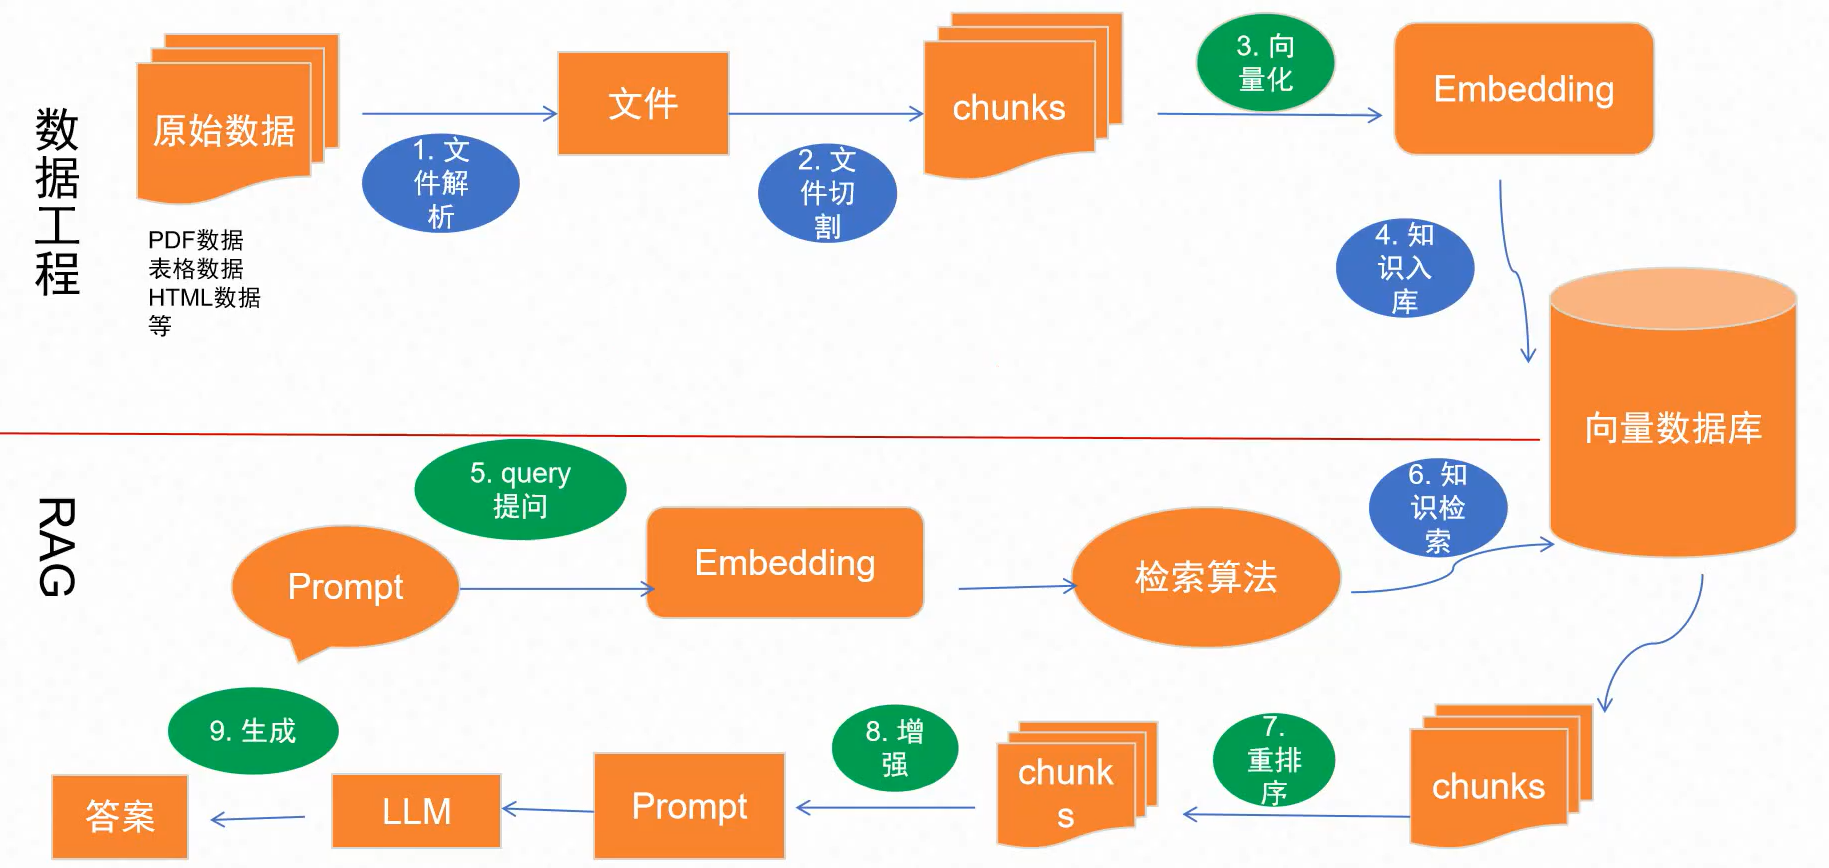
一、RAG原理
I 经典RAG实现流程
II 什么是知识图谱
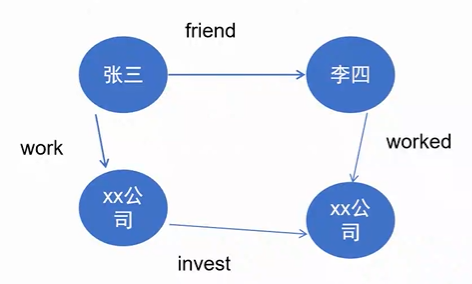
- 是一个存储信息的方法
- 描述的是事实
- 核心表达是实体和关系
- 可以有多种实体,多种关系
III GraphRAG 产品对比
| 编号 | 项目名 | 特色 | 开源地址 | Star 数 |
|---|---|---|---|---|
| 1 | Microsoft GraphRAG | 一个能够将知识图谱和 RAG 结合起来的数据工作流和转换工具,可以提供数据处理,检索问答能力,目前实测准确率最好,不过成本高,社区搜索速度慢。 | https://github.com/microsoft/graphrag | 24.7K |
| 2 | LightRAG | 一个轻量级的 RAG 框架,支持图增强文本索引、增量更新算法等,比 Microsoft GraphRAG 更适合个人使用,成本相对较低。 | https://github.com/HKUDS/LightRAG | 15.5k |
| 3 | Fast‑GraphRAG | 更低延迟的 GraphRAG 实现,动态数据生成和增量更新等,成本约为 Microsoft GraphRAG 的 1/6。 | https://github.com/circlemind‑ai/fast‑graphrag | 3.2k |
IV GraphRAG 环境部署(Microsoft GraphRAG)
主要的任务:创建索引+检索
注意:破折号 –,必须是英文的半角符号,而不是中文的全角符号。
| 核心步骤 | 操作命令 |
|---|---|
| 1. 创建虚拟环境 | 命令1:conda create -n graphrag python=3.11 命令2:conda activate graphrag |
| 2. 安装依赖 | 命令1:pip install graphrag 命令2:pip show graphrag |
| 3. 命令测试 | graphrag –help |
1、所有命令和选项:
graphrag --help用法: graphrag [选项] 命令 [参数]…
比如:graphrag query –method global "王进是谁?"
比如:graphrag –help
GraphRAG:一个基于图的检索增强生成(RAG)系统。
1.1 选项
–install-completion 为当前 shell 安装自动补全。
–show-completion 显示当前 shell 的补全脚本,以便复制它或自定义安装。
–help 显示此消息并退出。
1.2 命令:
init: 生成默认配置文件。
index: 构建知识图谱索引。
update: 更新现有的知识图谱索引。
query: 查询知识图谱索引。
prompt-tune: 使用您自己的数据生成自定义 graphrag 提示词(即自动模板化)。
2、“查询” 命令和选项:
graphrag query --help2.1 用法: graphrag query [选项] {查询}
| 参数 | 类型 | 变量值 |
|---|---|---|
| query | <字符串> | 要查询的问题。[必需填] |
2.2 选项
| 选项 | 简写 | 值 | 描述 |
|---|---|---|---|
| –method | -m | local、global、drift、basic | 要使用的查询算法。 |
1、查找依赖的参数
进入源码: https://github.com/microsoft/graphrag ,找到DEVELOPING.md文件,可以看到所需的python的版本号

2、安装conda
2.1 安装前准备
更新系统包并安装必要依赖:
sudo apt update && sudo apt install wget bzip2 -y2.2 下载 Miniconda 安装脚本
清华大学镜像站:
wget https://mirrors.tuna.tsinghua.edu.cn/anaconda/miniconda/Miniconda3-latest-Linux-x86_64.sh或者官方源:
wget https://repo.anaconda.com/miniconda/Miniconda3-latest-Linux-x86_64.sh2.3 运行安装脚本
bash Miniconda3-latest-Linux-x86_64.sh2.4 激活 Conda
安装完成后,使配置生效:
source ~/.bashrc2.5 验证安装
conda --version2.6 配置国内镜像源(加速后续使用)
安装成功后,立即配置 .condarc 文件,避免以后下载包慢:
cat << 'EOF' > ~/.condarc
channels:
  - defaults
show_channel_urls: true
default_channels:
  - https://mirrors.tuna.tsinghua.edu.cn/anaconda/pkgs/main
  - https://mirrors.tuna.tsinghua.edu.cn/anaconda/pkgs/r
custom_channels:
  conda-forge: https://mirrors.tuna.tsinghua.edu.cn/anaconda/cloud
  pytorch: https://mirrors.tuna.tsinghua.edu.cn/anaconda/cloud
EOF
3、安装环境
- 创建虚拟环境
conda create -n graphrag python=3.11conda activate graphrag- 安装依赖
pip install graphragpip show graphrag- 命令测试
graphrag --helpV RAG原始文本数据准备
cd到本地存放数据文件的目录
scp book.txt root@112.74.108.238:/opt/KG/VI GraphRAG核心参数配置

1、执行初始化命令
graphrag init --root ./其中 –root 参数用于指定生成的配置文件的存储路径,./ 表示当前目录。
input:里面放,原始的文本数据文件
settings.yaml:主配置文件,包含 GraphRAG 从索引构建到检索的设置;
.env:环境变量文件。里面主要存储的是 API_KEY 密钥等敏感信息,在 settings.yaml 文件中引用;
prompts/:提示词文件夹。它包含 GraphRAG 使用的默认提示;
2、修改.env 参数
vi .env填写.env 文件中的 GRAPHRA_API_KEY
3、修改 settings.yaml
vim settings.yaml填写对应参数信息,如果没有 api_base 这个参数,就自己去补充
| 参数 | 描述 |
|---|---|
| api_base | 请求某个模型调用 REST API 的 Endpoint |
| api_key | 作为变量,引用 .env 文件中的 GRAPHRA_API_KEY |
| encodeing_model | 设置编码模型 |
| model | 请求某个模型调用 REST API 对应的模型名称 |
VI GraphRAG 核心命令快速体验
1、构建索引
cd /opt/KG
如果长期不打印日志,就代表settings配置文件有问题,去修改和检查。
graphrag index --root ./会按照工作流去完成向量化和索引工作:
成功连接:
Workflow complete: generate_text_embeddings
Pipeline complete
并且相关文件被存放到output文件夹中
2、内容查询
graphrag query --root . --method global 文档里面涉及几个人物?二、GraphRAG-Index流程讲解
I Microsoft GraphRAG 源码阅读环境构建
1. 下载源码
可以直接到:https://github.com/microsoft/graphrag 手动下载
也可以基于 git 下载:git clone https://github.com/microsoft/graphrag.git
2 控制台报错:Set-ExecutionPolicy -Scope CurrentUser -ExecutionPolicy RemoteSigned
2.1 解除锁定(vscode终端调用powershell,但是windows的powershell默认不让执行任何脚本)
2.2 报错日志:
PS graphrag-main> ..venv\Scripts\Activate.ps1
..venv\Scripts\Activate.ps1 : 无法加载文件 graphrag-main.venv\Scripts\activate.ps1,因为在此系统上禁止运行脚本。有关详细信息,请参阅 https:/go.microsof
t.com/fwlink/?LinkID=135170 中的 about_Execution_Policies。
所在位置 行:1 字符: 1
- ..venv\Scripts\Activate.ps1
-
+ CategoryInfo          : SecurityError: (:) [],PSSecurityException
+ FullyQualifiedErrorId : UnauthorizedAccess
2.3 命令
查看当前的生效策略:(如果显示 Restricted,说明已恢复为 Windows 默认的完全限制状态。)
Get-ExecutionPolicy如果想查看所有范围的策略详情:
Get-ExecutionPolicy -List输出示例:
| Scope | ExecutionPolicy |
|---|---|
| MachinePolicy | Undefined |
| UserPolicy | Undefined |
| Process | RemoteSigned |
| CurrentUser | Undefined |
| LocalMachine | Undefined |
2.4 -ExecutionPolicy(常用:RemoteSigned)
Restricted
最严格的策略。只允许执行单个命令,禁止运行所有脚本文件(包括 .ps1、.psm1 等)。
Windows 客户端电脑的默认策略。适合对安全性要求极高、不需要运行脚本的环境。
AllSigned
要求所有脚本和配置文件都必须由受信任的发布者进行数字签名才能运行,包括你在本地编写的脚本。
对安全要求非常严格的环境,所有脚本的来源都必须得到验证。
RemoteSigned
本地创建的脚本可以直接运行,无需签名。但从网络(如互联网、电子邮件)下载的脚本,则必须有受信任的发布者的数字签名。
Windows 服务器电脑的默认策略。这是许多开发者环境常用的策略,兼顾了便利性与安全性。
Unrestricted
未签名的脚本也可以运行。不过,在运行从本地 Intranet 区域以外来源获取的脚本时,会发出警告提示。
macOS 和 Linux 等非 Windows 平台的默认策略(无法更改)。
Bypass
没有任何限制。不会阻止任何脚本执行,也不会发出任何警告或提示。
适用于 PowerShell 脚本被嵌入到更大应用程序中的场景,或者作为程序的基础,由程序自身管理安全模型。
Undefined
表示当前作用域内没有设置任何策略。如果所有作用域都是 Undefined,那么系统会回退使用默认策略:Windows 客户端为 Restricted,Windows 服务器为 RemoteSigned。
用于移除某个特定作用域的策略设置。
Default
不是一个可设置的独立策略,它代表系统的默认策略。其实际生效的策略是:Windows 客户端为 Restricted,Windows 服务器为 RemoteSigned。
用于将策略“重置”为系统默认值。
conda(可不做)
conda create --name graph python=3.11conda activate graph3. 构建uv环境
先检查是否已经安装过uv了
uv --version没有就执行命令安装
pip install uv虚拟环境迁移
uv sync4. 安装poetry依赖(如果选择了uv工具,则跳过这一步)
Microsoft GraphRAG 项目依赖是通过 poetry 来管理的,因此需要先安装 poetry。安装命令如下:
pip install poetry安装完 poetry 后,就可以使用 poetry 来安装 Microsoft GraphRAG 项目依赖了。安装命令如下:
poetry install5. 初始化配置文件
5.1执行命令
poetry run poe init --root ./或者(推荐)
uv run poe init --root ./会生成对应的配置文件和目录:
其中 –root 参数用于指定生成的配置文件的存储路径,./ 表示当前目录。
目录:
input:里面放,原始的文本数据文件
prompts/:提示词文件夹。它包含 GraphRAG 使用的默认提示;
文件:
settings.yaml:主配置文件,包含 GraphRAG 从索引构建到检索的设置;
.env:环境变量文件。里面主要存储的是 API_KEY 密钥等敏感信息,在 settings.yaml 文件中引用;
5.2 填写构建索引的素材、模型信息
1、input目录下要放好 “原始文本数据” 以供做 “索引” 操作
2、.env文件里面的变量,GRAPHRAG_API_KEY=,要设置成自己的可连通的秘钥
3、settings.yaml里面的字段要修改成下面的内容:
completion_models:
  default_completion_model:
    model_provider: openai
    model: Qwen3.6-35B-A3B
    auth_method: api_key # or azure_managed_identity
    api_key: ${GRAPHRAG_API_KEY} # set this in the generated .env file, or remove if managed identity
    api_base: http://ai-network-qwen.top/v1
    retry:
      type: exponential_backoff

embedding_models:
  default_embedding_model:
    model_provider: openai
    model: /mnt/data/Qwen3-Embedding-8B
    auth_method: api_key
    api_key: ${GRAPHRAG_API_KEY}
    api_base: http://ai-network-qwen.top/embedding/v1
    retry:
      type: exponential_backoff
6. 配置参数:跟之前一样
7. 数据准备:跟之前一样
8. 构建索引
poetry构建索引
poetry run poe index --root ./或者(uv构建索引)
uv run poe index --root ./执行完,会在根目录下生成一个目录:logs
II 文件解读
1、索引实现步骤
构建索引的过程是一个工作流,每一个节点如下:
| Step | Node | 解释 |
|---|---|---|
| 1 | create_base_text_units | 拆解为文本单元 |
| 2 | create_final_documents | 合并知识,生成最终文件 |
| 3 | extract_graph | 抽取图谱 |
| 4 | finalize_graph | 合并图谱 |
| 5 | create_communities | 创建社区分簇 |
| 6 | create_final_text_units | 把社区和原文本关联起来,生成最后的文本单元 |
| 7 | create_community_reports | 创建社区报告 |
| 8 | generate_text_embeddings | 构建文本向量化 |
III 以microsoft graphrag v3.1.2为例,讲解Index过程
1、构建索引命令:uv run poe index –root ./
核心方法路径:graphrag-main\graphrag-main\packages\graphrag\graphrag\cli\main.py
客户端主要的方法:初始化、创建索引、更新索引、提示词调整、查询
@app.command("init")
def _initialize_cli() -> None:
@app.command("index")
def _index_cli() -> None:
@app.command("update")
def _update_cli() -> None:
@app.command("prompt-tune")
def _prompt_tune_cli() -> None:
@app.command("query")
def _query_cli() -> None:
2 初始化源码:
@app.command("init")
def _initialize_cli() -> None:
    """Generate a default configuration file."""
    from graphrag.cli.initialize import initialize_project_at

    initialize_project_at(
        path=root, force=force, model=model, embedding_model=embedding_model
    )
按住from graphrag.cli.initialize import initialize_project_at,跳转到 initialize
看graphrag-main\packages\graphrag\graphrag\cli\initialize.py文件
初始化了文件:settings.yaml、.env
初始化了目录:prompt、input、output
    settings_yaml = root / "settings.yaml"
    if settings_yaml.exists() and not force:
        msg = f"Project already initialized at {root}"
        raise ValueError(msg)

    input_path = (
        root / (graphrag_config_defaults.input_storage.base_dir or "input")
    ).resolve()
    input_path.mkdir(parents=True, exist_ok=True)
    # using replace with custom tokens instead of format here because we have a placeholder for GRAPHRAG_API_KEY that is used later for .env overlay
    formatted = INIT_YAML.replace("<DEFAULT_COMPLETION_MODEL>", model).replace(
        "<DEFAULT_EMBEDDING_MODEL>", embedding_model
    )
    settings_yaml.write_text(formatted, encoding="utf-8", errors="strict")

    dotenv = root / ".env"
    if not dotenv.exists() or force:
        dotenv.write_text(INIT_DOTENV, encoding="utf-8", errors="strict")

    prompts_dir = root / "prompts"
    prompts_dir.mkdir(parents=True, exist_ok=True)

    prompts = {
        "extract_graph": GRAPH_EXTRACTION_PROMPT,
        "summarize_descriptions": SUMMARIZE_PROMPT,
        "extract_claims": EXTRACT_CLAIMS_PROMPT,
        "community_report_graph": COMMUNITY_REPORT_PROMPT,
        "community_report_text": COMMUNITY_REPORT_TEXT_PROMPT,
        "drift_search_system_prompt": DRIFT_LOCAL_SYSTEM_PROMPT,
        "drift_reduce_prompt": DRIFT_REDUCE_PROMPT,
        "global_search_map_system_prompt": MAP_SYSTEM_PROMPT,
        "global_search_reduce_system_prompt": REDUCE_SYSTEM_PROMPT,
        "global_search_knowledge_system_prompt": GENERAL_KNOWLEDGE_INSTRUCTION,
        "local_search_system_prompt": LOCAL_SEARCH_SYSTEM_PROMPT,
        "basic_search_system_prompt": BASIC_SEARCH_SYSTEM_PROMPT,
        "question_gen_system_prompt": QUESTION_SYSTEM_PROMPT,
    }

    for name, content in prompts.items():
        prompt_file = prompts_dir / f"{name}.txt"
        if not prompt_file.exists() or force:
            prompt_file.write_text(content, encoding="utf-8", errors="strict")
3 构建索引
找到_index_cli()方法的内部方法,ctrl+点击index_cli方法跳转到源码。
点击index_cli源码的内部方法:_run_index。
点击_run_index源码的内部方法:build_index。
点击build_index源码的内部方法:create_pipeline(config, method)
可以看到create_pipeline(config, method)源码的内部方法下面有规范的工作流构建流程。
graphrag-main\packages\graphrag\graphrag\index\workflows\factory.py
@app.command("index")
def _index_cli() -> None:
    """Build a knowledge graph index."""
    from graphrag.cli.index import index_cli

    index_cli(
        root_dir=root,
        verbose=verbose,
        cache=cache,
        dry_run=dry_run,
        skip_validation=skip_validation,
        method=method,
    )
流程如下:
graphrag-main\packages\graphrag\graphrag\index\workflows\factory.py
程序会按照cls.pipelines定义的流程去创建output目录下的文件内容
不执行,某个工作流节点,则直接改pipeline的_standard_workflows,注释掉指定的节点
_standard_workflows = [
    "create_base_text_units",
    "create_final_documents",
    "extract_graph",
    "finalize_graph",
    "extract_covariates",
    "create_communities",
    "create_final_text_units",
    "create_community_reports",
    "generate_text_embeddings",
]
4 流程顺序
4.1 下载Parquet Reader
先在vscode中下载Parquet预览插件:Parquet Reader、Parquet Explorer
4.2 load_input_documents 步骤生成的documents.parquet表
源码位置:\graphrag-main\packages\graphrag-input\graphrag_input\input_reader_factory.py
input_type.py:按照文件的格式加载文件
第一步:假设不想它程序识别到csv文件:
| 位置 | 改法 |
|---|---|
| input_type.py:12 | 删掉 Csv = "csv" |
| input_reader_factory.py:64-67 | 删掉 case InputType.Csv 三行 |
以txt格式的文件为例,在创建txt文档的索引的时候,会以id、title、text内容、日期作为数据存储模板schema,返回document格式展示
        text = await self._storage.get(path, encoding=self._encoding)
        document = TextDocument(
            id=gen_sha512_hash({"text": text}, ["text"]),
            title=str(Path(path).name),
            text=text,
            creation_date=await self._storage.get_creation_date(path),
            raw_data=None,
        )
        return [document]
第二步:看加载了哪些文件
流程如下:
graphrag-main\packages\graphrag\graphrag\index\workflows\factory.py
不执行,某个工作流节点,则直接改pipeline的_standard_workflows,注释掉指定的节点,在这里选择全部注释掉,只看加载了哪些文本呢
_standard_workflows = [
    # "create_base_text_units",
    # "create_final_documents",
    # "extract_graph",
    # "finalize_graph",
    # "extract_covariates",
    # "create_communities",
    # "create_final_text_units",
    # "create_community_reports",
    # "generate_text_embeddings",
]
打印,全部加载的文件名
路径:E:\projects\code\GraphRAG\IndexG\graphrag-main\graphrag-main\packages\graphrag-input\graphrag_input\input_reader.py
可以插在第 47 行 files = list(…) 之后:
files = list(self._storage.find(re.compile(self._file_pattern)))
logger.info("Matched %d input files: %s", len(files), files) # ← 插在这里
第三步:修改识别指定格式输入的文件
两种模板file_pattern仅供参考:按照后缀做正则匹配、按照固定格式、长度和后缀
并且还可以选择文件过滤器file_filter
input:
  type: text # [csv, text, json, jsonl]
  file_pattern: ".*\\.csv$$"
  # file_pattern: '^(?P<source>[^/]+)_(?P<year>\d{4})-(?P<month>\d{2})-(?P<day>\d{2})\.txt'
  file_filter:
    year: '2025'
    month: '07'
用构建索引的命令去执行:
uv run poe index --root ./4.3 create_base_text_units 生成 text_units.parquet表
路径:\graphrag-main\packages\graphrag\graphrag\index\workflows\factory.py
作用:
在微软 GraphRAG 的索引流程中,create_base_text_units 这一步的核心作用,就是将原始的长文档,切分成一系列更小、更易于处理的“文本单元”(Text Units)。是整个索引流程的“第一步”。
可在根目录的settings.yaml的chunking字段中定义切割文本的设置
chunking:
  type: tokens
  size: 1200
  overlap: 100
  encoding_model: o200k_base
另外还可以添加:
| 字段名称 | 参数类型 | 描述 |
|---|---|---|
| size | int | 使用的块大小。 |
| overlap | int | 使用的块重叠量。 |
| group_by_columns | list[str] | 用于分块的列,默认是以 id 分组 |
| strategy | ChunkStrategyType | 使用的分块策略。token或者sentence |
| encoding_model | str | 使用的编码模型。 |
| prepend_metadata | bool | 是否在每个块前添加元数据。 |
| chunk_size_includes_metadata | bool | 在最大令牌中是否计算元数据。 |
output目录下会生成text_units.parquet文件,里面会存有按照固定token数切割出来的数据
text_units.parquet 里的 Parquet 是一种专为高效处理大规模数据而设计的列式存储格式,在大数据领域非常流行。
4.4 create_final_documents
合并text_units.parquet和documents.parquet表,生成一个新的documents.parquet表,作用是合并和文本块和文件的信息
合并前:
documents.parquet表的字段:id、text、title、creation_date、raw_data、human_readable_id
合并后:documents.parquet表的字段多了一个text_unit_ids字段,是几串id值,每一串用逗号隔开。最后还有一串时间戳
相当于把文件id和文本块id,都写到一张表里,可以多表查询。
sample = await create_final_documents(
            text_units_table,
            documents_table,
            output_table,
        )
4.5 extract_graph,提取知识图谱
graphrag-main\graphrag-main\packages\graphrag\graphrag\index\workflows\extract_graph.py
settings.yaml文件,按照提示词去给文本块提取出相应的实体和关系,实体包括组织、人、Geographical location地理位置、活动
extract_graph:
  completion_model_id: default_completion_model
  prompt: "prompts/extract_graph.txt"
  entity_types: [organization,person,geo,event]
  max_gleanings: 1
执行完上述内容,记得修改prompts目录下的extract_graph.txt里面的英文,翻译成中文,然后改名为:extract_graph_cn.txt
否则切割的片段都将是英文,并且要修改settings.yaml文件,将实体类型改为中文,entity_types: [机构,人物,地理实体,事件],并且中文类型要和提示词中的一致。
多出两个文件(实体和关系):
entities.parquet
relationships.parquet
想要观察一下extract_graph这一个节点,提取出来的关系和节点,代码在\packages\graphrag\graphrag\index\operations\extract_graph\graph_extractor.py里面的方法:
async def _process_document(self, text, entity_types) -> str:
    ...
        results = response.content          # 第 96 行
    ...
    return results                          # 第 122 行
在第 122 行 return results 前插:
print("大模型提取图谱结果", results)
return results
方法2:解析后的实体/关系(推荐,逐 chunk 看清楚)
operations/extract_graph/extract_graph.py:76-101 的 _run_extract_graph()。第 95-99 行拿到单个 text unit 解析后的两个 DataFrame:
在 return 前插(能看到"每个文本块抽出了哪些实体、哪些关系"):
源代码:
    entities_df, relationships_df = await extractor(
        text,
        entity_types=entity_types,
        source_id=source_id,
    )
    # print("[extract_graph] source_id=%s → 实体 %d 个, 关系 %d 条",source_id, len(entities_df), len(relationships_df),)
    # print(("[extract_graph] entities:\n%s", entities_df.to_string()))
    # print("[extract_graph] relationships:\n%s", relationships_df.to_string())
    return (entities_df, relationships_df)
方法3:
层次 C:合并后的总表(最终结果)
workflows/extract_graph.py:61-78。第 61-75 行拿到合并去重后的总实体/关系表,第 77 行写库前。在下面插:
entities, relationships, raw_entities, raw_relationships = await extract_graph(...)  # 第 61-75

print("=== 合并后总实体数: %d ===", len(entities))        # ← 插这里
print("[extract_graph] 所有实体:\n%s", entities.to_string())
print("[extract_graph] 所有关系:\n%s", relationships.to_string())

await context.output_table_provider.write_dataframe("entities", entities)
整个 extract_graph 节点内部其实是两步:
| 步骤 | 提示词 | 干什么 | 是否关键 |
|---|---|---|---|
| 抽取 | extract_graph_cn.txt | 用 LLM 从文本抽实体+关系+描述 | 关键 |
| 摘要 | summarize_descriptions_cn.txt | 用 LLM 把描述合并精炼成一段 | 辅助 |
所以 summarize_descriptions.txt 也需要做翻译成中文的操作:summarize_descriptions_cn.txt
4.6 finalize_graph
extract_graph 负责"用 LLM 把实体关系抽出来";finalize_graph 负责把抽出来的东西洗成一张干净的、带度数的、可以去聚类和检索的图。缺了它,后面的 create_communities(社区检测)和查询阶段都会因为缺少 degree / id 而跑不起来。
| 动作 | 解决什么问题 |
|---|---|
| 去重 | extract_graph 从多个文本块抽取,同一实体/关系会出现很多次,需要合并成唯一一条 |
| 算 degree / combined_degree | 这是下游 Leiden 社区聚类(cluster_graph 节点)和社区报告的关键输入——图算法的度信息 |
| 分配 id / human_readable_id | 给每个实体、关系一个稳定、可引用的 id,后续社区报告、文本单元、embedding 等都靠这个 id 关联 |
| 定最终列 schema | 用 ENTITIES_FINAL_COLUMNS / RELATIONSHIPS_FINAL_COLUMNS 规范字段,丢弃抽取过程的中间列 |
源码:\graphrag-main\packages\graphrag\graphrag\index\workflows\finalize_graph.py
async def finalize_graph(
    entities_table: Table,
    relationships_table: Table,
) -> dict[str, list[dict[str, Any]]]:
    """Compute degrees and finalize entities and relationships.

    Streams relationship rows to build a degree map without
    materializing a DataFrame, then delegates to the individual
    finalize operations for streaming row-by-row enrichment and
    writing.

    Args
    ----
        entities_table: Table
            Opened table for reading and writing entity rows.
        relationships_table: Table
            Opened table for reading relationships into a DataFrame
            and writing finalized relationship rows.

    Returns
    -------
        dict[str, list[dict[str, Any]]]
            Sample rows keyed by `<code>"entities"</code>` and
            `<code>"relationships"</code>`, up to 5 each.
    """
    degree_map = await _build_degree_map(relationships_table)

    entity_samples = await finalize_entities(entities_table, degree_map)
    relationship_samples = await finalize_relationships(relationships_table, degree_map)

    return {
        "entities": entity_samples,
        "relationships": relationship_samples,
    }
4.7 提取斜变量:extract_covariates
4.8 create_communities ,生成表:communities.parquet
可修改配置信息:默认每个簇最多分十个文本块,超出十个就要多加一个簇
settings.yaml文件:
cluster_graph:
  max_cluster_size: 10
create_communities 一句话概括:用 Leiden 层次聚类算法,把实体关系图自动划分成一组"社区(community)"——这是 GraphRAG 全局检索和社区摘要的核心地基。
核心:Leiden 社区检测
真正的聚类在 cluster_graph.py:86-88:
community_mapping = hierarchical_leiden(
    edge_list, max_cluster_size=max_cluster_size, random_seed=seed
)
它做这些准备(_compute_leiden_communities):
- 把关系表规范成无向图:source/target 排序、去重(drop_duplicates)
- 可选 use_lcc:只保留最大连通分量(stable_lcc)
- 用关系的 weight(抽取时给的强度分)作为边权
- 跑 层次 Leiden,产出多个 level 的社区划分——从细粒度到粗粒度,形成一棵"社区树"
每个社区聚合了什么信息?
得到聚类结果后,create_communities.py:97-192 做了一堆整理:
| 字段 | 含义 |
|---|---|
| entity_ids | 这个社区里所有实体的 id(第 103-111 行) |
| relationship_ids | 社区内部的关系 id(只算 source/target 都在同一社区的边,第 118-141 行) |
| text_unit_ids | 社区涉及的原始文本块(供追溯来源) |
| parent / children | 层次树:父社区 / 子社区(第 164-179 行) |
| size | 社区大小 = 实体数量(第 182 行) |
| title | 自动命名 "Community N" |
| period | 时间戳(增量更新用) |
起到什么作用?这是 GraphRAG 区别于普通 RAG 的关键一步:
把海量实体关系"收拢"成主题簇。抽取阶段可能产出几千上万个实体,社区检测把语义相关的实体聚到一起(比如"三国·何进与宦官"相关实体成一个社区)。
是下一节点 create_community_reports 的输入——对每个社区用 LLM 生成一段"社区摘要",回答"这个社区整体在讲什么"。
是全局检索(global search)的基础——global search 用 map-reduce 遍历社区摘要,得到对整个文档集的宏观理解。
层次化结构(parent/children + level)支持不同粒度的查询:粗粒度社区给你大局观,细粒度社区给你具体细节。
补充:配置在 settings.yaml:93-94 的 cluster_graph.max_cluster_size: 10(限制最大簇大小,Leiden 会把过大的簇继续细分)。
一句话:extract_graph 抽出了实体和关系("图里有什么"),finalize_graph 洗出干净带度数的图,而 create_communities 把这图切成有主题含义的社区块,为后续"社区摘要 + 全局检索"铺路。缺了它,GraphRAG 就退化成只能做局部(local)检索,做不了全局(global)问答。
4.9 create_final_text_units,覆盖文件:text_units.parquet
create_final_text_units 的作用一句话:给 text_units 表"补全反向索引"——让每个文本块能够追溯它关联了哪些实体(entity)、关系(relationship)、声明(covariate)的 id。
核心代码:\graphrag-main\packages\graphrag\graphrag\index\workflows\create_final_text_units.py
放开它(取消注释create_final_text_units)的作用,它把图谱索引从单向变成双向:
| 方向 | 字段 | 谁建的 |
|---|---|---|
| 实体/关系 → 文本块 | text_unit_ids | extract_graph(本来就有) |
| 文本块 → 实体/关系 | entity_ids / relationship_ids | create_final_text_units(这里补) |
放开后,output/text_units.parquet 就带上 entity_ids、relationship_ids、covariate_ids 列。这个完整版 text_units 表是查询阶段的核心数据源——我 grep 到它被这些查询模块直接读取:
- local_search/mixed_context.py(局部检索上下文)
- context_builder/source_context.py(答案的来源引用/溯源)
- drift_search、basic_search、community_context 等
局部检索(local search)时,典型路径是"找到相关实体 → 通过实体的 text_unit_ids 反查文本块 → 再用这里的 entity_ids 组织上下文和来源标注"。所以它直接影响问答时的上下文构建和引用溯源能力。
覆盖前的文件:text_units.parquet有哪些字段
id、human_readable_id、source、target、description、weight、combined_degree、text_unit_ids
覆盖后的文件:text_units.parquet有哪些字段
id、human_readable_id、text、n_tokens、document_id、entity_ids、relationship_ids、covariate_ids
注释掉会失去什么
text_units 表会停留在 create_base_text_units 的原始态:只有 text、n_tokens、document_id,没有 entity_ids / relationship_ids / covariate_ids。
查询阶段凡是依赖这三个反向引用字段的地方会拿不到数据(实体→文本方向不受影响,因为那是 extract 阶段就有的;丢的是文本→实体的反向导航)。
依赖顺序:它需要 extract_graph(产出实体/关系的 text_unit_ids)、finalize_graph(给实体/关系定下最终 id)、以及可选的 extract_covariates(产出 covariates)先跑完。所以它在 pipeline 里必须排在这些之后——你现在的位置(communities 之后)是合理的。
covariate 那步当前也注释了(# "extract_covariates")。create_final_text_units 对 covariate 是有条件处理的(第 32-42 行)——没有 covariates 表时 covariate_ids 就是空列表,不会报错。所以放开 text_units 不必非得先放开 covariates。
一句话总结:放开 create_final_text_units,会补出"文本块 ← 实体/关系/声明"的反向索引,让 text_units.parquet 变成完整可导航的形态,这是后续 local/search 类查询构建上下文与来源引用的基础。
4.10 create_community_reports
create_community_reports 的作用一句话:用 LLM 给上一步聚类出来的每个"社区"写一份结构化报告——把一堆实体/关系,压缩成"这个主题簇到底在讲什么"的自然语言摘要。这是 GraphRAG 全局检索(global search)的核心地基。
整体流程(create_community_reports.py:71-140):
-
给每个社区准备"局部上下文"(第 116-123 行)
用 build_local_context,把每个社区内的实体描述 + 关系描述 +(可选的)声明拼成一段文本,作为 LLM 的输入材料。_prep_nodes/_prep_edges 负责把这些字段填好、缺失值补 "No Description"。 -
按层次用 LLM 生成报告(summarize_communities.py:63-98)
- get_levels 拿到社区的层级(还记得 create_communities 产生的 level/parent 树吗)
- 先给细颗粒社区写报告,再往上聚合:高层的父社区报告会把它子社区的报告当作上下文(build_level_context),形成"自底向上"的多粒度摘要。
-
抽取结构化报告(summarize_communities.py:123-161)
CommunityReportsExtractor 让 LLM 输出带 schema 的报告,每个社区一份:
| 字段 | 含义 |
|---|---|
| title | 报告标题 |
| summary | 社区整体摘要(一段话) |
| full_content | 报告完整文本 |
| findings | 关键发现列表(每条带 explanation + summary) |
| rank / rating | 重要度评分 |
| rating_explanation | 评分理由 |
| level | 所在层级 |
起到什么作用
这是 GraphRAG 闭环里的关键一跳:
- 把"图"变成"可检索的语义摘要"。之前几步产出的是实体/关系/社区这些结构化数据;到这里,每个社区被压成一段自然语言报告。
- 支撑全局检索(global search)。global search 用的是 map-reduce:map 阶段对每份社区报告提取要点,reduce 阶段汇总成最终答案。社区报告就是 global search 吃进去的"知识单元"。没有它,global search 无法工作(只能做 local search)。
- 层次化摘要多粒度。细社区报告聚焦具体主题,父社区报告给出更宏观的视角——所以查询时既能问"某个具体事件"也能问"整份文档集讲了什么大局"。
配置
settings.yaml:103-108:
community_reports:
  completion_model_id: default_completion_model
  graph_prompt: "prompts/community_report_graph.txt"   # ← 当前 graph 流程用的
  text_prompt: "prompts/community_report_text.txt"      # ← fast 流程(text 社区)用的
  max_length: 2000
  max_input_length: 8000
要把两个社区报告文件都翻译换成中文的
graph_prompt: "prompts/community_report_graph_cn.txt" # ← 当前 graph 流程用的
text_prompt: "prompts/community_report_text_cn.txt" # ← fast 流程(text 社区)用的
4.10 generate_text_embeddings(生成向量目录:lancedb)
generate_text_embeddings 是索引的最后一步,作用一句话:调用 embedding 模型,把三类文本转成向量,写进向量数据库(LanceDB),供查询阶段做语义相似度检索。
它向量化了哪三类内容
这是关键,定义在 generate_text_embeddings.py:52-69 的 EMBEDDING_FIELDS 字典:
| 字段名(向量索引) | 来源表 | 转成向量的列 | 内容 |
|---|---|---|---|
| text_unit_text | text_units | text | 原始文本块(切分后的 chunk 原文) |
| entity_description | entities | title_description | 实体「标题:描述」拼接 |
| community_full_content | community_reports | full_content | 社区报告的完整正文 |
每个字段具体向量化的是哪个"列"
- 文本块:text_units 表的 text 字段 —— 就是 create_base_text_units 切出来的、extract_graph 拿去抽实体的那些原始文本。
- 实体:不是某个现成列,而是动态拼出来的 title:description。看 row_transformers.py:92-99:
- 社区报告:community_reports 表的 full_content 字段 —— 就是上一步 create_community_reports 生成的报告完整正文(含 findings)。
用的模型 + 存到哪
模型:settings.yaml:20 的 Qwen3-Embedding-8B(embed_text.embedding_model_id → default_embedding_model)。
目标库:settings.yaml:68-70 的 vector_store: type=lancedb, db_uri=output\lancedb,在里面建三个索引(entity_description、community_full_content、text_unit_text),每个向量的维度 4096(你日志里能看到 vector_size: 4096)。
作用:这三类向量是 local search(局部检索)的核心底座
| 向量 | 查询时用来找什么 |
|---|---|
| entity_description | 用问题语义找到相关实体 |
| text_unit_text | 找到相关文本块(答案的依据原文) |
| community_full_content | 找到相关社区报告(更高层的语义上下文) |
检索时的典型路径:问题 → 向量相似度排出相关实体/文本块/社区 → 召回它们的原文 → 拼成上下文喂给 LLM 生成答案。
一句话总结:generate_text_embeddings 把「文本块原文、实体标题+描述、社区报告正文」这三样东西用嵌入模型转成向量存进 LanceDB,是整个索引流水线的收尾——至此,前面对文档的切分、抽图、聚类、写报告,终于变成了可以按语义检索的向量索引。
它不把 entities 的 description、relationships 单独向量化,也不是把整个文档原文向量化——只有上面那三列。现在snapshots.embeddings: false,所以它只写向量库,不额外落 embeddings.* 表。
三、 GraphRAG 图数据库
首先,我们需要在本地搭建一个图数据库来存储知识结构。
Neo4j 是一个开源的 NoSQL 图数据库,它使用图来表示和存储数据。在 DB‑Engines 排名中根据数据库管理系统的受欢迎程度对其进行排名中,Graph DBMS 榜单中 Neo4j 排名第一。查询链接为:
https://db-engines.com/
I Python 连接 Neo4j
Neo4j 与 Python、JavaScript、Java 和 .Net 等库都做了集成,因此只要安装了对应的库,就可以连接 Neo4j 服务。在 Python 中,可以直接通过 pip 安装 neo4j 包来连接 Neo4j 服务。执行如下命令:
uv add neo4j使用方法:本地安装或者在线使用
neo4j.com
推荐:在wsl中安装neo4j软件,在线使用存在区域限制。
拉取并运行:在 WSL 终端中执行一行命令,即可完成拉取镜像和启动容器
docker run -d \
  --name neo4j-wsl \
  -p 7474:7474 -p 7687:7687 \
  -e NEO4J_AUTH=neo4j/mypassword \
  -v /opt/neo4j-dir/data:/data \
  -v /opt/neo4j-dir/logs:/logs \
  neo4j:latest
这条命令会以后台模式运行一个最新的 Neo4j 容器,并将容器的 7474 (网页管理界面) 和 7687 (程序连接端口) 映射到 WSL 的相同端口上
开始使用:完成后,在 WSL 里通过 http://localhost:7474 就能访问 Neo4j 的网页管理界面了
从 neo4j 包中导入 GraphDatabase 类,然后设置 Neo4j 的连接地址、用户名、密码和数据库名称,然后创建 driver 对象,最后通过 driver 对象连接 Neo4j 服务。执行如下代码:
from neo4j import GraphDatabase

NEO4J_URI="bolt://localhost:7687"
NEO4J_USERNAME="neo4j"
NEO4J_PASSWORD="mypassword"  # 这里替换成自己设置的密码
NEO4J_DATABASE="neo4j"        # 数据库名称

driver = GraphDatabase.driver(
    NEO4J_URI,
    auth=(NEO4J_USERNAME, NEO4J_PASSWORD)
)
可以快速做一个连接测试,执行如下代码:
driver = GraphDatabase.driver(
    NEO4J_URI,
    auth=(NEO4J_USERNAME, NEO4J_PASSWORD)
)

def test_connection():
    # 在这创建会话
    with driver.session() as session:
        session.run("MATCH (n) RETURN n LIMIT 1")

try:
    test_connection()
    print("连接成功!")
except Exception as e:
    print("连接失败:", e)
finally:
    driver.close() # 确保在所有操作完成后再关闭驱动程序
连接成功!
如果返回结果为 连接成功!,则说明 Neo4j 服务一切正常,便可以进入下面的实践。否则需要进一步检查 Neo4j 服务是否正常启动,以及 Neo4j 的连接地址、用户名、密码和数据库名称是否正确。
II 知识图谱快速入门
知识图谱建立在图论的基础上,而图是用于对对象之间的成对关系进行建模的结构。图主要由两个主要元素组成:节点和关系。其中:
- 节点代表单个对象或实体,类似于传统数据库中的记录。这些实体可以是任何人、公司或地点。
- 节点通过标签进行分类,方便根据节点的角色进行分类和查询,例如 “客户” 或 “产品”。
Neo4j 是存储知识图谱的其中一种图数据库,它支持节点和关系的存储,同时,通过 Cypher 查询语言进行图谱的创建、查询和分析,即 Cypher 是 Neo4j 中用于交互和操作图谱的查询语言。其形式及如下:

节点,可以是 Person、Organization、Product、Location 等实体类型,每个节点可以有多个属性,例如 name、age、gender 等,同时属性是以键值对形式存储的。
from neo4j import GraphDatabase

NEO4J_URI="bolt://localhost:7687"
NEO4J_USERNAME="neo4j"
NEO4J_PASSWORD="mypassword"  # 这里替换成自己设置的密码
NEO4J_DATABASE="neo4j"        # 数据库名称
driver = GraphDatabase.driver(
    NEO4J_URI,
    auth=(NEO4J_USERNAME, NEO4J_PASSWORD)
)
通过 CREATE 语句可以创建节点,同时可以为节点添加属性,语法形式是:
CREATE (node_name:node_type {property_name: property_value, ...})其中, node_name 这是一个变量名,用于引用创建的节点, node_type 是节点的标签,表示节点的类型, property_name 是属性的名称, property_value 是属性的值。
with driver.session() as session:
    # 添加多个节点: Person
    session.run("""
        CREATE (p1:Person {name: 'zhangsan', age: 30, city: 'beijing'}),
               (p2:Person {name: 'lisi', age: 23, city: 'shanghai'})
    """)

    # 添加多个节点: Company
    session.run("""
        CREATE (c1:Company {name: 'shuzhiweilai', industry: 'Technology', location: 'beijing'}),
               (c2:Company {name: 'naixue', industry: 'Education', location: 'beijing'})
    """)
删除节点的语法
with driver.session() as session:
    # 1. 先查是否存在
    result = session.run("MATCH (p:Person {name: 'zhangsan'}) RETURN p.name AS name")
    records = list(result)
    print(f"查询结果: {len(records)} 个节点")

    if records:
        # 2. 强制删除(带统计)
        def delete_op(tx):
            res = tx.run("MATCH (p:Person {name: 'zhangsan'}) DETACH DELETE p")
            summary = res.consume()
            return summary.counters.nodes_deleted

        deleted = session.execute_write(delete_op)
        print(f"实际删除了 {deleted} 个节点")
    else:
        print("节点不存在,请检查 name 值是否匹配")
如上代码所示:类似 p1 这种的生命周期仅仅是局部作用域:变量的作用域通常是局部的,仅在创建它的查询中有效。一旦查询执行完毕,变量就不再存在。
这里面的 Person 和 Company 是节点的标签, name、age、city 是节点的属性, zhangsan、lisi、beijing 是节点的属性值。其中:
- 通过 CREATE 语句创建节点时,如果该标签不存在,则创建该标签,否则不创建。
- 一个标签下可以有多个节点,一个节点也可以有多个标签。比如 Person 标签下可以有 zhangsan 和 lisi 两个节点,同时 zhangsan 和 lisi 也可以有多个标签,比如同时是 Person 和 Student。
- 一个节点可以有多个属性,比如 zhangsan 节点可以有 name、age、city 三个属性。
比如我们现在将 zhangsan 和 lisi 增加到 Student 标签下的节点,同时他们也是 Person 标签下的节点。因此我们通过如下 Cypher 语句进行创建:
with driver.session() as session:
    # zhangsan 添加Student标签
    session.run("""
        MATCH (p:Person {name: 'zhangsan'})
        SET p:Student
        RETURN p
    """)
    # lisi 添加Student标签
    session.run("""
        MATCH (p:Person {name: 'lisi'})
        SET p:Student
        RETURN p
    """)
这里需要了解的知识点是: MATCH 语句用于在图谱中查找节点, SET 语句用于为节点添加标签, RETURN 语句用于返回添加标签后的节点。执行后在 Neo4j 的数据库中可以看到: zhangsan 和 lisi 同时是 Person 和 Student 标签下的节点。
同时,也可以更新节点的属性,比如将 zhangsan 的 age 属性更新为 31,通过如下 Cypher 语句进行更新:
with driver.session() as session:
    session.run("""
        MATCH (p:Person {name: 'zhangsan'})
        SET p.age = 31
        RETURN p
    """)
执行后在 Neo4j 的浏览器中可以看到: zhangsan 的 age 属性被更新为 31。
- 关系:关系是连接节点的边,用于表示节点之间的关联。
关系由两个主要元素组成:
- 关系类型:表示关系的名称,例如 "朋友" 或 "同事"。
- 关系方向:表示关系的方向,例如 "从 A 到 B" 或 "从 B 到 A"。
关系类型和关系方向是关系的重要组成部分,用于描述节点之间的关联。关系类型可以是任何字符串,而关系方向可以是 "正向" 或 "反向"。其语法形式如下:
CREATE (node_name)-[:relation_type]->(related_node_name)其中, node_name 是节点的名称, relation_type 是关系的类型, related_node_name 是相关节点的名称
这里以 lisi 和 zhangsan 为例,创建 company 和 person 之间的关系,通过如下 Cypher 语句进行创建:
with driver.session() as session:
    # 创建zhangsan与shuzhiweilai公司之间的EMPLOYED_BY关系
    session.run("""
        MATCH (p:Person {name: 'zhangsan'})
        MATCH (c:Company {name: 'shuzhiweilai'})
        CREATE (p)-[:EMPLOYED_BY]->(c)
    """)

    # 创建lisi与naixue公司之间的LIVES_IN关系
    session.run("""
        MATCH (p:Person {name: 'lisi'})
        MATCH (c:Company {name: 'naixue'})
        CREATE (p)-[:EMPLOYED_BY]->(c)
    """)
需要使用 MATCH 语句先找到相应的节点,然后再创建它们之间的关系。执行代码后,则可以在 Neo4j 的浏览器中看到: zhangsan 和 lisi 与 shuzhiweilai 和 naixue 公司之间建立了 EMPLOYED_BY 关系。
以上是通过节点、属性、标签、关系四个概念的角度,给大家介绍了 Neo4j 中图谱的创建、更新和查询。这样的图谱其实就已经具备了知识图谱的雏形,即:
- 节点:表示实体,例如人、公司、地点等。
- 属性:表示实体的特征,例如姓名、年龄、城市等。
- 标签:表示实体的类型,例如 Person、Company、Student 等。
- 关系:表示实体之间的关系,例如 EMPLOYED_BY 等。
我们是可以基于这样的图谱开始进行简单到复杂的查询的,比如如下的一些示例:
from neo4j import GraphDatabase

NEO4J_URI="bolt://localhost:7687"
NEO4J_USERNAME="neo4j"
NEO4J_PASSWORD="mypassword"  # 这里替换成自己设置的密码
NEO4J_DATABASE="neo4j"        # 数据库名称

driver = GraphDatabase.driver(
    NEO4J_URI,
    auth=(NEO4J_USERNAME, NEO4J_PASSWORD)
)

def test_connection():
    # 在这创建会话
    with driver.session() as session:
        session.run("MATCH (n) RETURN n LIMIT 1")

try:
    test_connection()
    print("连接成功!")
except Exception as e:
    print("连接失败:", e)

def neo4j_query_examples(driver, query_type, params=None):
    """
    执行各种Neo4j查询示例

    参数:
    - driver: Neo4j驱动实例
    - query_type: 查询类型,可选值包括:
        'all_persons', 'all_companies', 'filter_by_city', 'all_relationships',
        'specific_relationship', 'node_relationships', 'path_query', 'aggregation',
        'group_by', 'colleagues', 'complex_query', 'param_query', 'subgraph', 'community'
    - params: 查询参数字典,根据查询类型不同而不同

    返回:
    - 查询结果列表
    """
    if params is None:
        params = {}

    results = []

    with driver.session() as session:
        if query_type == 'all_persons':
            # 查询所有Person节点
            result = session.run("""
                MATCH (p:Person)
                RETURN p.name AS name, p.age AS age, p.city AS city
            """)

            print("所有Person节点:")
            for record in result:
                print(f"姓名: {record['name']}, 年龄: {record['age']}, 城市: {record['city']}")
                results.append({
                    'name': record['name'],
                    'age': record['age'],
                    'city': record['city']
                })

        elif query_type == 'all_companies':
            # 查询所有Company节点
            result = session.run("""
                MATCH (c:Company)
                RETURN c.name AS name, c.industry AS industry, c.location AS location
            """)

            print("所有Company节点:")
            for record in result:
                print(f"公司: {record['name']}, 行业: {record['industry']}, 位置: {record['location']}")
                results.append({
                    'name': record['name'],
                    'industry': record['industry'],
                    'location': record['location']
                })

        elif query_type == 'filter_by_city':
            # 按城市过滤Person节点
            city = params.get('city', 'beijing')
            result = session.run("""
                MATCH (p:Person)
                WHERE p.city = $city
                RETURN p.name AS name, p.age AS age
            """, {'city': city})

            print(f"{city}的人员:")
            for record in result:
                print(f"姓名: {record['name']}, 年龄: {record['age']}")
                results.append({
                    'name': record['name'],
                    'age': record['age']
                })

        elif query_type == 'all_relationships':
            # 查询所有关系
            result = session.run("""
                MATCH (p:Person)-[r]->(c:Company)
                RETURN p.name AS person, type(r) AS relationship, c.name AS company
            """)

            print("所有人员与公司的关系:")
            for record in result:
                print(f"{record['person']} {record['relationship']} {record['company']}")
                results.append({
                    'person': record['person'],
                    'relationship': record['relationship'],
                    'company': record['company']
                })

        elif query_type == 'specific_relationship':
            # 查询特定类型的关系
            rel_type = params.get('rel_type', 'EMPLOYED_BY')
            result = session.run(f"""
                MATCH (p:Person)-[:{rel_type}]->(c:Company)
                RETURN p.name AS person, c.name AS company
            """)

            print(f"{rel_type}关系:")
            for record in result:
                print(f"{record['person']} 与 {record['company']} 有{rel_type}关系")
                results.append({
                    'person': record['person'],
                    'company': record['company']
                })

        elif query_type == 'node_relationships':
            # 查询特定节点的关系
            # 查找一个名为 zhangsan 的 Person 节点所发出的所有关系,并返回这些关系的类型、目标节点的名字以及目标节点的标签。
            person_name = params.get('person_name', 'zhangsan')
            result = session.run("""
                MATCH (p:Person {name: $name})-[r]->(c)
                RETURN type(r) AS relationship, c.name AS connected_to, labels(c) AS node_type
            """, {'name': person_name})

            print(f"{person_name}的所有关系:")
            for record in result:
                print(f"关系类型: {record['relationship']}, 连接到: {record['connected_to']}, 节点类型: {record['node_type']}")
                results.append({
                    'relationship': record['relationship'],
                    'connected_to': record['connected_to'],
                    'node_type': record['node_type']
                })

        elif query_type == 'aggregation':
            # 聚合查询
            result = session.run("""
                MATCH (p:Person)-[:EMPLOYED_BY]->(c:Company)
                RETURN c.name AS company, count(p) AS employee_count, avg(p.age) AS avg_age
            """)

            print("公司员工统计:")
            for record in result:
                print(f"公司: {record['company']}, 员工数: {record['employee_count']}, 平均年龄: {round(record['avg_age'], 1)}")
                results.append({
                    'company': record['company'],
                    'employee_count': record['employee_count'],
                    'avg_age': record['avg_age']
                })

        elif query_type == 'group_by':
            # 条件分组查询
            # 统计图数据库中每个城市的人数,并列出每个城市中人的名字,然后按照人数从多到少排序。
            result = session.run("""
                MATCH (p:Person)
                RETURN p.city AS city, count(p) AS person_count,
                    collect(p.name) AS names
                ORDER BY person_count DESC
            """)

            print("按城市分组的人员统计:")
            for record in result:
                print(f"城市: {record['city']}, 人数: {record['person_count']}, 姓名: {record['names']}")
                results.append({
                    'city': record['city'],
                    'person_count': record['person_count'],
                    'names': record['names']
                })

        elif query_type == 'complex_query':
            # 多条件复合查询
            min_age = params.get('min_age', 25)
            location = params.get('location', 'beijing')
            result = session.run("""
                MATCH (p:Person)-[r]->(c:Company)
                WHERE p.age > $min_age AND c.location = $location
                AND (type(r) = 'EMPLOYED_BY' OR type(r) = 'INVESTED_IN')
                RETURN p.name AS person, p.age AS age,
                    type(r) AS relationship, c.name AS company
                ORDER BY p.age DESC
            """, {'min_age': min_age, 'location': location})

            print(f"{min_age}岁以上且与{location}公司有雇佣或投资关系的人:")
            for record in result:
                print(f"{record['person']} ({record['age']}岁) {record['relationship']} {record['company']}")
                results.append({
                    'person': record['person'],
                    'age': record['age'],
                    'relationship': record['relationship'],
                    'company': record['company']
                })

        elif query_type == 'param_query':
            # 参数化查询
            query_params = {
                'min_age': params.get('min_age', 25),
                'location': params.get('location', 'beijing'),
                'relationship_types': params.get('relationship_types', ["EMPLOYED_BY", "INVESTED_IN"])
            }

            result = session.run("""
                MATCH (p:Person)-[r]->(c:Company)
                WHERE p.age > $min_age AND c.location = $location
                AND type(r) IN $relationship_types
                RETURN p.name AS person, type(r) AS relationship, c.name AS company
            """, query_params)

            print(f"参数化查询结果(年龄 > {query_params['min_age']}, 位置: {query_params['location']}):")
            for record in result:
                print(f"{record['person']} {record['relationship']} {record['company']}")
                results.append({
                    'person': record['person'],
                    'relationship': record['relationship'],
                    'company': record['company']
                })

        else:
            print(f"未知的查询类型: {query_type}")
            results.append({"error": f"未知的查询类型: {query_type}"})

        return results

try:
    # 查询所有Person节点
    neo4j_query_examples(driver, 'all_persons')

    # 查询北京的人员
    neo4j_query_examples(driver, 'filter_by_city', {'city': 'beijing'})

    # 查询zhangsan的所有关系
    neo4j_query_examples(driver, 'node_relationships', {'person_name': 'zhangsan'})

    # 执行复杂查询
    neo4j_query_examples(driver, 'complex_query', {
        'min_age': 20,
        'location': 'beijing'
    })

finally:
    # 关闭驱动
    driver.close()
III. Microsoft GraphRAG 导入
Microsoft GraphRAG 提供的两种方法将本地的非结构化数据构建知识图谱索引的完整流程及底层的实现原理,而无论是通过 Microsoft GraphRAG 的 CLI 工具,还是通过源码的 Poetry,其生成的文件都是一样的,即在 output 目录下会依次生成:
- documents.parquet
- text_units.parquet
- entities.parquet
- relationships.parquet
- communities.parquet
- community_reports.parquet
这些文件中存储了构建知识图谱索引的全部数据,这里介绍如何将这些数据导入到 Neo4j 的图数据库中,并进行可视化。
1 构建批量导入函数
在开始逐步构建知识图谱之前,需要先构建一个批量的通用导入函数,用于将各个 <code>.parquet</code> 文件中的数据更高效的导入到 Neo4j 的图数据库中。知识图谱存储的往往是非常大的数据量(数百万到数亿行的量级),有非常多的复杂关系,因此在实际的使用中,往往都是需要一些优化策略来做大规模数据的管理,常见的优化方案是:
- 使用 Neo4j Admin Import 导入,这是最快的导入方式,可以比 Cypher 导入快 10‑100 倍。
- 并行处理与多线程。
- 使用 APOC 批量导入。
- 搭配其他优化策略,比如优化 Cypher 语句、优化数据格式、数据分区与分布式处理等。
在如下的 <code>parallel_batched_import</code> 函数中,实现的是一个使用并行批量导入数据到 Neo4j 的函数。它将大批量数据分成多个批次,然后使用线程池并行处理每个批次,从而提高导入的效果。
import time
import pandas as pd
import concurrent.futures
from neo4j import GraphDatabase
from  neo4j_drive_define_001 import neo4j_driver as driver
from  neo4j_drive_define_001 import NEO4J_DATABASE

def parallel_batched_import(statement, df, batch_size=100, max_workers=8):
    """
    使用并行处理进行批量导入数据到Neo4j

    参数:
    - statement: Cypher查询语句,使用value作为每行数据的引用
    - df: 要导入的DataFrame
    - batch_size: 每批处理的行数
    - max_workers: 并行线程数

    返回:
    - 导入统计信息的字典
    """

    # 1. 初始化,计算总行数,批次数,并记录开始时间
    total = len(df)
    batches = (total + batch_size - 1) // batch_size  # 向上取整
    start_time = time.time()
    results = []

    print(f"开始并行导入 {total} 行数据,分为 {batches} 个批次,每批 {batch_size} 条")

    # 2. 定义批处理函数
    def process_batch(batch_idx):
        """
        批处理函数,用于处理每个批次的数据
        """
        # 计算批次的起始和结束索引
        start = batch_idx * batch_size
        end = min(start + batch_size, total)
        batch = df.iloc[start:end]

        batch_start_time = time.time()

        try:
            with driver.session(database=NEO4J_DATABASE) as session:
                # UNWIND 是 Cypher 查询语言中的一个关键字,用于将一个列表展开为多行。$rows 是一个参数,表示将要传入的行数据
                # 完整意思是:将$rows参数(一个列表)中的每个元素展开,每个元素被赋值给变量value, 对每个value执行后续的Cypher语句
                result = session.run(
                    "UNWIND $rows AS value " + statement,
                    rows=batch.to_dict("records")
                )
            summary = result.consume()  # Neo4j 中用于处理查询结果的一个方法。它的主要作用是获取查询的摘要信息,包括执行统计、
            batch_duration = time.time() - batch_start_time

            return {
                "batch": batch_idx,
                "rows": end - start,
                "success": True,
                "duration": batch_duration,
                "counters": summary.counters  # summary.counters 是在执行 Cypher 查询后返回的统计信息
            }

        except Exception as e:
            batch_duration = time.time() - batch_start_time
            print(f"批次 {batch_idx} (行 {start}-{end-1}) 处理失败: {str(e)}")
            return {
                "batch": batch_idx,
                "rows": end - start,
                "success": False,
                "duration": batch_duration,
                "error": str(e)
            }

    # 使用线程池并行处理批次
    with concurrent.futures.ThreadPoolExecutor(max_workers=max_workers) as executor:
        futures = [executor.submit(process_batch, i) for i in range(batches)]

        # 处理完成的批次
        for i, future in enumerate(concurrent.futures.as_completed(futures)):
            result = future.result()
            results.append(result)

            if result["success"]:
                print(f"批次 {result['batch']} 完成: {result['rows']} 行,耗时 {result['duration']:.2f}秒")
            else:
                print(f"批次 {result['batch']} 失败: {result['rows']} 行,耗时 {result['duration']:.2f}秒,错误: {result.get('error')}")

            # 显示进度
            print(f"进度: {i+1}/{batches} 批次完成 ({((i+1)/batches*100):.1f}%)")

    # 统计结果
    successful_rows = sum(r["rows"] for r in results if r["success"])
    failed_rows = sum(r["rows"] for r in results if not r["success"])

    duration = time.time() - start_time
    rows_per_second = successful_rows / duration if duration > 0 else 0

    print(f"导入完成: 总计 {total} 行,成功 {successful_rows} 行,失败 {failed_rows} 行")
    print(f"总耗时: {duration:.2f}秒,平均速度: {rows_per_second:.2f} 行/秒")

    return {
        "total_rows": total,
        "successful_rows": successful_rows,
        "failed_rows": failed_rows,
        "duration_seconds": duration,
        "rows_per_second": rows_per_second,
        "batch_results": results
    }
理解了 parallel_batched_import 函数后,就依次将完成 Microsoft GraphRAG 索引过程得到的各个 .parquet 文件导入到 Neo4j 的图数据库中。
2 导入文档 Document
documents.parquet 文件中主要存储的是在执行索引之前,我们存放在 Input 文件夹下的原始的非结构化文档,比如 .txt、.csv 等大批量文件。经过索引的构建流程后,会经过文档加载器解析出文档中的全部内容,并且会通过后处理,在进行 text_unit 的切分后,填充每个文档对应的 text_unit_ids。读取该文件的代码如下所示:
import pandas as pd
import numpy as np
from tabulate import tabulate

df_documents = pd.read_parquet('../output/documents.parquet')

def _stringify(x):
    if isinstance(x, (list, tuple, set, np.ndarray)):
        return ", ".join(str(i) for i in x)
    return x

df_documents = df_documents.apply(lambda col: col.map(_stringify))

print(tabulate(
    df_documents,
    headers='keys',
    tablefmt='pretty',
    showindex=False,
    stralign='left',
    maxcolwidths=[20] * len(df_documents.columns),
))
其中各个字段的含义如下所示:
Document DataFrame 字段解释
表格
| 字段名 | 类型 | 说明 |
|---|---|---|
| id | 字符串 | 唯一标识符,用于唯一标识每个文档(即单个文件)。 |
| human_readable_id | 字符串 | 可读的标识符,通常用于用户界面显示,便于用户理解和识别。 |
| title | 字符串 | 加载的文档其对应的文件名。 |
| text | 字符串 | 通过文档解析器解析到的文档全部内容。 |
| text_unit_ids | 列表(字符串) | 关联的文本单元的唯一标识符列表,文本单元是将文档切分的块。 |
| creation_date | 日期时间 | 创建的日期和时间,以 UTC 或本地时间格式表示。 |
| metadata | 字典(可选) | 额外的元数据,包含与文档相关的其他信息,如作者、来源、标签等。此字段可以为空。 |
在知识图谱构建过程中,Document 实体作为原始信息载体,其导入策略可以考虑以下原则:
- 节点标识:需要使用 <code>id</code> 字段作为 Document 节点的唯一标识符,确保图谱中的文档实体一致性。
- 约束策略:唯一性约束,确保文档的 id 是唯一的。
- 属性选择:比如标题,文本内容等(我们上节课讲解了如何自定义属性(即通过 <code>file_partten</code> 和 <code>file_filter</code> 来定义出更多的列)),但是注意:<code>text_unit_ids</code> 有必要添加属性吗? 可以做,但是很低效,因为后面可以通过关系来连接,从而降低查询的复杂度。举个例子:
- 一个包含 1000 个文档,每个文档平均有 50 个文本单元的知识图谱:
- 使用关系:创建 50,000 个 CONTAINS 关系,每个关系指向一个 TextUnit 节点
- 使用属性:每个 Document 节点包含一个平均有 50 个 ID 的列表,需要在查询时进行列表处理
- 标签策略:基础标签,为所有文档添加 <code>__Document__</code> 标签。
因此,把上述的策略转化成代码。就如下所示:
from  neo4j_drive_define_01 import neo4j_driver as driver
from  neo4j_drive_define_01 import NEO4J_DATABASE
from parallel_batched_import_02 import parallel_batched_import
# 接下来,连接到 Neo4j 数据库,并调用 <code>create_document_nodes</code> 函数,导入文档。代码如下:

import pandas as pd
import numpy as np
from tabulate import tabulate

df_documents = pd.read_parquet('../output/documents.parquet')

def _stringify(x):
    if isinstance(x, (list, tuple, set, np.ndarray)):
        return ", ".join(str(i) for i in x)
    return x

df_documents = df_documents.apply(lambda col: col.map(_stringify))

# print(tabulate(
#     df_documents,
#     headers='keys',
#     tablefmt='pretty',
#     showindex=False,
#     stralign='left',
#     maxcolwidths=[20] * len(df_documents.columns),
# ))

# 创建Document节点
def create_document_nodes(df_documents):
    # 首先创建唯一性约束
    with driver.session(database=NEO4J_DATABASE) as session:
        try:
            session.run("CREATE CONSTRAINT IF NOT EXISTS FOR (d:__Document__) REQUIRE d.id IS UNIQUE")
        except Exception as e:
            print(f"创建约束时出错(可能已存在): {e}")

    # 导入文档
    # MERGE与ON CREATE SET组合,是一种条件性属性设置方式:特点是:
    # 1. 只在节点首次创建时设置属性
    # 2. 如果节点已存在,不会修改现有属性
    # 适合初始导入场景,避免覆盖已有数据
    cypher_statement = """
MERGE (d:__Document__ {id: value.id})
ON CREATE SET
    d.human_readable_id = value.human_readable_id,
    d.title = value.title,
    d.text = value.text,
    d.creation_date = value.creation_date,
    d.import_timestamp = timestamp()
"""
    return parallel_batched_import(cypher_statement, df_documents)

# 执行 document.parquet 文件的导入
create_document_nodes(df_documents)
看到创建完成后,在 <code>localhost:7474</code> 的 Neo4j 浏览器中,可以看到 <code>__Document__</code> 标签的节点已经创建完成,如下图所示:
至此已经完成了 <code>documents.parquet</code> 文件的导入。接下来执行 <code>text_units.parquet</code> 文件的导入。
3 导入文本单元 Chunk
<code>text_units.parquet</code> 文件中主要存储的是内容是根据 <code>settings.yaml</code> 文件中定义的切分策略,将 <code>documents.parquet</code> 文件中的内容切分出来的文本单元。同时会通过后处理,关联到经过实体和关系提取 Workflow 后的实体和关系。读取该文件的代码如下所示:
from tabulate import tabulate

df_text_units = pd.read_parquet('../output/text_units.parquet')  # 替换为实际路径
# 假设 df 是你的 DataFrame
print(tabulate(df_text_units, headers='keys', tablefmt='pretty', showindex=False, stralign='left', maxcolwidt
text_units DataFrame 字段解释
| 字段名 | 类型 | 说明 |
|---|---|---|
| id | 字符串 | 唯一标识符,用于唯一标识每个文档块(即从单个文档中切分出来的完整块)。 |
| human_readable_id | 字符串 | 可读的标识符,通常用于用户界面显示,便于用户理解和识别。 |
| text | 字符串 | 该文本块中的内容 |
| n_tokens | 整数 | 按照切分策略切分出来的最终文本长度。 |
| document_ids | 列表 (字符串) | 关联的文档的唯一标识符列表,用于将文本块与 document 中的文档 id 关联。 |
| entity_ids | 列表 (字符串) | 关联的实体的唯一标识符列表,表示该文本块中都提取出来了哪些实体。 |
| relationship_ids | 列表 (字符串) | 关联的关系的唯一标识符列表,表示该文本块中都提取出来了哪些关系。 |
| covariate_ids | 列表 (字符串) | 关联的协变量的唯一标识符列表,用于统计分析或建模。 |
在知识图谱构建过程中,TextUnit 实体作为文本切分后的产物,其导入策略可以考虑以下原则:
- 节点标识:需要使用 <code>id</code> 字段作为 TextUnit 节点的唯一标识符,确保图谱中文档块实体一致性。
- 约束策略:唯一性约束,确保文本块的 id 是唯一的。
- 属性选择:比如文本内容,文本长度等,根据需求选择。
- 关系策略:创建 <code>PART_OF</code> 关系,将 TextUnit 节点与 Document 节点关联起来,表示该文本块属于哪个文档。
因此,把上述的策略转化成代码。就如下所示:
def setup_chunk_constraints():
    """创建Chunk标签的约束"""
    with driver.session(database=NEO4J_DATABASE) as session:
        try:
            # 创建Chunk.id唯一性约束
            session.run("CREATE CONSTRAINT IF NOT EXISTS FOR (c:__Chunk__) REQUIRE c.id IS UNIQUE")
            print("已创建Chunk.id唯一性约束")
        except Exception as e:
            print(f"创建__Chunk__约束时出错(可能已存在): {e}")
            # 尝试旧版本Neo4j的语法
            try:
                session.run("CREATE CONSTRAINT ON (c:__Chunk__) ASSERT c.id IS UNIQUE")
                print("已使用旧语法创建__Chunk__.id唯一性约束")
            except Exception as e2:
                print(f"使用旧语法创建约束也失败: {e2}")
def setup_entity_constraints():
"""创建Entity标签的约束"""
with driver.session(database=NEO4J_DATABASE) as session:
try:
# 创建Entity.id唯一性约束
session.run("CREATE CONSTRAINT IF NOT EXISTS FOR (e:__Entity__) REQUIRE e.id IS UNIQUE")
session.run("CREATE CONSTRAINT IF NOT EXISTS FOR (e:__Entity__) REQUIRE e.name IS UNIQUE")
print("已创建__Entity__.id唯一性约束")
except Exception as e:
print(f"创建__Entity__约束时出错 (可能已存在): {e}")
# 尝试旧版本Neo4j的语法
try:
session.run("CREATE CONSTRAINT ON (e:__Entity__) ASSERT e.id IS UNIQUE")
print("已使用旧语法创建__Entity__.id唯一性约束")
except Exception as e2:
print(f"使用旧语法创建约束也失败: {e2}")
def import_entities(df_entities, batch_size=100, max_workers=8):
"""
导入实体(Entity)到Neo4j
参数:
- df_entities: 包含实体数据的DataFrame
- batch_size: 每批处理的行数
- max_workers: 并行线程数
返回:
- 导入统计信息的字典
"""
# 1. 创建Entity的约束
setup_entity_constraints()
# 2. 预处理text_unit_ids - 确保是列表格式
print("预处理text_unit_ids...")
# 创建DataFrame的副本
df_entities = df_entities.copy()
# 处理text_unit_ids字段
for idx, row in df_entities.iterrows():
text_unit_ids = row.get('text_unit_ids')
# 如果不是列表,转换为列表
if not isinstance(text_unit_ids, list):
if isinstance(text_unit_ids, str):
try:
# 尝试解析JSON字符串
import json
text_unit_ids = json.loads(text_unit_ids)
except:
# 如果解析失败,将其作为单个元素的列表
text_unit_ids = [text_unit_ids]
elif hasattr(text_unit_ids, 'dtype') and hasattr(text_unit_ids, 'tolist'):
# 处理NumPy数组
text_unit_ids = text_unit_ids.tolist()
else:
# 其他类型,转为列表
text_unit_ids = [text_unit_ids] if text_unit_ids is not None else []
# 处理嵌套列表
flat_text_unit_ids = []
for item in text_unit_ids:
if isinstance(item, list) or (hasattr(item, 'dtype') and hasattr(item, 'tolist')):
if hasattr(item, 'tolist'):
flat_text_unit_ids.extend(item.tolist())
else:
flat_text_unit_ids.extend(item)
else:
flat_text_unit_ids.append(item)
# 确保所有ID都是字符串且非空
flat_text_unit_ids = [str(id) for id in flat_text_unit_ids if id is not None and str(id).strip() != '']
# 更新DataFrame
df_entities.at[idx, 'text_unit_ids'] = flat_text_unit_ids
# 3. 检查Neo4j功能支持
print("检查Neo4j功能支持...")
has_apoc = False
has_vector = False
try:
with driver.session(database=NEO4J_DATABASE) as session:
# 检查APOC,我们目前使用的不是插件模式
try:
result = session.run("RETURN apoc.version() AS version")
version = result.single()["version"]
has_apoc = True
print(f"APOC插件已安装,版本: {version}")
except Exception as e:
print(f"检查APOC插件时出错 (可能未安装): {e}")
except Exception as e:
print(f"检查Neo4j功能支持时出错: {e}")
# 4. 导入Entity节点并创建关系
print("开始导入__Entity__节点并创建关系...")
# 根据功能支持构建Cypher语句
if has_apoc and has_vector:
# 完整功能支持
entity_statement = """
MERGE (e:__Entity__ {id:value.id})
SET e += value {.human_readable_id, .description, .frequency, .degree, .x, .y}
SET e.name = replace(coalesce(value.title, value.human_readable_id, ''), '"', '')
WITH e, value
CALL db.create.setNodeVectorProperty(e, "description_embedding", value.description_embedding)
WITH e, value
CALL apoc.create.addLabels(e,
CASE WHEN coalesce(value.type,"") = ""
THEN []
ELSE [apoc.text.upperCamelCase(replace(value.type,'"',''))]
END
) YIELD node
WITH node as e, value
UNWIND value.text_unit_ids AS text_unit
MATCH (c:__Chunk__ {id:text_unit})
MERGE (c)-[:HAS_ENTITY]->(e)
"""
elif has_apoc:
# 只有APOC支持,没有向量支持
entity_statement = """
MERGE (e:__Entity__ {id:value.id})
SET e += value {.human_readable_id, .description, .frequency, .degree, .x, .y}
SET e.name = replace(coalesce(value.title, value.human_readable_id, ''), '"', '')
WITH e, value
CALL apoc.create.addLabels(e,
CASE WHEN coalesce(value.type,"") = ""
THEN []
ELSE [apoc.text.upperCamelCase(replace(value.type,'"',''))]
END
) YIELD node
WITH node as e, value
UNWIND value.text_unit_ids AS text_unit
MATCH (c:__Chunk__ {id:text_unit})
MERGE (c)-[:HAS_ENTITY]->(e)
"""
elif has_vector:
# 只有向量支持,没有APOC支持
entity_statement = """
MERGE (e:__Entity__ {id:value.id})
SET e += value {.human_readable_id, .description, .frequency, .degree, .x, .y}
SET e.name = replace(coalesce(value.title, value.human_readable_id, ''), '"', '')
WITH e, value
CALL db.create.setNodeVectorProperty(e, "description_embedding", value.description_embedding)
WITH e, value
UNWIND value.text_unit_ids AS text_unit
MATCH (c:__Chunk__ {id:text_unit})
MERGE (c)-[:HAS_ENTITY]->(e)
"""
else:
# 基本功能,无APOC和向量支持
entity_statement = """
MERGE (e:__Entity__ {id:value.id})
SET e += value {.human_readable_id, .description, .frequency, .degree, .x, .y}
SET e.name = replace(coalesce(value.title, value.human_readable_id, ''), '"', '')
WITH e, value
UNWIND value.text_unit_ids AS text_unit
MATCH (c:__Chunk__ {id:text_unit})
MERGE (c)-[:HAS_ENTITY]->(e)
"""
# 执行导入
entity_result = parallel_batched_import(entity_statement, df_entities, batch_size, max_workers)
# 5. 验证结果
with driver.session(database=NEO4J_DATABASE) as session:
# 检查Entity节点数量
result = session.run("MATCH (e:__Entity__) RETURN count(e) as count")
entity_count = result.single()["count"]
# 检查HAS_ENTITY关系数量
result = session.run("MATCH (c:__Chunk__)-[r:HAS_ENTITY]->(e:__Entity__) RETURN count(r) as count")
relation_count = result.single()["count"]
# 检查动态标签
result = session.run("CALL db.labels() YIELD label WHERE label <> '__Entity__' AND label <> '__Chunk__' AND label <> '__Document__' RETURN collect(label) as labels")
dynamic_labels = result.single()["labels"]
print(f"验证结果: {entity_count} 个__Entity__节点, {relation_count} 个HAS_ENTITY关系")
print(f"动态标签: {dynamic_labels}")
return entity_result控制台打印的结果:
已创建Chunk.id唯一性约束
开始导入Chunk节点...
开始并行导入 6 行数据,分为 1 个批次,每批 100 条
批次 0 完成: 6 行,耗时 0.06秒
进度: 1/1 批次完成 (100.0%)
导入完成: 总计 6 行,成功 6 行,失败 0 行
总耗时: 0.06秒,平均速度: 95.22 行/秒
准备Chunk‑Document关系数据...
行 0 处理后的document_id: ['44f50b8b6744fad4f7f141be070a31ad49dcc4c2ad7f0c125f2cbd780bc4491d381e02e901d07e34318462a2b0d9407c6a682ae0d2cd3637b6098a834c31af85']
行 1 处理后的document_id: ['44f50b8b6744fad4f7f141be070a31ad49dcc4c2ad7f0c125f2cbd780bc4491d381e02e901d07e34318462a2b0d9407c6a682ae0d2cd3637b6098a834c31af85']
行 2 处理后的document_id: ['44f50b8b6744fad4f7f141be070a31ad49dcc4c2ad7f0c125f2cbd780bc4491d381e02e901d07e34318462a2b0d9407c6a682ae0d2cd3637b6098a834c31af85']
行 3 处理后的document_id: ['44f50b8b6744fad4f7f141be070a31ad49dcc4c2ad7f0c125f2cbd780bc4491d381e02e901d07e34318462a2b0d9407c6a682ae0d2cd3637b6098a834c31af85']
行 4 处理后的document_id: ['44f50b8b6744fad4f7f141be070a31ad49dcc4c2ad7f0c125f2cbd780bc4491d381e02e901d07e34318462a2b0d9407c6a682ae0d2cd3637b6098a834c31af85']
发现 1 个唯一的document_id
开始并行导入 1 行数据,分为 1 个批次,每批 100 条
批次 0 完成: 1 行,耗时 0.04秒
进度: 1/1 批次完成 (100.0%)
导入完成: 总计 1 行,成功 1 行,失败 0 行
总耗时: 0.04秒,平均速度: 23.81 行/秒
已创建 1 个Document节点
开始创建 6 个Chunk‑Document关系...
开始并行导入 6 行数据,分为 1 个批次,每批 100 条
批次 0 完成: 6 行,耗时 0.21秒
进度: 1/1 批次完成 (100.0%)
导入完成: 总计 6 行,成功 6 行,失败 0 行
总耗时: 0.21秒,平均速度: 28.57 行/秒
已创建 6 个Chunk‑Document关系
验证结果: 6 个Chunk节点, 1 个Document节点, 6 个PART_OF关系
4 导入实体 Entities
<code>entities.parquet</code> 文件中主要存储的通过提示词,借助大模型从 <code>text_units</code> 中提取出来的实体。读取该文件的代码如下所示:
import pandas as pd
from tabulate import tabulate

# 使用绝对路径读取 Parquet 文件
df_entities = pd.read_parquet('../output/entities.parquet')  # 替换为实际路径

# 假设 df 是你的 DataFrame
print(tabulate(df_entities, headers='keys', tablefmt='pretty', showindex=False, stralign='left', maxcolwidths
entities DataFrame 字段解释
| 字段名 | 类型 | 说明 |
|---|---|---|
| id | 字符串 | 唯一标识符,用于唯一标识每个实体记录。 |
| human_readable_id | 字符串 | 可读的标识符,用于用户界面显示,便于用户理解和识别。 |
| title | 字符串 | 实体的名称或主题。 |
| type | 字符串 | 实体的类型,例如 GEO 表示地理位置。 |
| description | 字符串 | 对实体的详细描述,提供更多上下文信息。 |
| text_unit_ids | 列表(字符串) | 关联的文本单元的唯一标识符列表,用于将实体与文本块关联。 |
| frequency | 整数 | 实体出现的频率,表示该实体在数据中的重要性或常见程度。 |
| degree | 整数 | 实体的度数,通常表示与其他实体的连接数量。 |
| x | 浮点数 | 实体在二维空间中的 x 坐标,通常用于可视化。 |
| y | 浮点数 | 实体在二维空间中的 y 坐标,通常用于可视化。 |
在知识图谱构建过程中,其导入策略可以考虑以下原则:
- 节点标识:需要使用 <code>id</code> 字段作为 Entity 节点的唯一标识符,确保图谱中实体节点一致性。同时为了避免重复,<code>name</code>字段也需要作为 Entity 节点的唯一标识符。
- 约束策略:唯一性约束,确保实体的 id 是唯一的。
- 属性选择:比如实体的名称,描述,频率,度数等,根据需求选择。
- 标签策略:给节点添加动态标签(根据实体的 <code>type</code> 添加)
- 关系策略:创建 <code>HAS_ENTITY</code> 关系,将 Entity 节点与 Chunk 节点关联起来,表示该实体属于哪个文本块。
因此,把上述的策略转化成代码。就如下所示:
import pandas as pd
from tabulate import tabulate
import numpy as np
# 使用绝对路径读取 Parquet 文件
df_entities = pd.read_parquet('../output/entities.parquet')  # 替换为实际路径

# 假设 df 是你的 DataFrame

def _stringify(x):
    if isinstance(x, (list, tuple, set, np.ndarray)):
        return ", ".join(str(i) for i in x)
    return x
df_entities = df_entities.apply(lambda col: col.map(_stringify))

print(tabulate(
    df_entities,
    headers='keys',
    tablefmt='pretty',
    showindex=False,
    stralign='left',
    maxcolwidths=[20] * len(df_entities.columns),
))

from  neo4j_drive_define_01 import neo4j_driver as driver
from  neo4j_drive_define_01 import NEO4J_DATABASE
from parallel_batched_import_02 import parallel_batched_import

def setup_entity_constraints():
    """创建Entity标签的约束"""
    with driver.session(database=NEO4J_DATABASE) as session:
        try:
            # 创建Entity.id唯一性约束
            session.run("CREATE CONSTRAINT IF NOT EXISTS FOR (e:__Entity__) REQUIRE e.id IS UNIQUE")
            session.run("CREATE CONSTRAINT IF NOT EXISTS FOR (e:__Entity__) REQUIRE e.name IS UNIQUE")
            print("已创建__Entity__.id唯一性约束")
        except Exception as e:
            print(f"创建__Entity__约束时出错(可能已存在): {e}")
            # 尝试旧版本Neo4j的语法
            try:
                session.run("CREATE CONSTRAINT ON (e:__Entity__) ASSERT e.id IS UNIQUE")
                print("已使用旧语法创建__Entity__.id唯一性约束")
            except Exception as e2:
                print(f"使用旧语法创建约束也失败: {e2}")

def import_entities(df_entities, batch_size=100, max_workers=8):
    """
    导入实体(Entity)到Neo4j

    参数:
    - df_entities: 包含实体数据的DataFrame
    - batch_size: 每批处理的行数
    - max_workers: 并行线程数

    返回:
    - 导入统计信息的字典
    """
    # 1. 创建Entity的约束
    setup_entity_constraints()

    # 2. 预处理text_unit_ids - 确保是列表格式
    print("预处理text_unit_ids...")

    # 创建DataFrame的副本
    df_entities = df_entities.copy()

    # 处理text_unit_ids字段
    for idx, row in df_entities.iterrows():
        text_unit_ids = row.get('text_unit_ids')

        # 如果不是列表,转换为列表
        if not isinstance(text_unit_ids, list):
            if isinstance(text_unit_ids, str):
                try:
                    # 尝试解析JSON字符串
                    import json
                    text_unit_ids = json.loads(text_unit_ids)
                except:
                    # 如果解析失败,将其作为单个元素的列表
                    text_unit_ids = [text_unit_ids]
            elif hasattr(text_unit_ids, 'dtype') and hasattr(text_unit_ids, 'tolist'):
                # 处理NumPy数组
                text_unit_ids = text_unit_ids.tolist()
            else:
                # 其他类型,转为列表
                text_unit_ids = [text_unit_ids] if text_unit_ids is not None else []

        # 处理嵌套列表
        flat_text_unit_ids = []
        for item in text_unit_ids:
            if isinstance(item, list) or (hasattr(item, 'dtype') and hasattr(item, 'tolist')):
                if hasattr(item, 'tolist'):
                    flat_text_unit_ids.extend(item.tolist())
                else:
                    flat_text_unit_ids.extend(item)
            else:
                flat_text_unit_ids.append(item)

        # 确保所有ID都是字符串且非空
        flat_text_unit_ids = [str(id) for id in flat_text_unit_ids if id is not None and str(id).strip() != '']

        # 更新DataFrame
        df_entities.at[idx, 'text_unit_ids'] = flat_text_unit_ids

    # 3. 检查Neo4j功能支持
    print("检查Neo4j功能支持...")
    has_apoc = False
    has_vector = False

    try:
        with driver.session(database=NEO4J_DATABASE) as session:
            # 检查APOC,我们目前使用的不是插件模式
            try:
                result = session.run("RETURN apoc.version() AS version")
                version = result.single()["version"]
                has_apoc = True
                print(f"APOC插件已安装,版本: {version}")
            except Exception as e:
                print(f"检查APOC插件时出错(可能未安装): {e}")
    except Exception as e:
        print(f"检查Neo4j功能支持时出错: {e}")

    # 4. 导入Entity节点并创建关系
    print("开始导入__Entity__节点并创建关系...")

    # 根据功能支持构建Cypher语句
    if has_apoc and has_vector:
        # 完整功能支持
        entity_statement = """
            MERGE (e:__Entity__ {id:value.id})
            SET e += value {.human_readable_id, .description, .frequency, .degree, .x, .y}
            SET e.name = replace(coalesce(value.title, value.human_readable_id, ''), '"', '')

            WITH e, value
            CALL db.create.setNodeVectorProperty(e, "description_embedding", value.description_embedding)

            WITH e, value
            CALL apoc.create.addLabels(e,
                CASE WHEN coalesce(value.type,"") = ""
                THEN []
                ELSE [apoc.text.upperCamelCase(replace(value.type,'"',''))]
                END
            ) YIELD node

            WITH node as e, value
            UNWIND value.text_unit_ids AS text_unit
            MATCH (c:__Chunk__ {id:text_unit})
            MERGE (c)-[:HAS_ENTITY]->(e)
            """
    elif has_apoc:
        # 只有APOC支持,没有向量支持
        entity_statement = """
            MERGE (e:__Entity__ {id:value.id})
            SET e += value {.human_readable_id, .description, .frequency, .degree, .x, .y}
            SET e.name = replace(coalesce(value.title, value.human_readable_id, ''), '"', '')

            WITH e, value
            CALL apoc.create.addLabels(e,
                CASE WHEN coalesce(value.type,"") = ""
                THEN []
                ELSE [apoc.text.upperCamelCase(replace(value.type,'"',''))]
                END
            ) YIELD node

            WITH node as e, value
            UNWIND value.text_unit_ids AS text_unit
            MATCH (c:__Chunk__ {id:text_unit})
            MERGE (c)-[:HAS_ENTITY]->(e)
            """

    # 只有向量支持,没有APOC支持
    elif has_vector:
        entity_statement = """
            MERGE (e:__Entity__ {id:value.id})
            SET e += value {.human_readable_id, .description, .frequency, .degree, .x, .y}
            SET e.name = replace(coalesce(value.title, value.human_readable_id, ''), '"', '')

            WITH e, value
            CALL db.create.setNodeVectorProperty(e, "description_embedding", value.description_embedding)

            WITH e, value
            UNWIND value.text_unit_ids AS text_unit
            MATCH (c:__Chunk__ {id:text_unit})
            MERGE (c)-[:HAS_ENTITY]->(e)
            """

    else:
        # 基本功能,无APOC和向量支持
        entity_statement = """
            MERGE (e:__Entity__ {id:value.id})
            SET e += value {.human_readable_id, .description, .frequency, .degree, .x, .y}
            SET e.name = replace(coalesce(value.title, value.human_readable_id, ''), '"', '')

            WITH e, value
            UNWIND value.text_unit_ids AS text_unit
            MATCH (c:__Chunk__ {id:text_unit})
            MERGE (c)-[:HAS_ENTITY]->(e)
            """

    # 执行导入
    entity_result = parallel_batched_import(entity_statement, df_entities, batch_size, max_workers)

    # 5. 验证结果
    with driver.session(database=NEO4J_DATABASE) as session:
        # 检查Entity节点数量
        result = session.run("MATCH (e:__Entity__) RETURN count(e) as count")
        entity_count = result.single()["count"]

        # 检查HAS_ENTITY关系数量
        result = session.run("MATCH (c:__Chunk__)-[r:HAS_ENTITY]->(e:__Entity__) RETURN count(r) as count")
        relation_count = result.single()["count"]

        # 检查动态标签
        result = session.run("CALL db.labels() YIELD label WHERE label <> '__Entity__' AND label <> '__Chunk__' RETURN collect(label) AS labels")
        dynamic_labels = result.single()["labels"]

        print(f"验证结果: {entity_count} 个__Entity__节点, {relation_count} 个HAS_ENTITY关系")
        print(f"动态标签: {dynamic_labels}")

    return entity_result

    """
    如果需要安装 apoc 插件, 可以进入该地址: https://github.com/neo4j/apoc/releases, 下载对应的版本, 然后将
    其放置在 Neo4j 的 plugins 文件夹下, 重启 Neo4j 即可。
    """

# 导入实体
import_entities(df_entities, batch_size=100, max_workers=8)
5 导入关系 Relationship
在 relationships.parquet 文件中, 主要存储的是通过提示词, 借助大模型从 text_units 中提取出来的关系。读取该文件的代码如下所示:
使用绝对路径读取 Parquet 文件
df_relations = pd.read_parquet(‘../output/relationships.parquet’) # 替换为实际路径
假设 df 是你的 DataFrame
print(tabulate(df_relations, headers=’keys’, tablefmt=’pretty’, showindex=False, stralign=’left’, maxcolwidths=30))
| relationships DataFrame 字段解释 | 字段名 | 类型 | 说明 |
|---|---|---|---|
| id | 字符串 | 唯一标识符, 用于唯一标识每个关系记录。 | |
| human_readable_id | 字符串 | 可读的标识符, 通常用于用户界面显示, 便于用户理解和识别。 | |
| source | 字符串 | 关系的源实体, 表示关系的起始节点。 | |
| target | 字符串 | 关系的目标实体, 表示关系的结束节点。 | |
| description | 字符串 | 对关系的详细描述, 提供更多上下文信息。 | |
| weight | 浮点数 | 关系的权重, 通常用于表示关系的重要性或强度。 | |
| combined_degree | 整数 | 关系的组合度, 表示与其他实体的连接数量。 | |
| text_unit_ids | 列表 (字符串) | 关联的文本单元的唯一标识符列表, 通常用于将关系与文本关联。 |
在知识图谱构建过程中, 我们可以使用已经创建好的 Entity 节点, 然后根据 source 和 target 字段, 创建关系。其导入策略可以考虑以下原则:
- 节点标识: 需要使用 id 字段作为Relationship节点的唯一标识符, 确保图谱中关系节点一致性。
- 约束策略: 唯一性约束, 确保关系的id是唯一的。
- 属性选择: 比如关系的描述, 权重, 组合度等, 根据需求选择。
- 关系策略: 查找两个实体节点 (source 和 target) , 创建或更新这两个实体之间的 RELATED 关系。
因此, 把上述的策略转化成代码。就如下所示: 其中比较关键的是:
- RELATED关系: 连接两个Entity节点, 表示实体之间的直接语义关系, 例如: (Person:Entity)-[:RELATED]->(Company:Entity)
- HAS_RELATIONSHIP关系: 连接Chunk节点和Relationship节点, 表示某个文本块中提到了某种关系, 例如: (TextChunk:Chunk)-[:HAS_RELATIONSHIP]->(EntityRelationship:Relationship)
6 导入社区 Community
在 communities.parquet 文件中, 主要存储的通过社区发现算法, 根据 settings.yaml 文件中
cluster_graph 配置划分出的社区层级。同时通过后处理, 对每个社区中包含的实体、关系、文本单元等进行关联。读取
该文件的代码如下所示:
使用绝对路径读取 Parquet 文件
df_communities = pd.read_parquet('../output/communities.parquet')  # 替换为实际路径

假设 df 是你的 DataFrame
print(tabulate(df_communities, headers='keys', tablefmt='pretty', showindex=False, stralign='left', maxcolwidths=30))
| communities DataFrame 字段解释 | 字段名 | 类型 | 说明 |
|---|---|---|---|
| id | 字符串 | 唯一标识符, 用于唯一标识每个社区记录。 | |
| human_readable_id | 字符串 | 可读的标识符, 通常用于用户界面显示, 便于用户理解和识别。 | |
| community | 字符串 | 社区的标识符, 通常用于标识所属社区。 | |
| level | 整数 | 社区的层级, 表示该社区在层级结构中的位置。 | |
| parent | 整数 | 父社区的标识符, 表示该社区的上层社区。-1 表示没有父社区。 | |
| children | 列表 (字符串) | 子社区的标识符列表, 表示该社区下属的子社区。 | |
| title | 字符串 | 社区的名称或标题。 | |
| entity_ids | 列表 (字符串) | 关联的实体 ID 列表, 通常用于将社区与实体关联。 | |
| relationship_ids | 列表 (字符串) | 关联的关系 ID 列表, 通常用于将社区与关系关联。 | |
| text_unit_ids | 列表 (字符串) | 关联的文本单元 ID 列表, 通常用于将社区与文本关联。 | |
| period | 日期 | 社区的时间段, 表示该社区在时间维度中的范围。 | |
| size | 整数 | 社区的规模, 表示该社区包含的实体或成员数量。 |
思考现在已经有的节点和关系, 我们其实只需要把关系与社区进行关联就足够了。因此, 导入的策略可以考虑以下原
则:
- 节点标识: 需要使用 id 字段作为Community节点的唯一标识符, 确保图谱中节点一致性。
- 约束策略: 唯一性约束, 确保Community的id是唯一的。
- 属性选择: 社区的描述、名称、级别、规模等, 根据需求选择。
- 关系策略: 与该社区相关的实体节点 (通过 relationship_ids) 与社区建立 IN_COMMUNITY 关系。
上述策略转成代码
import pandas as pd
from tabulate import tabulate
import numpy as np
# 使用绝对路径读取 Parquet 文件
df_communities = pd.read_parquet('../output/communities.parquet')  # 替换为实际路径

# 假设 df 是你的 DataFrame

def _stringify(x):
    if isinstance(x, (list, tuple, set, np.ndarray)):
        return ", ".join(str(i) for i in x)
    return x
df_communities = df_communities.apply(lambda col: col.map(_stringify))

print(tabulate(
    df_communities,
    headers='keys',
    tablefmt='pretty',
    showindex=False,
    stralign='left',
    maxcolwidths=[20] * len(df_communities.columns),
))

from  neo4j_drive_define_01 import neo4j_driver as driver
from  neo4j_drive_define_01 import NEO4J_DATABASE
from parallel_batched_import_02 import parallel_batched_import

def setup_community_constraints():
    """创建Community标签的约束"""
    with driver.session(database=NEO4J_DATABASE) as session:
        try:
            # 创建Community.id唯一性约束
            session.run("CREATE CONSTRAINT IF NOT EXISTS FOR (c:__Community__) REQUIRE c.id IS UNIQUE")
            print("已创建__Community__.id唯一性约束")
        except Exception as e:
            print(f"创建__Community__约束时出错 (可能已存在): {e}")
            # 尝试旧版本Neo4j的语法
            try:
                session.run("CREATE CONSTRAINT ON (c:__Community__) ASSERT c.id IS UNIQUE")
                print("已使用旧语法创建__Community__.id唯一性约束")
            except Exception as e2:
                print(f"使用旧语法创建约束也失败: {e2}")

def import_communities(df_communities, batch_size=100, max_workers=8):
    """
    导入社区(Community)数据到Neo4j

    参数:
    - df_communities: 包含社区数据的DataFrame
    - batch_size: 每批处理的行数
    - max_workers: 并行线程数

    返回:
    - 导入统计信息的字典
    """
    # 1. 创建Community的约束
    setup_community_constraints()

    # 2. 预处理列表字段 - 确保是列表格式
    print("预处理列表字段...")

    # 创建DataFrame的副本
    df_communities = df_communities.copy()

    # 需要处理的列表字段
    list_fields = ['children', 'entity_ids', 'relationship_ids', 'text_unit_ids']

    for field in list_fields:
        if field in df_communities.columns:
            for idx, row in df_communities.iterrows():
                field_value = row.get(field)

                # 如果不是列表, 转换为列表
                if not isinstance(field_value, list):
                    if isinstance(field_value, str):
                        try:
                            # 尝试解析JSON字符串
                            import json
                            field_value = json.loads(field_value)
                        except:
                            # 如果解析失败, 将其作为单个元素的列表
                            field_value = [field_value]
                    elif hasattr(field_value, 'dtype') and hasattr(field_value, 'tolist'):
                        # 处理NumPy数组
                        field_value = field_value.tolist()
                    else:
                        # 其他类型, 转为列表
                        field_value = [field_value] if field_value is not None else []

                # 处理嵌套列表
                flat_field_value = []
                for item in field_value:
                    if isinstance(item, list) or (hasattr(item, 'dtype') and hasattr(item, 'tolist')):
                        if hasattr(item, 'tolist'):
                            flat_field_value.extend(item.tolist())
                        else:
                            flat_field_value.extend(item)
                    else:
                        flat_field_value.append(item)

                # 确保所有ID都是字符串且非空
                if field in ['entity_ids', 'relationship_ids', 'text_unit_ids']:
                    flat_field_value = [str(id) for id in flat_field_value if id is not None and str(id).strip() != '']

                # 更新DataFrame
                df_communities.at[idx, field] = flat_field_value

    # 3. 导入社区节点
    print("导入社区节点...")

    community_statement = """
MERGE (c:__Community__ {id: value.id})
SET c.human_readable_id = value.human_readable_id,
    c.community = value.community,
    c.level = value.level,
    c.parent = value.parent,
    c.children = value.children,
    c.title = value.title,
    c.period = value.period,
    c.size = value.size,
    c.name = coalesce(value.title, value.human_readable_id, 'Community_' + value.id)

RETURN c.id as community_id
"""

    # 执行导入社区节点
    community_result = parallel_batched_import(community_statement, df_communities, batch_size, max_workers)
    print(f"已创建 {community_result['successful_rows']} 个__Community__节点")

    # 4. 创建社区与实体的关系
    print("创建社区与实体的关系...")

    # 准备实体-社区关系数据
    entity_relations = []
    for _, row in df_communities.iterrows():
        community_id = row['id']
        for entity_id in row['entity_ids']:
            entity_relations.append({
                'community_id': community_id,
                'entity_id': entity_id
            })

    if entity_relations:
        df_entity_relations = pd.DataFrame(entity_relations)

        # 创建Entity到Community的关系
        entity_rel_statement = """
MATCH (c:__Community__ {id: value.community_id})
MATCH (e:__Entity__ {id: value.entity_id})
MERGE (e)-[:IN_COMMUNITY]->(c)
"""

        # 执行导入Entity-Community关系
        entity_rel_result = parallel_batched_import(entity_rel_statement, df_entity_relations, batch_size, max_workers)
        print(f"已创建 {entity_rel_result['successful_rows']} 个Entity-Community关系")
    else:
        print("没有找到有效的Entity-Community关系数据")

    # 5. 创建社区与关系的关系
    print("创建社区与关系的关系...")

    # 准备关系-社区关系数据
    rel_relations = []
    for _, row in df_communities.iterrows():
        community_id = row['id']
        for relationship_id in row['relationship_ids']:
            rel_relations.append({
                'community_id': community_id,
                'relationship_id': relationship_id
            })

    if rel_relations:
        df_rel_relations = pd.DataFrame(rel_relations)

        # 创建Relationship到Community的关系
        rel_rel_statement = """
MATCH (c:__Community__ {id: value.community_id})
MATCH (r:__Relationship__ {id: value.relationship_id})
MERGE (r)-[:IN_COMMUNITY]->(c)
"""

        # 执行导入Relationship-Community关系
        rel_rel_result = parallel_batched_import(rel_rel_statement, df_rel_relations, batch_size, max_workers)
        print(f"已创建 {rel_rel_result['successful_rows']} 个Relationship-Community关系")
    else:
        print("没有找到有效的Relationship-Community关系数据")

    # 5. 创建与Relationship的关系
    print("开始创建社区与关系的关系...")

    # 准备Relationship关系数据
    rel_relations = []
    for _, row in df_communities.iterrows():
        community_id = row['id']
        relationship_ids = row.get('relationship_ids', [])

        for rel_id in relationship_ids:
            rel_relations.append({
                'community_id': community_id,
                'relationship_id': rel_id
            })

    if rel_relations:
        df_rel_relations = pd.DataFrame(rel_relations)

        rel_rel_statement = """
    MATCH (c:__Community__ {id: value.community_id})
    MATCH (r:__Relationship__ {id: value.relationship_id})
    MERGE (r)-[:IN_COMMUNITY]->(c)
    """

        rel_rel_result = parallel_batched_import(rel_rel_statement, df_rel_relations, batch_size, max_workers)
        print(f"已创建 {rel_rel_result['successful_rows']} 个Relationship‑Community关系")
    else:
        print("没有找到有效的Relationship‑Community关系数据")

    # 6. 验证结果
    with driver.session(database=NEO4J_DATABASE) as session:
        # 检查Community节点数量
        result = session.run("MATCH (c:__Community__) RETURN count(c) as count")
        community_count = result.single()["count"]

        # 检查IN_COMMUNITY关系数量
        result = session.run("MATCH ()-[r:IN_COMMUNITY]->() RETURN count(r) as count")
        in_community_count = result.single()["count"]

        print(f"验证结果: {community_count} 个__Community__节点, {in_community_count} 个IN_COMMUNITY关系")

    return community_result

# 导入社区
import_communities(df_communities, batch_size=100, max_workers=8)
至此,就完成了 communities.parquet 文件的导入。接下来,我们开始导入 community_reports.parquet 文件。
7 导入社区报告 community_reports
在 community_reports.parquet 文件中,主要存储的内容是让大模型通过提示工程,对每个社区中的实体和关系进行总结,并生成社区的报告。读取该文件的代码如下所示:
# 使用绝对路径读取 Parquet 文件
df_communities_reports = pd.read_parquet('community_reports.parquet')  # 替换为实际路径

# 假设 df 是你的 DataFrame

def _stringify(x):
    if isinstance(x, (list, tuple, set, np.ndarray)):
        return ", ".join(str(i) for i in x)
    return x
df_communities_reports = df_communities_reports.apply(lambda col: col.map(_stringify))

print(tabulate(
    df_communities_reports,
    headers='keys',
    tablefmt='pretty',
    showindex=False,
    stralign='left',
    maxcolwidths=[20] * len(df_communities_reports.columns),
))
各个字段的解释如下所示:
community_reports DataFrame 字段解释
| 字段名 | 类型 | 说明 |
|---|---|---|
| id | 字符串 | 唯一标识符,用于唯一标识每个记录。 |
| human_readable_id | 字符串 | 可读的标识符,通常用于用户界面显示,便于用户理解和识别。 |
| community | 整数 | 社区的标识符,表示该记录所属的社区编号。 |
| level | 整数 | 社区的层级,表示该社区在层级结构中的位置。 |
| parent | 整数 | 父社区的标识符,表示该社区的上级社区,-1 表示没有父社区。 |
| children | 列表 (字符串) | 子社区的标识符列表,表示该社区下属的子社区。 |
| title | 字符串 | 社区的名称或标题,简要描述该社区的主题。 |
| summary | 字符串 | 对社区的简要描述,提供更多上下文信息。 |
| full_content | 字符串 | 社区的详细内容,包含更全面的信息和背景。 |
| rank | 浮点数 | 社区的排名,通常用于表示社区的重要性或影响力。 |
| rating_explanation | 字符串 | 对社区评分的解释,说明评分的依据和原因。 |
| findings | 列表 (字典) | 相关发现的列表,每个发现包含解释和摘要。 |
| full_content_json | JSON | 社区的完整内容,以 JSON 格式存储,便于数据交换和处理。 |
| period | 日期 | 社区的时间段,表示该社区的有效时间范围。 |
| size | 整数 | 社区的规模,通常表示社区中包含的实体或成员数量。 |
对于社区报告,是不是需要将它们连接到它们所涉及的实体,并且为社区更新属性。因此,导入的策略可以考虑以下原则:
- 属性策略: 更新社区的属性,包括 level、title、rank、rank_explanation、full_content 和 summary。
- 关系策略: 遍历与该社区相关的发现(findings),为每个发现创建一个新的 Finding 节点,并将其与社区建立 HAS_FINDING 关系。
代码:
import pandas as pd
from tabulate import tabulate
import numpy as np
# 使用绝对路径读取 Parquet 文件
df_communities_reports = pd.read_parquet('../output/community_reports.parquet')  # 替换为实际路径

# 假设 df 是你的 DataFrame

def _stringify(x):
    if isinstance(x, (list, tuple, set, np.ndarray)):
        return ", ".join(str(i) for i in x)
    return x
df_communities_reports = df_communities_reports.apply(lambda col: col.map(_stringify))

print(tabulate(
    df_communities_reports,
    headers='keys',
    tablefmt='pretty',
    showindex=False,
    stralign='left',
    maxcolwidths=[20] * len(df_communities_reports.columns),
))

from  d01_neo4j_drive_define import neo4j_driver as driver
from  d01_neo4j_drive_define import NEO4J_DATABASE
from  d02_parallel_batched_import import parallel_batched_import

def import_community_reports(df_reports, batch_size=20, max_workers=2):
    """
    导入社区报告数据到Neo4j

    参数:
    - df_reports: 包含社区报告数据的DataFrame
    - batch_size: 每批处理的行数
    - max_workers: 并行线程数

    返回:
    - 导入统计信息的字典
    """

    # 1. 预处理社区报告数据
    print("预处理社区报告数据...")
    df_reports = df_reports.copy()

    # 先创建新列,避免KeyError
    df_reports['community_str'] = None
    df_reports['processed_findings'] = None

    # 检查findings字段并打印样本数据以便调试
    sample_findings = []

    for idx, row in df_reports.iterrows():
        # 处理community字段 - 先转换为字符串再赋值
        if 'community' in row:
            community_str = str(row['community'])
            df_reports.at[idx, 'community_str'] = community_str

        # 处理findings字段 - 特别处理NumPy数组
        findings = row.get('findings')

        # 处理NumPy数组
        if hasattr(findings, 'dtype') and hasattr(findings, 'tolist'):
            print(f"行 {idx}: 将NumPy数组转换为列表,形状: {findings.shape if hasattr(findings, 'shape') else 'unknown'}")
            try:
                findings = findings.tolist()
            except Exception as e:
                print(f"行 {idx}: 转换NumPy数组失败: {e}")
                findings = []

        # 处理其他类型
        elif not isinstance(findings, list):
            if isinstance(findings, str):
                try:
                    import json
                    findings = json.loads(findings)
                    print(f"行 {idx}: 从字符串解析findings成功")
                except Exception as e:
                    print(f"行 {idx}: 解析findings字符串失败: {e}")
                    findings = []
            else:
                print(f"行 {idx}: findings不是列表、NumPy数组或字符串,而是 {type(findings)}")
                findings = []

        # 确保findings是有效的列表
        if not isinstance(findings, list):
            print(f"行 {idx}: 处理后findings仍不是列表,强制设为空列表")
            findings = []

        # 打印findings的内容以便调试
        if len(findings) > 0:
            print(f"行 {idx}: 找到 {len(findings)} 个findings")
            if idx < 3:  # 只打印前3行的详细内容
                print(f" 示例: {findings[0]}")
                sample_findings.append((idx, findings))
        else:
            print(f"行 {idx}: 没有找到findings")

        # 确保每个finding是字典
        valid_findings = []
        for i, finding in enumerate(findings):
            if isinstance(finding, dict):
                # 确保必要的字段存在
                if 'summary' not in finding:
                    finding['summary'] = f"Finding_{i}"
                if 'explanation' not in finding:
                    finding['explanation'] = ""
                valid_findings.append(finding)
            else:
                print(f"行 {idx}: 跳过无效的finding类型: {type(finding)}")
                # 尝试转换为字典
                if isinstance(finding, (list, tuple)) and len(finding) >= 2:
                    try:
                        valid_findings.append({
                            'summary': str(finding[0]),
                            'explanation': str(finding[1])
                        })
                        print(f" 成功转换为字典: {finding[0]}")
                    except Exception as e:
                        print(f" 转换失败: {e}")

        # 更新DataFrame - 使用at而不是loc
        df_reports.at[idx, 'processed_findings'] = valid_findings

    # 打印样本数据
    print(f"收集了 {len(sample_findings)} 个样本findings:")
    for idx, findings in sample_findings:
        print(f"行 {idx}: {len(findings)} 个findings")

    # 2. 准备Finding数据 - 直接从处理后的数据创建
    print("准备Finding数据...")
    findings_data = []

    for idx, row in df_reports.iterrows():
        community_str = row['community_str']
        processed_findings = row['processed_findings']

        if not isinstance(processed_findings, list):
            print(f"行 {idx}: processed_findings不是列表,跳过")
            continue

        for i, finding in enumerate(processed_findings):
            if isinstance(finding, dict):
                finding_id = f"{community_str}_{i}"
                findings_data.append({
                    'finding_id': finding_id,
                    'community_id': community_str,
                    'summary': finding.get('summary', f"Finding_{i}"),
                    'explanation': finding.get('explanation', "")
                })

    print(f"准备了 {len(findings_data)} 个Finding数据")

    # 3. 导入社区节点
    print("步骤1: 导入社区节点...")

    # 社区节点创建语句
    community_statement = """
    MERGE (c:__Community__ {community: value.community_str})
    SET c.level = value.level,
        c.title = value.title,
        c.rank = value.rank,
        c.rating_explanation = value.rating_explanation,
        c.full_content = value.full_content,
        c.summary = value.summary,
        c.name = coalesce(value.title, 'Community_' + value.community_str)
    RETURN c.community as community_id
    """

    # 执行导入社区节点
    community_result = parallel_batched_import(community_statement, df_reports, batch_size, max_workers)
    print(f"已创建/更新 {community_result['successful_rows']} 个社区节点")

    # 4. 如果有Finding数据,创建Finding节点和关系
    if findings_data:
        print("步骤2: 导入Finding节点和关系...")
        df_findings = pd.DataFrame(findings_data)

        finding_statement = """
    // 创建Finding节点
    MERGE (f:__Finding__ {id: value.finding_id})
    SET f.summary = value.summary,
        f.explanation = value.explanation,
        f.name = value.summary

    // 创建与Community的关系
    WITH f, value
    MATCH (c:__Community__ {community: value.community_id})
    MERGE (c)-[:HAS_FINDING]->(f)
    """

        # 执行导入Finding节点和关系
        finding_result = parallel_batched_import(finding_statement, df_findings, batch_size, max_workers)
        print(f"已创建 {finding_result['successful_rows']} 个Finding节点和HAS_FINDING关系")
    else:
        print("没有找到有效的Finding数据,跳过创建Finding节点和关系")

    # 5. 验证结果
    with driver.session(database=NEO4J_DATABASE) as session:
        # 检查Community节点数量
        result = session.run("MATCH (c:__Community__) RETURN count(c) as count")
        community_count = result.single()["count"]

        # 检查Finding节点数量 - 使用try-except处理可能的错误
        try:
            result = session.run("MATCH (f:__Finding__) RETURN count(f) as count")
            finding_count = result.single()["count"]
        except Exception as e:
            print(f"查询Finding节点时出错: {e}")
            finding_count = 0

        # 检查HAS_FINDING关系数量 - 使用try-except处理可能的错误
        try:
            result = session.run("MATCH ()-[r:HAS_FINDING]->() RETURN count(r) as count")
            has_finding_count = result.single()["count"]
        except Exception as e:
            print(f"查询HAS_FINDING关系时出错: {e}")
            has_finding_count = 0

    print(f"验证结果: {community_count} 个__Community__节点, {finding_count} 个__Finding__节点, {has_finding_count} 个HAS_FINDING关系")
    return community_result

# 导入社区报告
import_community_reports(df_communities_reports, batch_size=100, max_workers=8)
至此,完成了 Microsoft GraphRAG 生成索引的完整知识图谱构建与可视化。详细了解了知识图谱的全貌后,之后就是 Microsoft GraphRAG 实现的 Query 阶段的实操以及底层原理。
四 GraphRAG Query 源码篇
在完成了 Microsoft GraphRAG 的索引构建及自定义接入图数据库 Neo4j 构建完整的知识图谱后,我们在上一小节课程中已经初步实践了可以通过 Cypher 语句来查询结构化数据中的信息。当然,传统的 Cypher 查询方式,需要我们具备一定的图数据库知识,对非技术人员来说,使用门槛较高。而 Microsoft GraphRAG 则提供了一种更为直观、易用的查询方式,我们只需要输入自然语言查询,即可获得结构化的查询结果。
这就需要我们了解 Microsoft GraphRAG 使用的第二阶段,即查询(Query)阶段。
索引阶段我们利用大语言模型结合提示工程,从非结构化文本(.txt、.csv)中提取出实体(Entities)与关系(Relationships),构建出了基础的 Knowledge Graph,并且通过建立层次化的 community 结构,community 以及 community_report 的丰富语义,相较于传统基于 Cypher 的查询方式可以提供更多灵活性的 Query 操作,Microsoft GraphRAG 在项目开源之初是提供了 local 和 global 两种查询方式,分别对应了 local search 和 global search,而后在不断的迭代更新过程中,除了优化了 local search 和 global search 的效果,还新增了 DRIFT Search 和 Multi Index Search 作为扩展优化的可选项,以进一步丰富 Query 操作的多样性。
如下图所以,原图来源于 Microsoft GraphRAG 的官方论文:https://arxiv.org/pdf/2404.16130

Microsoft GraphRAG 在查询阶段构建的流程,相较于构建索引阶段会更为直观,核心的具体步骤包括:
- 接收用户的查询请求。
- 根据查询所需的详细程度,选择合适的社区级别进行分析。
- 在选定的社区级别进行信息检索。
- 依据社区摘要生成初步的响应。
- 将多个相关社区的初步响应进行整合,形成一个全面的最终答案。
通过学习 Microsoft GraphRAG 索引构建的源码大家应该已经能够清晰的知道,Indexing 过程中并不是在创建完第一层社区后就停止了,而是分层的。也就是说,当创建第一层社区(即基础社区)后,会将这些社区视为节点,进一步构建更高层级的社区。这种方法就实现在知识图谱中可以以不同的粒度级别上组织和表示数据。比如第一层社区可以包含具体的实体或数据,而更高层级的社区则可以聚合这些基础社区,形成更广泛的概览。
因此最核心的 Local Search 和 Global Search 的实现,就是源于不同的粒度级别而构建出来用于处理不同类型问题的 Pipeline,其中:
- Local Search 是基于实体的检索。
- Global Search 则是基于社区的检索。
因此接下来,我们就分别从源码层面,来详细介绍 Local Search 和 Global Search 的实现原理,并实际操作不同检索方式的查询操作。
首先来介绍 Local Search,即本地检索。
I. Local Search 实现原理与源码解析
Local Search 即本地检索,是基于实体的检索。本地搜索从相关实体开始,使用知识图谱来查找最相关的信息。例如,给定查询中的实体,使用的是连接节点的信息,通过辨识与查询相关的实体与关系,检索特定文本片段、摘要和关联性资料。
所以 Local Search 本质上是基于实体的推理。特别适合回答 “who”、“what”、“when” 类型的问题。
在 Microsoft GraphRAG 源码中实现的内部原理如下图所示:
接下来,我们就进入源码,逐层的解析 Local Search 的实现过程。
1 构建索引
首先,我们还是在当前的运行环境下先构建索引。(如果已经构建过索引,则可以跳过此步骤)这里我们使用的还是单 txt 文件,切分的 chunk_size 为 300,chunk_overlap 为 100。在源码环境下,执行构建索引的命令为:
poetry run poe index --root ./构建索引完成后,在 output 目录下依次生成 document.parent、text_units.parent、entities.parent、relationships.parent、communities.parent 以及 community_report.parent 主要的索引,在检索过程中,会加载这些索引文件中的相关数据内容。
2 Local Search 源码执行方法
与 graphrag index 命令类似,Microsoft GraphRAG 的检索工作流可以通过 graphrag query 命令支持,在源码环境下其命令格式如何使用,我们可以通过 graphrag query –help 命令来查看,如下图所示:
各个字段参数的含义如下表所示:
graphrag query 命令参数说明
表格
| 参数名称 | 类型 | 描述 | 默认值 | 是否必需 |
|---|---|---|---|---|
| –method | Type | 可以选择 local、global、drift 或 basic 算法。 | None | 是 |
| –query | TEXT | 要执行的查询,即提出的问题。 | None | 是 |
| –config | PATH | 要使用的配置文件路径。 | None | 否 |
| –data | PATH | 索引管道输出目录(即包含 parquet 文件的目录)。 | None | 否 |
| –root | PATH | 项目根目录的路径。 | . | 否 |
| –community-level | INTEGER | 从中加载社区报告的 Leiden 社区层级。较高的值表示来自较小社区的报告。 | 2 | 否 |
| –dynamic-community-selection | 使用动态社区选择的全局搜索。 | no-dynamic-community-selection | 否 | |
| –response-type | TEXT | 描述响应类型和格式的自由文本,可以是任何内容,例如多个段落、单个段落、单句、3-7 点列表、单页、多页报告。 | Multiple Paragraphs | 否 |
| –streaming | 以流式方式打印响应。 | no-streaming | 否 | |
| –help | 显示帮助信息并退出。 | 否 |
其中,在执行查询时必须指定的参数是 –method 和 –query,其他参数为可选参数。其中:
- –method 参数可以选择 local、global、drift 或 basic 算法。(接下来我们会依次介绍这几种算法)
- –query 参数是要执行的查询,即提出的问题。
了解到这里,就可以通过命令行快速启动问答检索了。这里我们先来看 <code>local</code> 本地搜索。输入如下命令:
新版GraphRAG,没有参数–query
poetry run poe query --root ./ --method local --query "张飞是谁?"源码:\IndexG\graphrag-main\graphrag-main\packages\graphrag\graphrag\cli\main.py
@app.command("query")
def _query_cli() -> None:
    """Query a knowledge graph index."""
    from graphrag.cli.query import (
        run_basic_search,
        run_drift_search,
        run_global_search,
        run_local_search,
    )

    match method:
        case SearchMethod.LOCAL:
            run_local_search(
                data_dir=data,
                root_dir=root,
                community_level=community_level,
                response_type=response_type,
                streaming=streaming,
                query=query,
                verbose=verbose,
            )
        case SearchMethod.GLOBAL:
            run_global_search(
                data_dir=data,
                root_dir=root,
                community_level=community_level,
                dynamic_community_selection=dynamic_community_selection,
                response_type=response_type,
                streaming=streaming,
                query=query,
                verbose=verbose,
            )
        case SearchMethod.DRIFT:
            run_drift_search(
                data_dir=data,
                root_dir=root,
                community_level=community_level,
                streaming=streaming,
                response_type=response_type,
                query=query,
                verbose=verbose,
            )
        case SearchMethod.BASIC:
            run_basic_search(
                data_dir=data,
                root_dir=root,
                response_type=response_type,
                streaming=streaming,
                query=query,
                verbose=verbose,
            )
        case _:
            raise ValueError(INVALID_METHOD_ERROR)
2.1 读取各种文件
源码:\IndexG\graphrag-main\graphrag-main\packages\graphrag\graphrag\cli\query.py
1 加载output目录下的文件
2 转换这些文件为dataframe格式
3 打印结果:文件信息列表,包含文件名、列和行数
def run_local_search(
    data_dir: Path | None,
    root_dir: Path,
    community_level: int,
    response_type: str,
    streaming: bool,
    query: str,
    verbose: bool,
):
    """Perform a local search with a given query.

    Loads index files required for local search and calls the Query API.
    """
    cli_overrides: dict[str, Any] = {}
    if data_dir:
        cli_overrides["output_storage"] = {"base_dir": str(data_dir)}
    config = load_config(
        root_dir=root_dir,
        cli_overrides=cli_overrides,
    )
# 加载output目录下的文件
    dataframe_dict = _resolve_output_files(
        config=config,
        output_list=[
            "communities",
            "community_reports",
            "text_units",
            "relationships",
            "entities",
        ],
        optional_list=[
            "covariates",
        ],
    )
# 转换这些文件为dataframe格式
    communities: pd.DataFrame = dataframe_dict["communities"]
    community_reports: pd.DataFrame = dataframe_dict["community_reports"]
    text_units: pd.DataFrame = dataframe_dict["text_units"]
    relationships: pd.DataFrame = dataframe_dict["relationships"]
    entities: pd.DataFrame = dataframe_dict["entities"]
    covariates: pd.DataFrame | None = dataframe_dict["covariates"]

    # 文件信息列表,包含文件名、列和行数
    file_info = [
        ("communities.parquet", communities),
        ("community_reports.parquet", community_reports),
        ("text_units.parquet", text_units),
        ("relationships.parquet", relationships),
        ("entities.parquet", entities),
    ]

    print("步骤 1: 读取索引输出文件的详细信息:")
    print("-" * 80)  # 分隔符
    # 遍历文件信息并打印
    for file_name, df in file_info:
        print(f"文件名: {file_name}, 列: {list(df.columns)}, 行数: {len(df)}")
    print("-" * 80)  # 分隔符

    if streaming:

        async def run_streaming_search():
            full_response = ""
            context_data = {}

            def on_context(context: Any) -> None:
                nonlocal context_data
                context_data = context

            callbacks = NoopQueryCallbacks()
            callbacks.on_context = on_context

            async for stream_chunk in api.local_search_streaming(
                config=config,
                entities=entities,
                communities=communities,
                community_reports=community_reports,
                text_units=text_units,
                relationships=relationships,
                covariates=covariates,
                community_level=community_level,
                response_type=response_type,
                query=query,
                callbacks=[callbacks],
                verbose=verbose,
            ):
                full_response += stream_chunk
                print(stream_chunk, end="")
                sys.stdout.flush()
            print()
            return full_response, context_data

        return asyncio.run(run_streaming_search())
    # not streaming
    response, context_data = asyncio.run(
        api.local_search(
            config=config,
            entities=entities,
            communities=communities,
            community_reports=community_reports,
            text_units=text_units,
            relationships=relationships,
            covariates=covariates,
            community_level=community_level,
            response_type=response_type,
            query=query,
            verbose=verbose,
        )
    )
    print(response)

    return response, context_data
执行测试命令:
poetry run poe query --root ./ --method local "张飞是谁?"结果如下:
Poe => python -m graphrag query --root ./ --method local '张飞是谁?'
步骤 1: 读取索引输出文件的详细信息:
--------------------------------------------------------------------------------
文件名: communities.parquet, 列: ['id', 'human_readable_id', 'community', 'level', 'parent', 'children', 'title', 'entity_ids', 'relationship_ids', 'text_unit_ids', 'period', 'size'], 行数: 25
文件名: community_reports.parquet, 列: ['id', 'human_readable_id', 'community', 'level', 'parent', 'children', 'title', 'summary', 'full_content', 'rank', 'rating_explanation', 'findings', 'full_content_json', 'period', 'size'], 行数: 25
文件名: text_units.parquet, 列: ['id', 'human_readable_id', 'text', 'n_tokens', 'document_id', 'entity_ids', 'relationship_ids', 'covariate_ids'], 行数: 6
文件名: relationships.parquet, 列: ['id', 'human_readable_id', 'source', 'target', 'description', 'weight', 'combined_degree', 'text_unit_ids'], 行数: 168
文件名: entities.parquet, 列: ['id', 'human_readable_id', 'title', 'type', 'description', 'text_unit_ids', 'frequency', 'degree'], 行数: 151
--------------------------------------------------------------------------------

张飞是东汉末年著名的军事将领,也是刘备的结义兄弟与核心部将。他性情刚毅暴烈、嫉恶如仇,且骁勇善战,始终追随刘备征战,是早期势力的核心战将之一。

在军事生涯方面,张飞早年随刘备于涿郡起兵,参与平定黄巾之乱。在合兵讨伐黄巾军首领张宝的战役中,他担任先锋,曾不数合内刺死张宝副将高升,并配合关羽运用猪羊狗血秽物破除张宝的妖法,成功击溃敌军[Data: Entities (2); Relationships (24, 33); Sources (0)]。其超凡的武艺与勇猛的作战风格在早期军旅中便已崭露头角。

在仕途与早期发展方面,刘备凭战功获任安喜县尉后,张飞随之赴任。朝廷降诏需甄别军功吏员,时任督邮到县巡查,因其傲慢贪暴、逼害县吏与百姓,张飞愤而采取极端行动。他将督邮绑缚至县前马桩上,用柳条重重鞭打十余枝,致使柳条折断数十根,史称“怒鞭督邮”[Data: Reports (4); Entities (2); Relationships (77, 93); Sources (2)]。该事件充分彰显了张飞刚烈嫉恶的行事风格,但也直接引发了官府对刘备集团的跨层级追捕。

面对追捕危机,张飞与刘备、关羽的政治与军事命运高度绑定。由于三人早年结为异姓兄弟,在平定黄巾与安喜任职期间始终同甘共苦、紧密协作[Data: Relationships (21, 75)]。在督邮事件后,面对省府下达的抓捕文书,张飞果断与刘备、关羽一同弃官逃亡,最终投奔代州寻求刘恢的庇护,为刘备日后重整势力并开启新的仕途跃升保留了核心班底[Data: Reports (4); Sources (2)]。张飞一生以忠义与武勇著称,是汉末乱世中极具代表性的武将人物。
2.2 读取向量数据库
从非流失输出的源码做溯源
api.local_search 进入 async for chunk in local_search_streaming 进入 local_search_streaming
目的是加载数据库实例,为后续向量相似度匹配做准备
   init_loggers(config=config, verbose=verbose, filename="query.log")

    # 步骤 2: 查看向量库「配置」(一个连接 + 多张表)
    print("步骤 2: 向量数据库配置")
    print("-" * 80)
    print(f"库类型 type: {config.vector_store.type}")
    print(f"存放位置 db_uri: {config.vector_store.db_uri}")
    print(f"默认向量维度 vector_size: {config.vector_store.vector_size}")
    print(f"索引 schema(每种 embedding 一张表):")
    for name, schema in config.vector_store.index_schema.items():
        print(f"  - {name}: 表名={schema.index_name}, "
              f"维度={schema.vector_size}, 字段={list(schema.fields.keys())}")

    # 步骤 3: 真正创建并连接向量库实例
    print("步骤 3: 创建向量库实例并连接")
    print("-" * 80)
    description_embedding_store = get_embedding_store(
        config=config.vector_store,
        embedding_name=entity_description_embedding,
    )
    print(f"创建完成,实例类: {type(description_embedding_store).__name__}")
    print(f"索引名 index_name: {description_embedding_store.index_name}")
    print(f"向量维度 vector_size: {description_embedding_store.vector_size}")
    print(f"db_uri: {getattr(description_embedding_store, 'db_uri', 'N/A')}")

    # LanceDB 连接成功后,可以进一步看表
    db_conn = getattr(description_embedding_store, "db_connection", None)
    if db_conn is not None:
        print(f"已连接,库内表列表: {db_conn.table_names()}")

    msg = f"Vector Store Args: {redact(config.vector_store.model_dump())}"
    logger.debug(msg)

    description_embedding_store = get_embedding_store(
        config=config.vector_store,
        embedding_name=entity_description_embedding,
    )

    entities_ = read_indexer_entities(entities, communities, community_level)
    covariates_ = read_indexer_covariates(covariates) if covariates is not None else []
    prompt = load_search_prompt(config.local_search.prompt)

    logger.debug("Executing streaming local search query: %s", query)
    search_engine = get_local_search_engine(
        config=config,
        reports=read_indexer_reports(community_reports, communities, community_level),
        text_units=read_indexer_text_units(text_units),
        entities=entities_,
        relationships=read_indexer_relationships(relationships),
        covariates={"claims": covariates_},
        description_embedding_store=description_embedding_store,
        response_type=response_type,
        system_prompt=prompt,
        callbacks=callbacks,
    )
    return search_engine.stream_search(query=query)